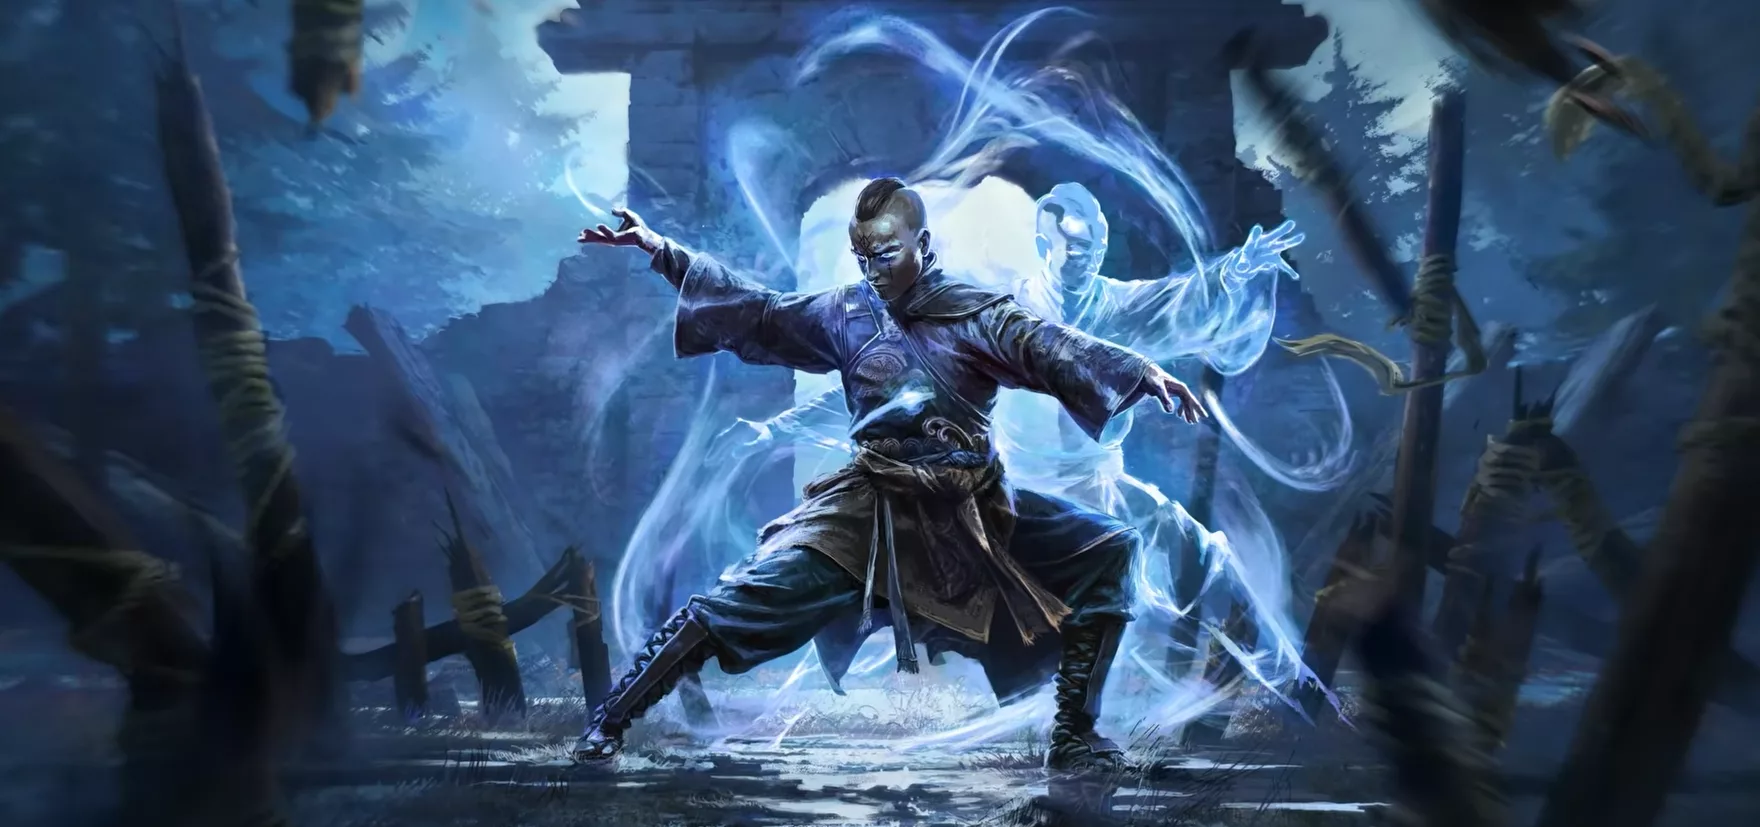
Return of the Ancients. Jonathan Rogers, Game Director of Path of Exile 2, opens GGG Live with a direct announcement: the stream is packed, the news is plentiful, and Twitch Drops are live right now. By watching the live stream on the Path of Exile channel, you could claim the hideout decoration Red Queen’s Font by following the instructions displayed on screen.

After this introduction, Jonathan Rogers immediately rolls the cinematic trailer for Path of Exile 2: Return of the Ancients. The trailer sets the tone: ancient forces awakening, forgotten factions rising again, and an update that the developers themselves describe as their biggest to date. Six new endgame storylines, a new Challenge League, new Pinnacle Bosses, brand-new Ascendancy Classes, a full rework of existing mechanics, and dozens of Unique Items — patch 0.5.0 aims wide.
Jonathan then hands over to Mark Roberts, Game Director of Path of Exile (the PoE 1 side), to present the new league. Both directors take turns throughout the live, broadcast on the Path of Exile YouTube channel, to detail every component of Return of the Ancients. This recap covers their full presentation, point by point.
🗡️ PART 1 — The New League: Return Of the Ancients
Pharaoh and the forgotten art of runesmithing
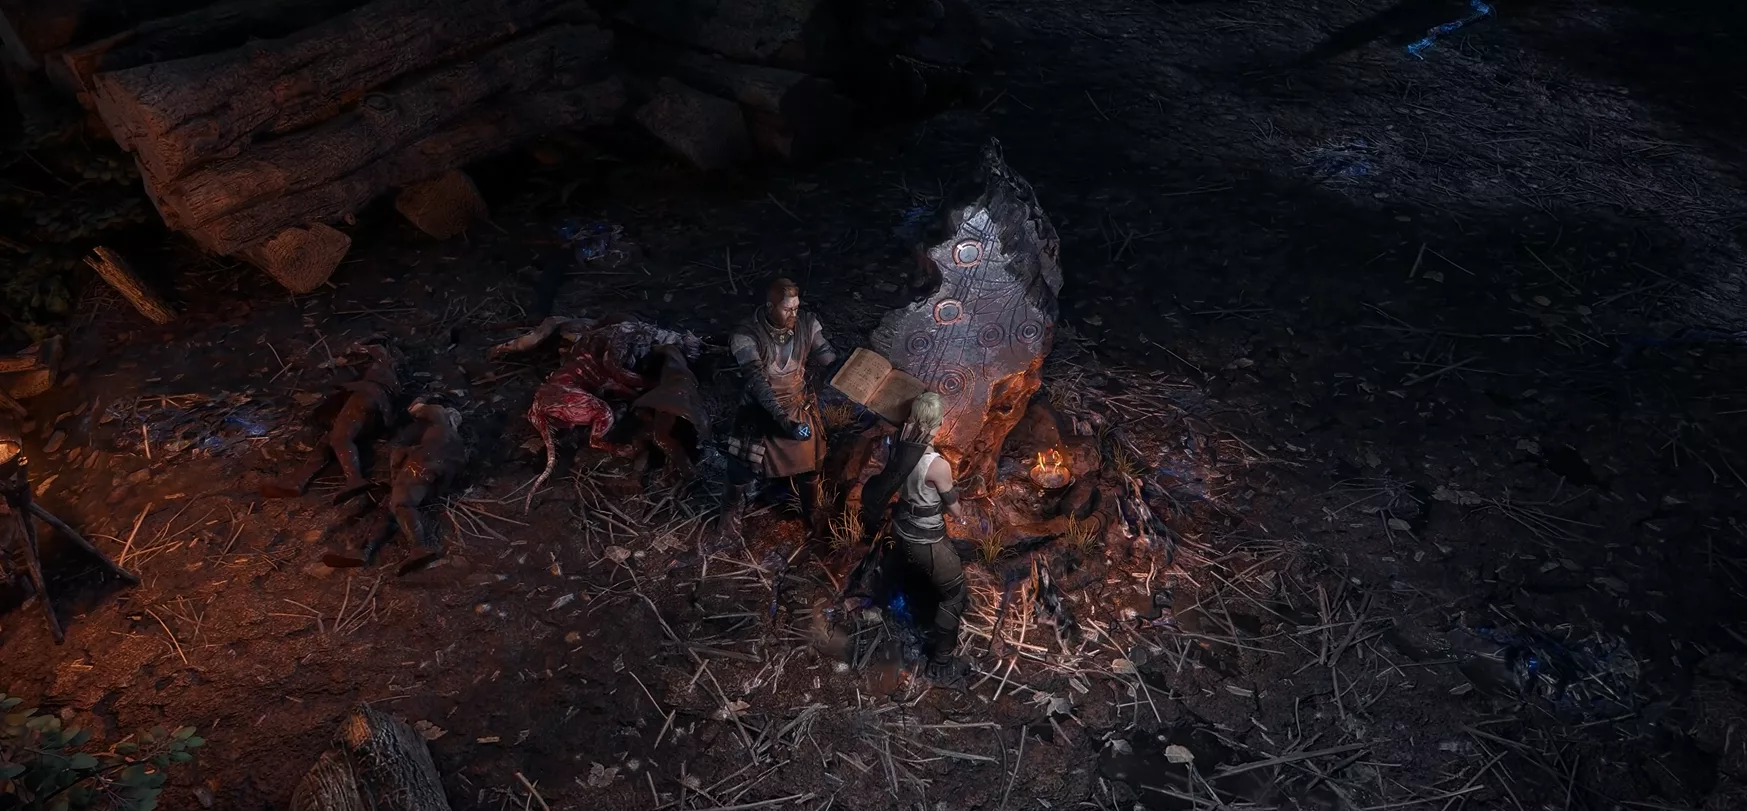
In the ruins of the Elder League, a young blacksmith named Pharaoh finds himself ambushed by undead in Clefeld. After rescuing him, he introduces himself: fascinated by the ancient Ezomite art of runesmithing, he has compiled his discoveries into a tome he is eager to share. He initiates you into the system, but things quickly go wrong — the nearby corpses rise again, infused by the runic magic unleashed. After the fight, Pharaoh realises he needs someone more seasoned to unravel these secrets. He entrusts you with his tome and asks you to record everything you find during your explorations.
The Remnants system
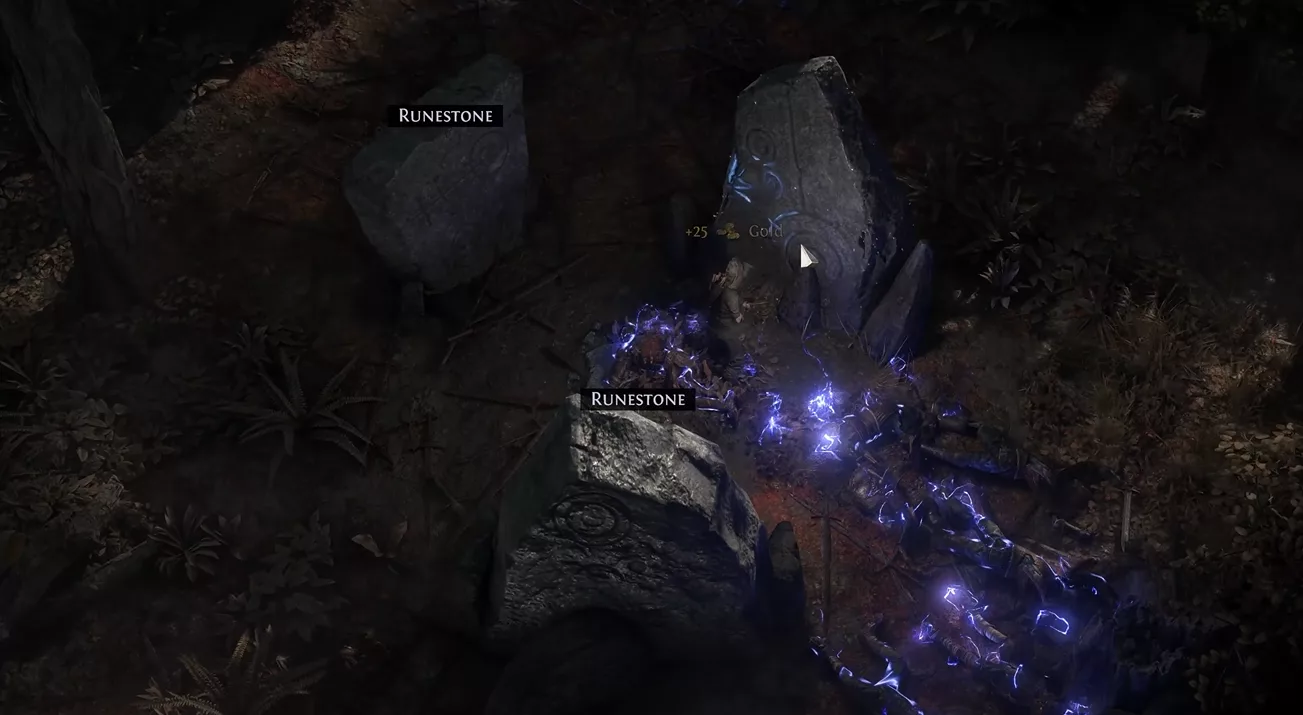
At the heart of the league’s gameplay are the Remnants. In every zone of the Runes of Aldur League, you will find a Remnant. As you approach it, you notice that some symbols are already engraved on it while others wait for you to fill them in. This starting configuration determines which recipes are available. Combining the Tempest and Lightning runes, for example, produces an orb of augmentation.
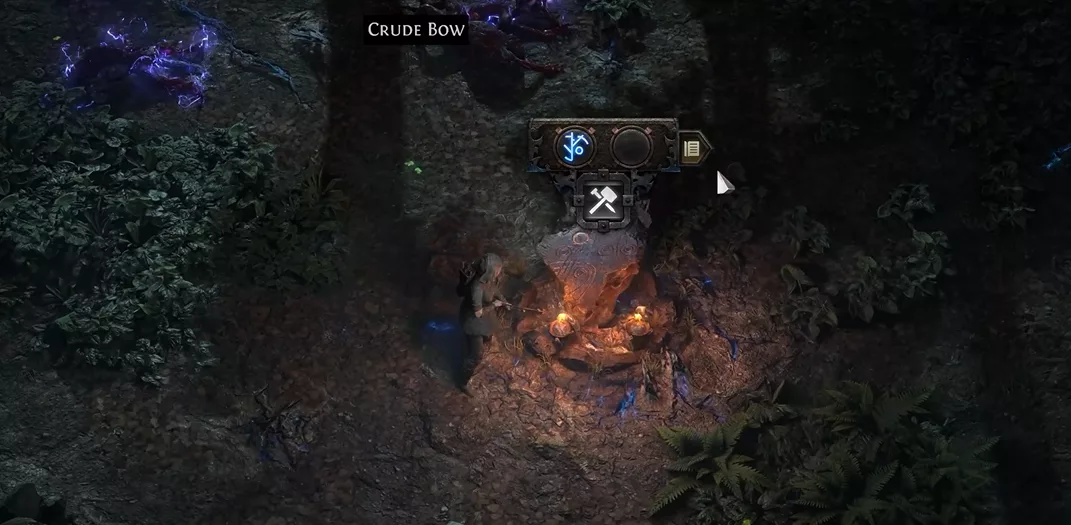
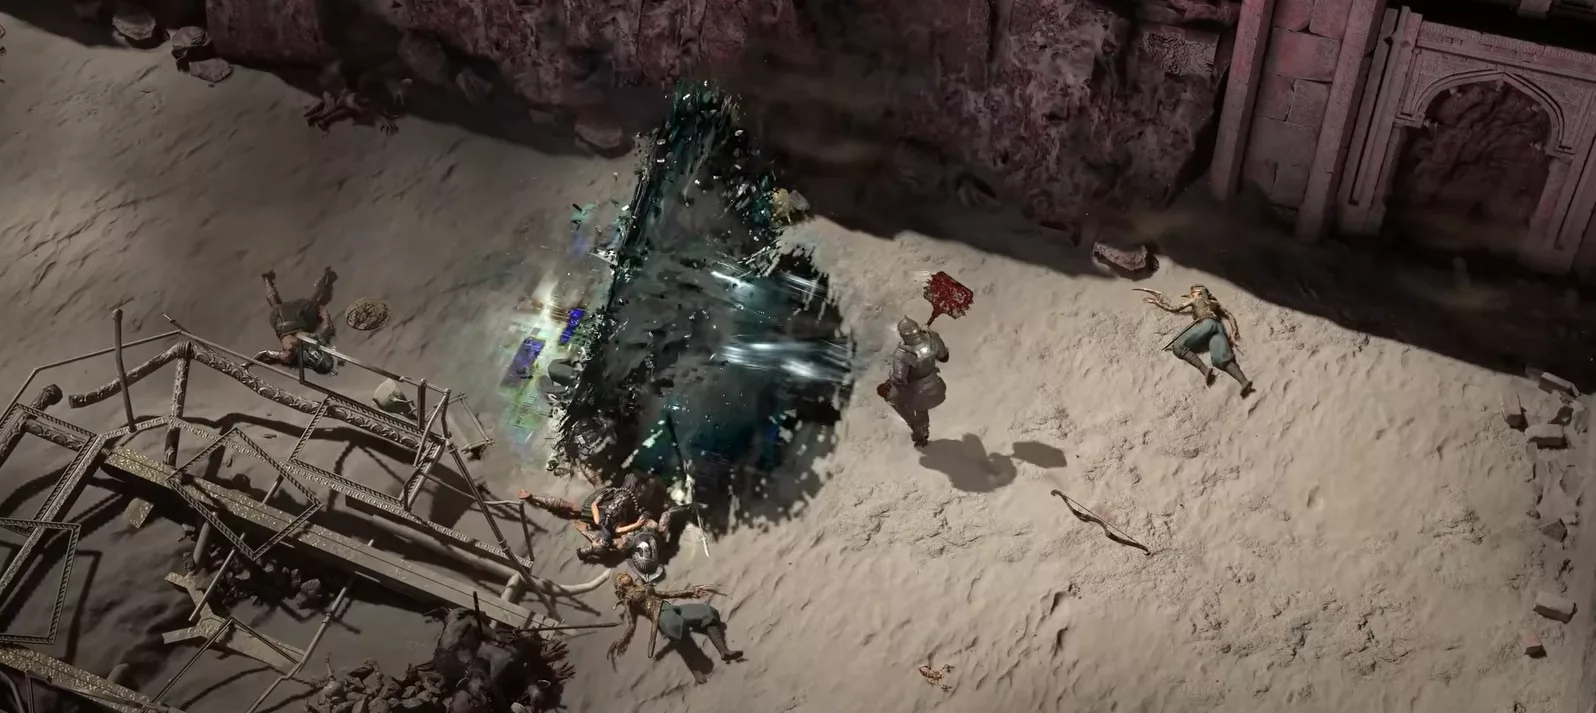
The runes you use to craft the item also empower the monsters that will rise to block your path. Use a fire rune? Enemies gain fire properties. Choose a moon rune? Lunar rays rain down during the fight. After the victory, you shatter the Remnant to retrieve the crafted item. As you level up, Remnants gain more rune slots, allowing you to craft rarer items — but triggering more monster waves, each loaded with additional empowerments.
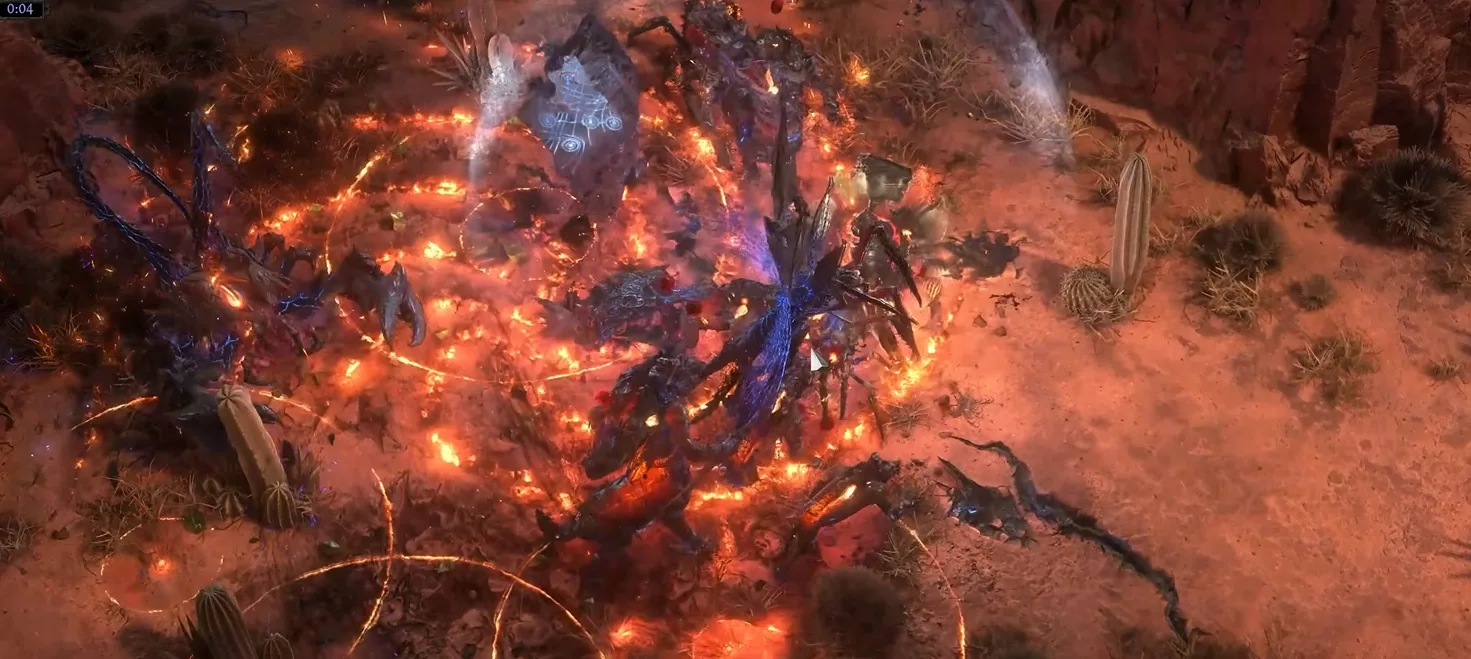
Some rune effects are particularly fearsome. The oath rune, for example, designates a monster as a leader — invincible as long as its minions remain alive. Killing the minions deals damage to it instead. The most complex recipes can require six, seven, or even eight runes. To keep track, Pharaoh’s crafting tome records all available options based on the runes already present on the Remnant.
The Kalguuran origins of runes
To expand his knowledge, Pharaoh asks you to keep an eye out for traces of runic magic in Wraeclast. Additional quests punctuate the campaign and allow you to document these discoveries in order to rediscover the secrets of the ancient Ezomite runesmiths.
The first revelation comes at Ogham: the runic magic the Ezomites believed was their own actually originates from the Kalguurans. Millennia ago, the Kalguurans landed in Wraeclast searching for Verisium, a metal upon which engraved runes allow control over reality. Pharaoh is determined to master these ancestral techniques. If you bring him Verisium, he can use it to forge power into any piece of armour.
Runic Ward and armour runeforging
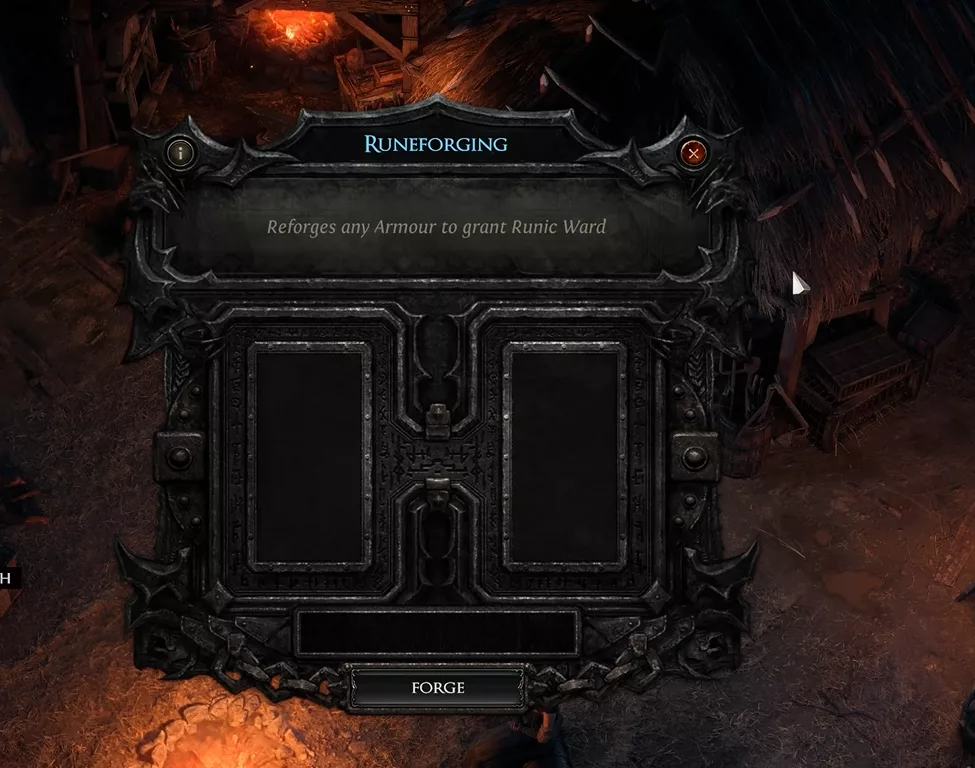
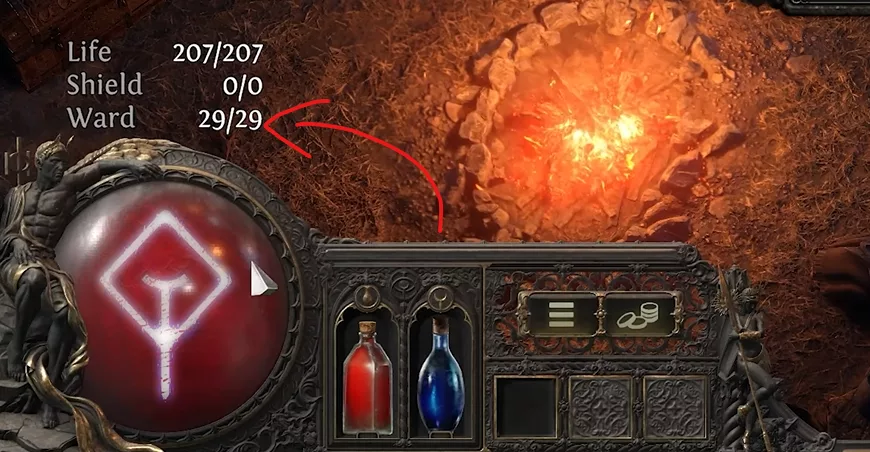
The result of this forging is Runic Ward: a new defensive resource that protects you from death. When your Life drops to zero, Runic Ward kicks in and keeps your character alive long enough for it to recover. In practice, it is an extra life. If the damage also exhausts your Runic Ward, you die regardless.
Every piece of armour in the game can be upgraded this way, including uniques. The results vary depending on the item. Some armour pieces simply gain Runic Ward with no drawback. Others sacrifice existing defences to obtain a larger amount of Runic Ward. Others still gain entirely new modifiers, making previously useless uniques perfectly viable at high level.
The Kalguuran Runes of Power
Runic Ward is not just for defence. The Kalguurans also used it to fuel their combat magic. Rather than spending Mana through Skill Gems born of corruption, their approach relies on Runes of Power that consume Runic Ward to trigger their effects. The league introduces several of these Kalguuran skills, designed to work on any class.
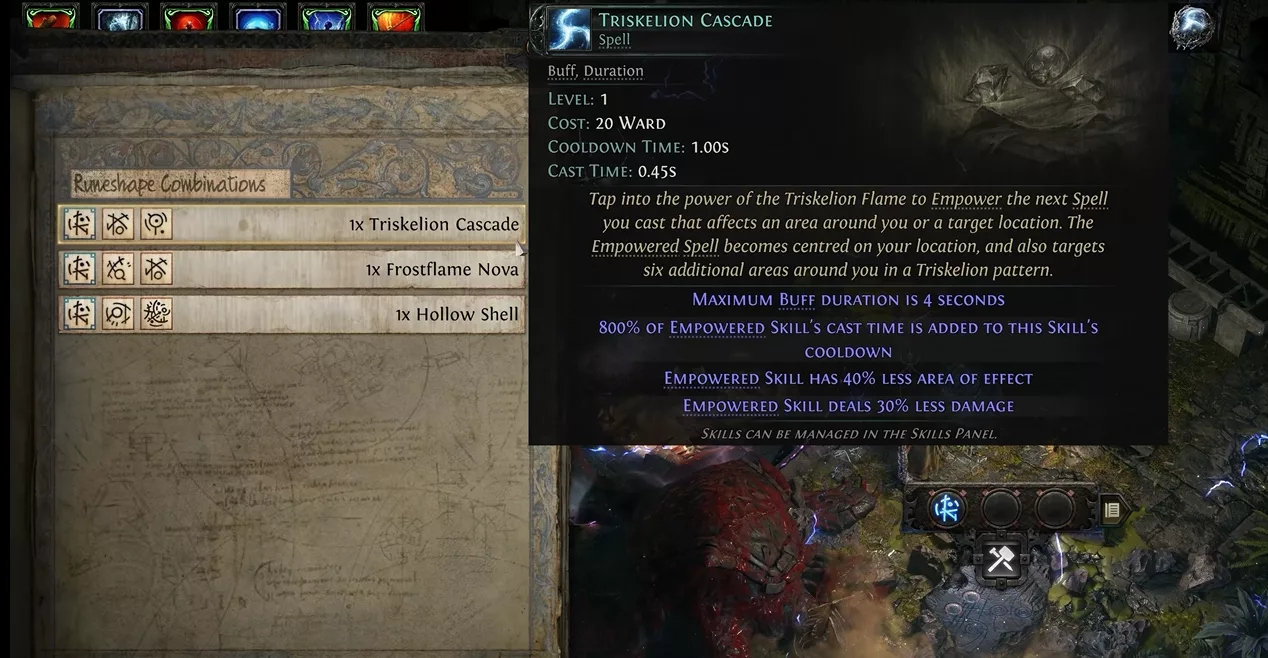
Triskelion Cascade: activating this skill causes your next spell to fire multiple times following a triskelion pattern. It works with skills you cast from yourself such as Ice Nova, or with targeted ranged spells such as Comet.
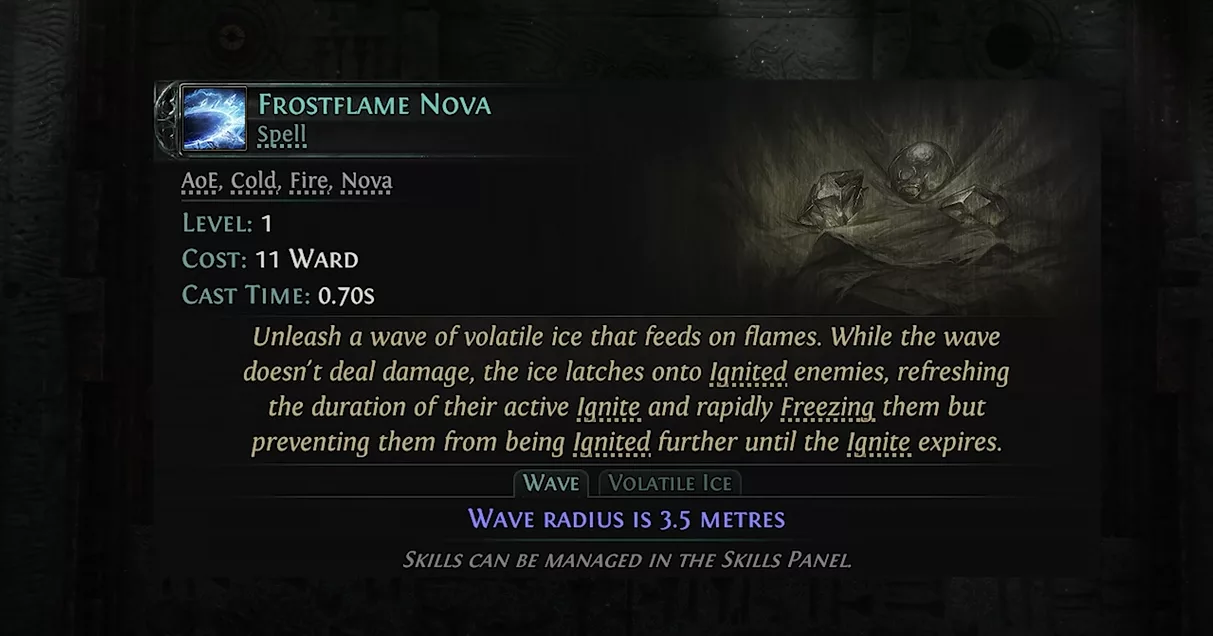
Frostflame Nova: used on a group of burning enemies, this skill converts the ignite into frost fire. Enemies continue to burn but simultaneously accumulate freeze as well.
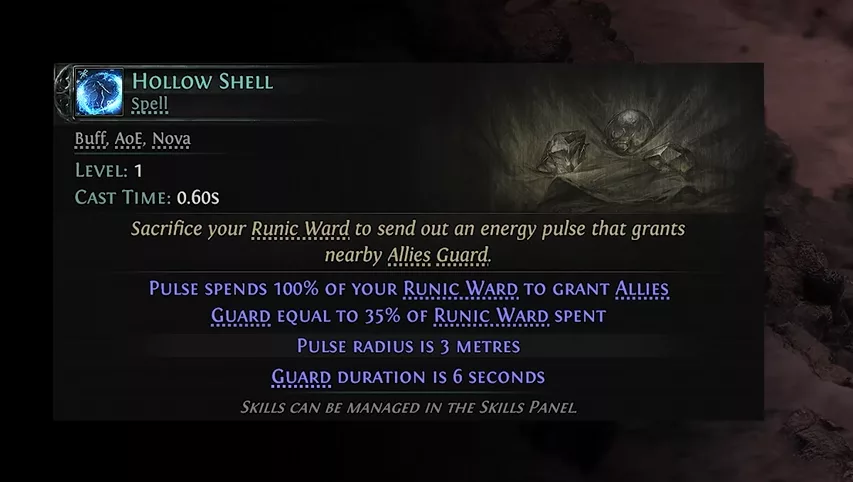
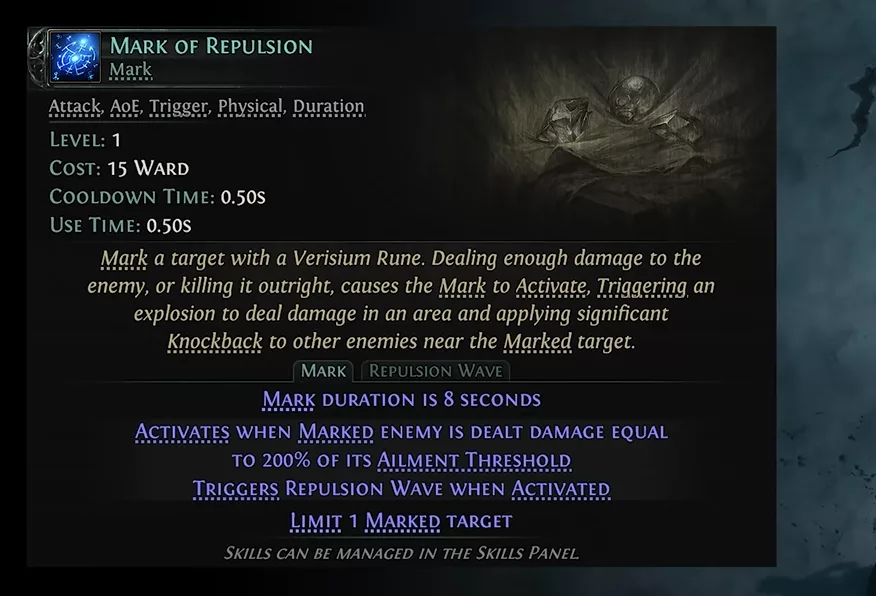
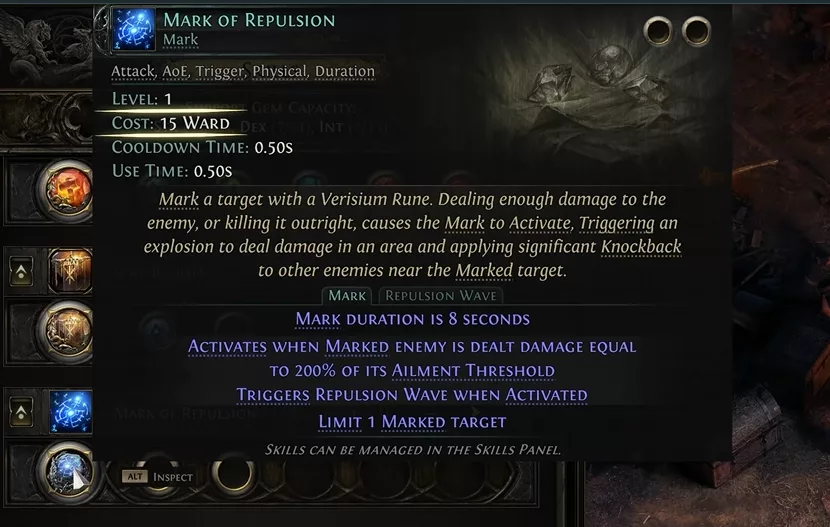
Among the other options available, there are defensive buffs and control mechanics. Hollow Shell protects all nearby allies. Mark of Repulsion creates a mark capable of pushing all enemies away from its target’s vicinity.
Unlike standard Skill Gems, these Kalguuran skills have no colour. No attribute requirement, no restriction tied to equipped weapon type. They are designed to be accessible to every class and often interact with mechanics common to all builds.
The Runic Supports
By combining different runes, the Kalguurans created supports for their runic abilities. You can do the same, through a set of Runic Supports that attach to standard Skill Gems. Concussive Runes adds concussive shockwaves to any skill that stuns. Runic Infusion lets you spend ward to directly amplify the damage of any skill.
Mystic Refuge and the reforging of uniques
Other quests enrich the campaign with additional crafting methods. Hidden in the Act 3 jungle, the Mystic Refuge holds further secrets for Pharaoh. This knowledge grants him the ability to reforge unique weapons.
Many low-level unique weapons with interesting but insufficient modifiers for the current game can be upgraded to gain significant power. And reforging is not limited to standard uniques. All Kalguuran uniques can also be runeforged, sometimes with surprising results. Slit, a new unique, can for example receive several different outcomes depending on the choices made during the reforge.
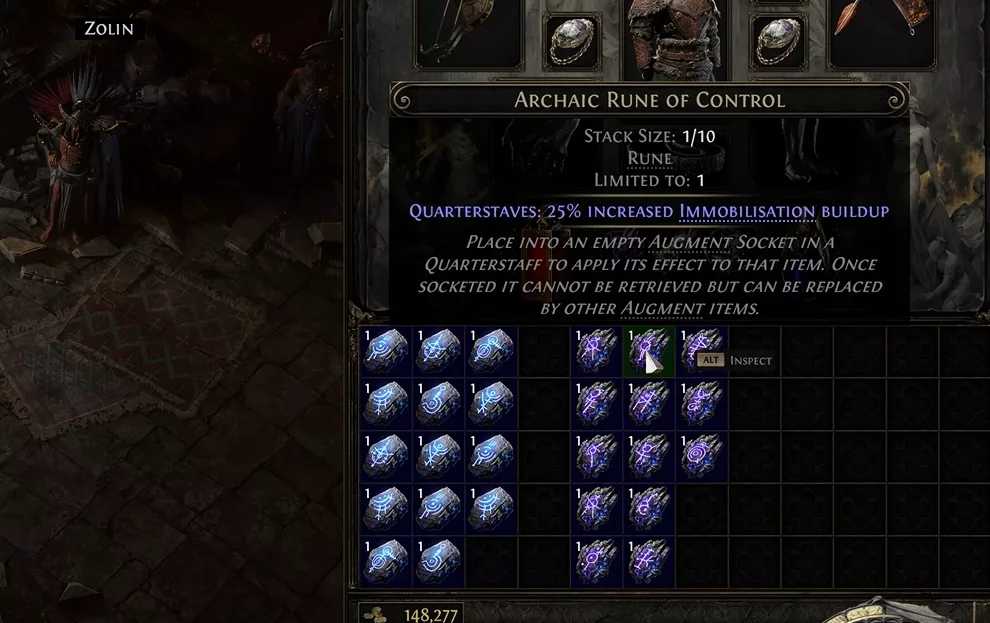
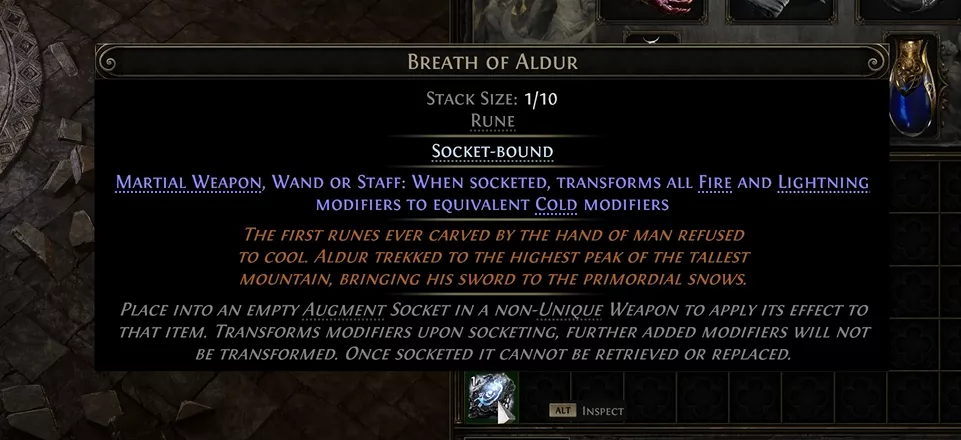
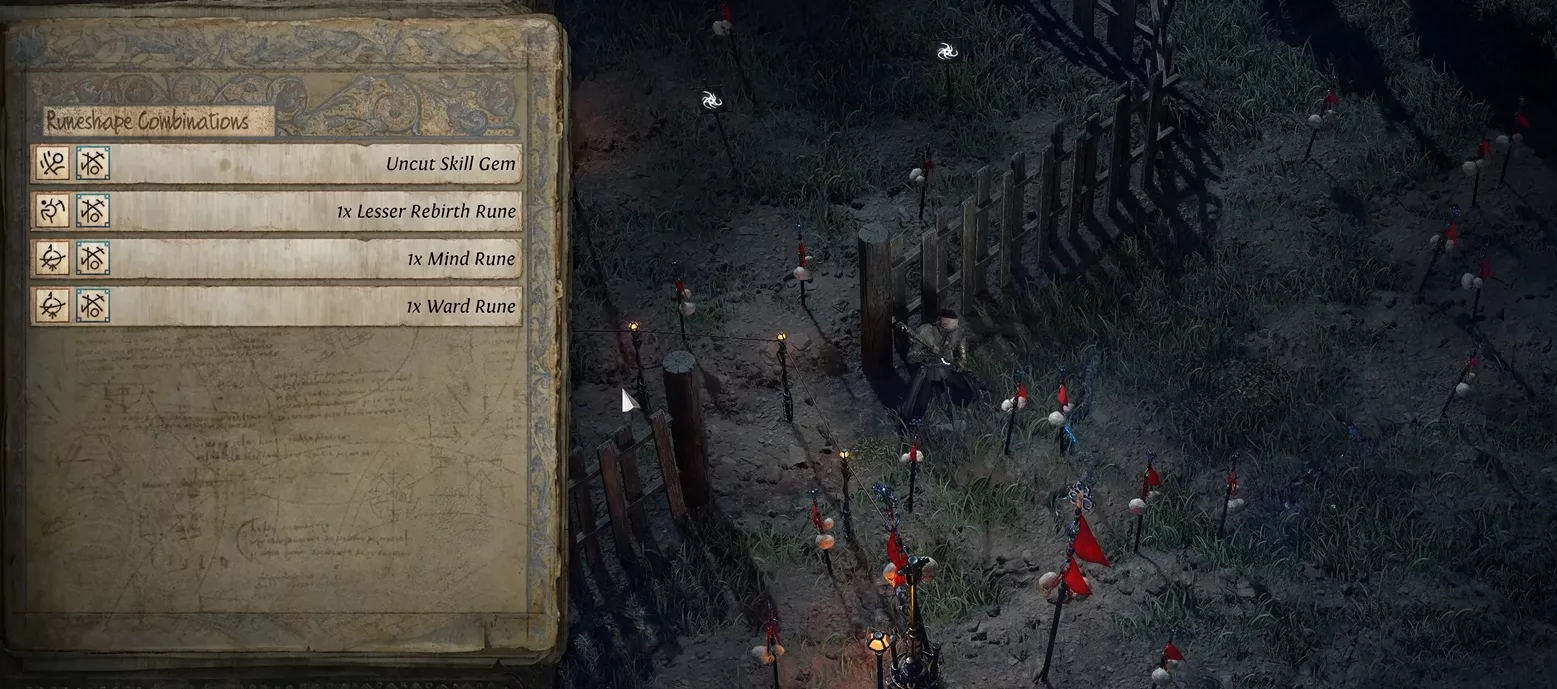
100+ runes and new currencies
Beyond the basic recipes on Remnants, the Runes of Aldur League brings over 100 new runes and numerous crafting currencies. The effects of some of these runes are particularly powerful.
The Elemental Conversion Rune converts all existing elemental mods on a non-unique weapon from one element to another. In practice, you can merge a weapon with three different elemental damage mods into a single source of cold damage, for a far more concentrated result.
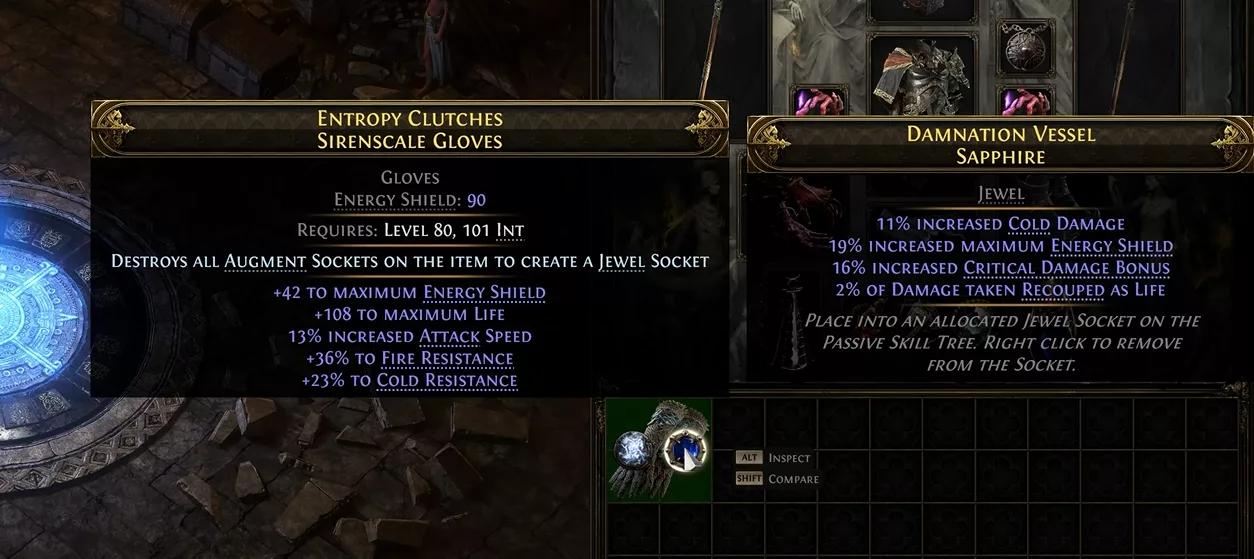
Another rune lets you destroy the rune sockets on an item to convert them into jewel sockets. A sacrifice, but one that opens up entirely new build possibilities.
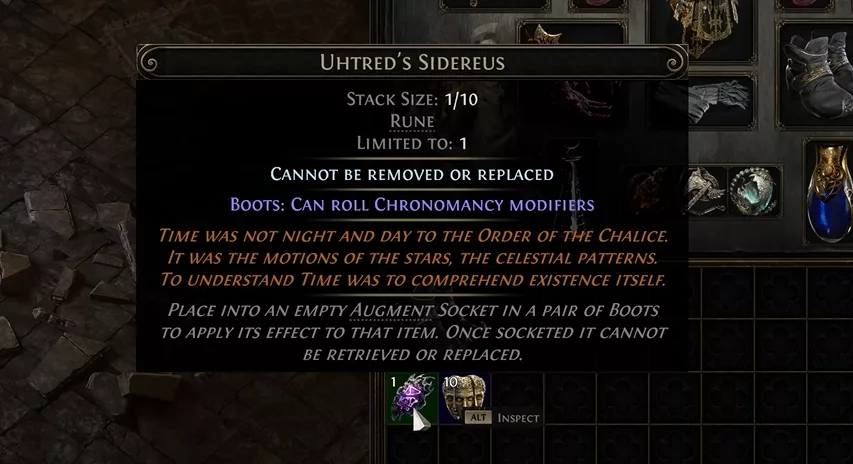
Meta Runes represent another distinct category. The Rune of Chronomancy, for example, unlocks a set of temporal modifiers usable on boots. Once placed, you then apply standard crafting orbs to attempt to roll mods such as cooldown reduction or increased skill effect duration.
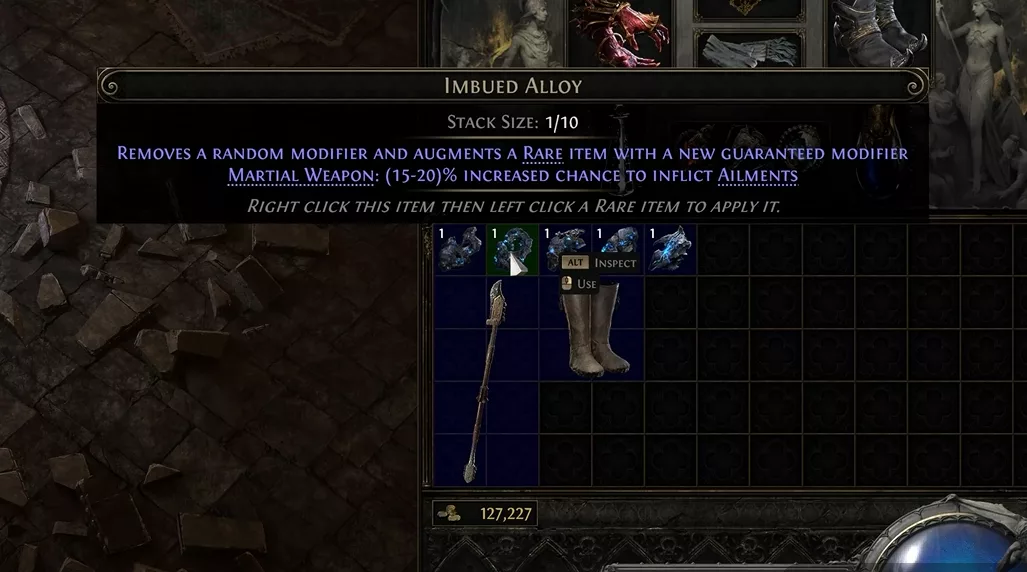
Finally, Alloys form a new currency type. By alloying ordinary metals with Verisium, you produce Alloys capable of inscribing normally inaccessible modifiers directly onto an item. An Imbued Alloy, for example, enhances ailment damage. The possible combinations are vast enough to keep the community exploring them for many weeks.
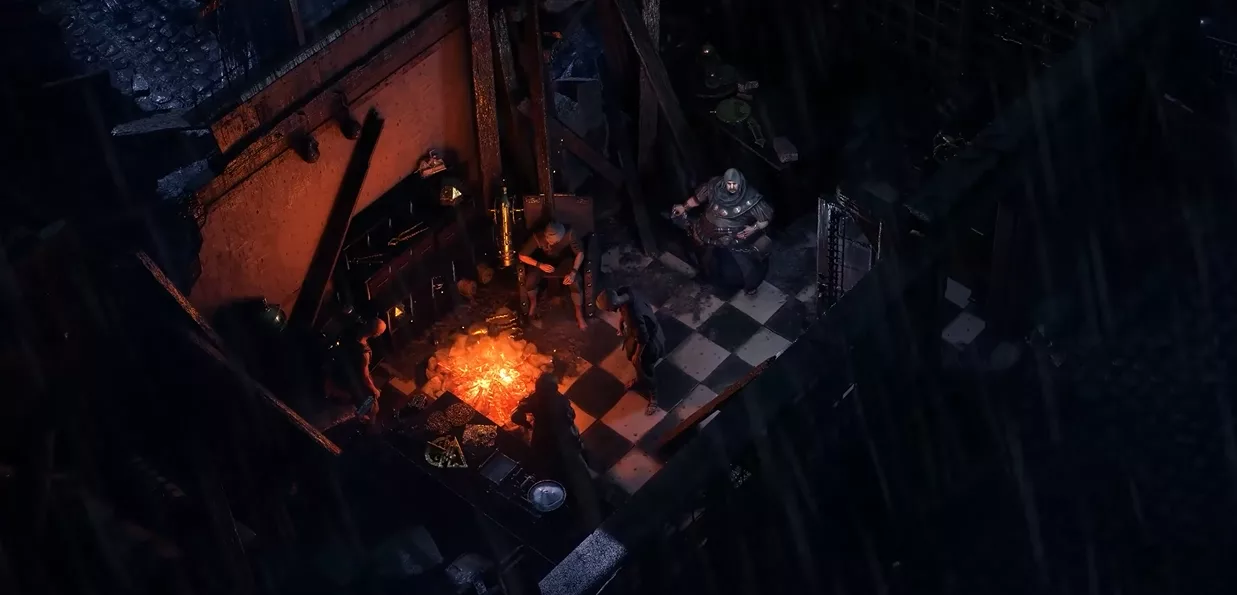
Dannig and the Expedition rework
At King’s March in Act 4, Pharaoh finally meets Dannig, a true Kalguuran runesmith. Thrilled by this discovery, Pharaoh wants to learn how to merge modern Kalguuran techniques with the ancient knowledge he has reconstructed. From this point on, he joins the expeditions that Dannig has been running for some time.
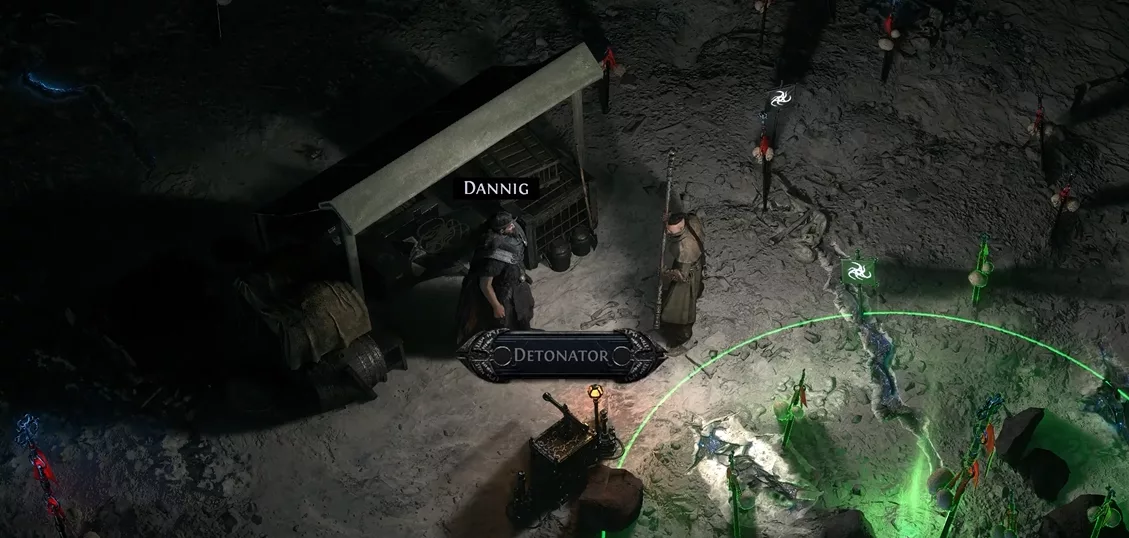
This encounter profoundly transforms the Expedition mechanic. For those who haven’t played it, it involves placing explosives to unearth buried dead and recover Verisium. From now on, expeditions integrate the Remnants from the Runes of Aldur League, allowing specific crafts to be performed along the way through the new league mechanic.
The fundamental difference from simple Remnant encounters lies in the stacking. In an expedition, the empowerments granted by Remnants apply to every monster along the explosive line for the rest of the encounter, and they accumulate. Too many active Remnants at once can create genuinely extreme situations where enemies reach staggering levels of empowerment. But the rewards follow suit.
🌊 PART 2 — Endgame: The Reworked Atlas
The southern coast and the ocean
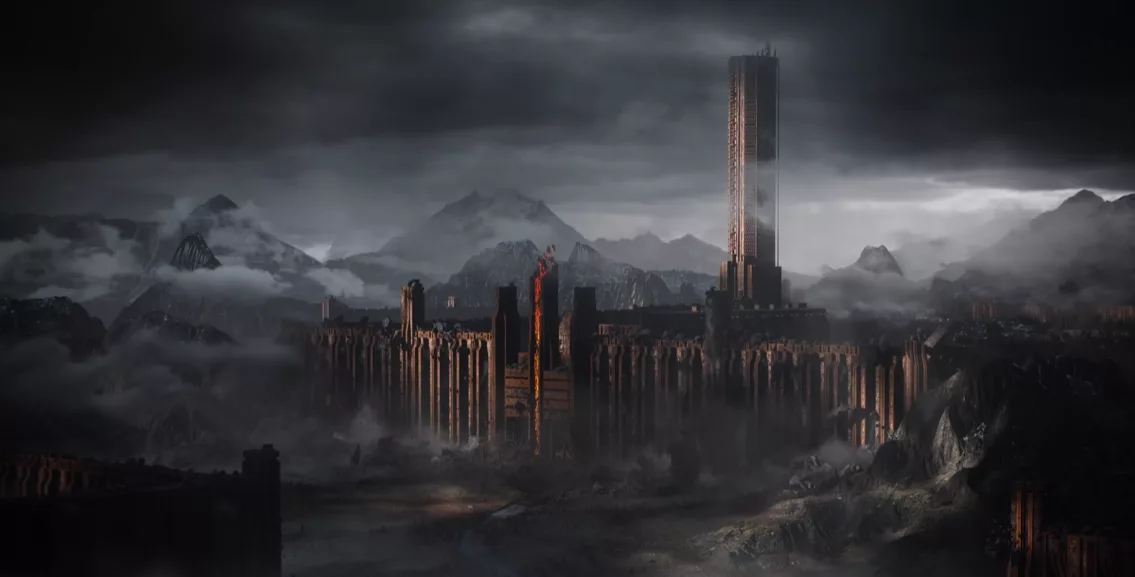
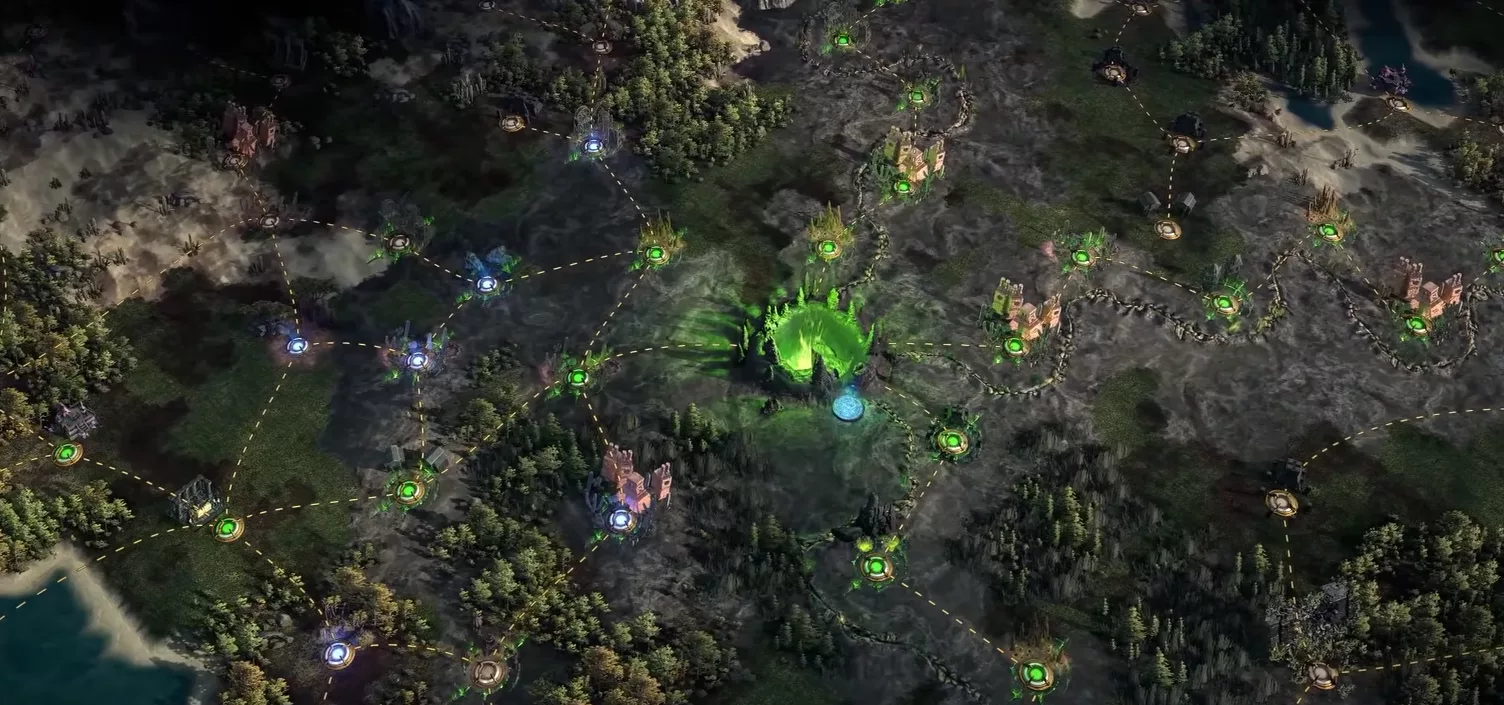
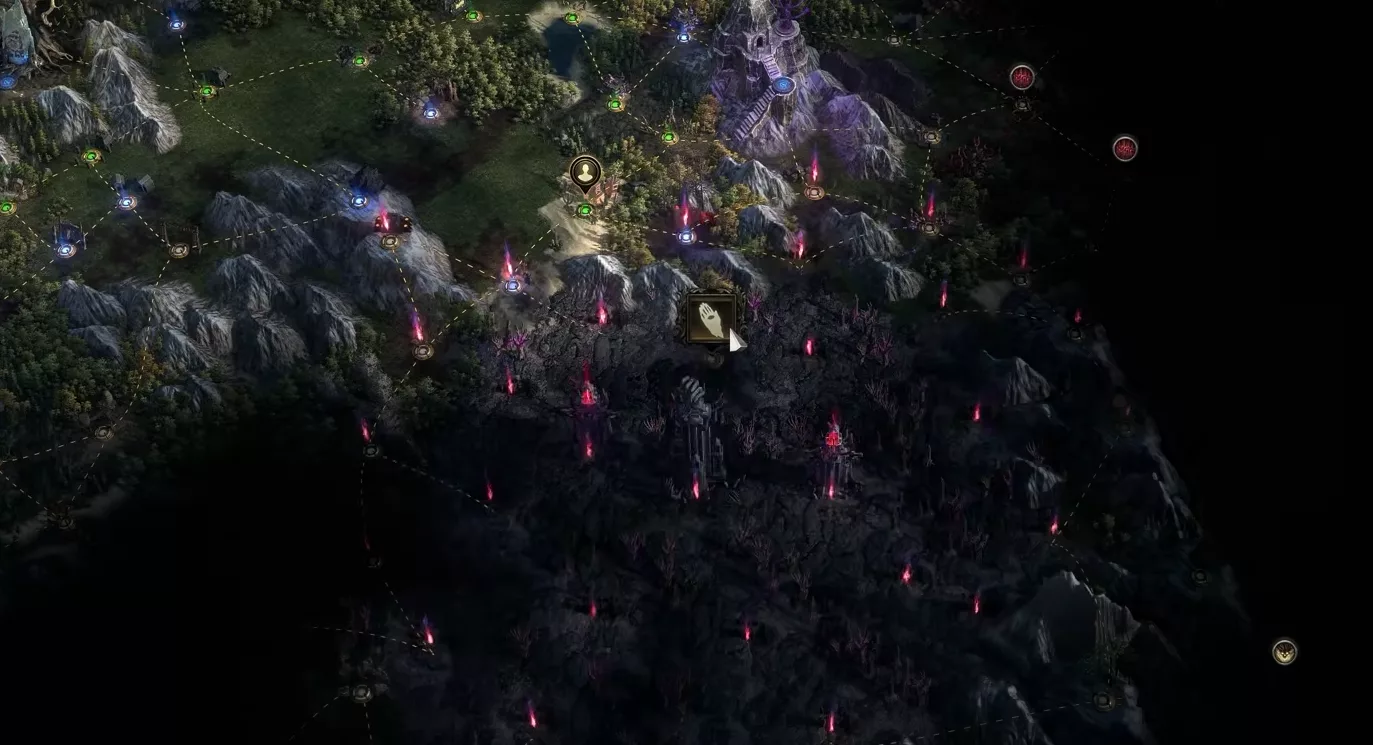
The Atlas has undergone a radical transformation for Return of the Ancients. To the south of the map, the Wraeclast coastline now appears, with the ocean stretching beyond it. This is an entirely new area, and it governs the full progression of the new League in endgame.
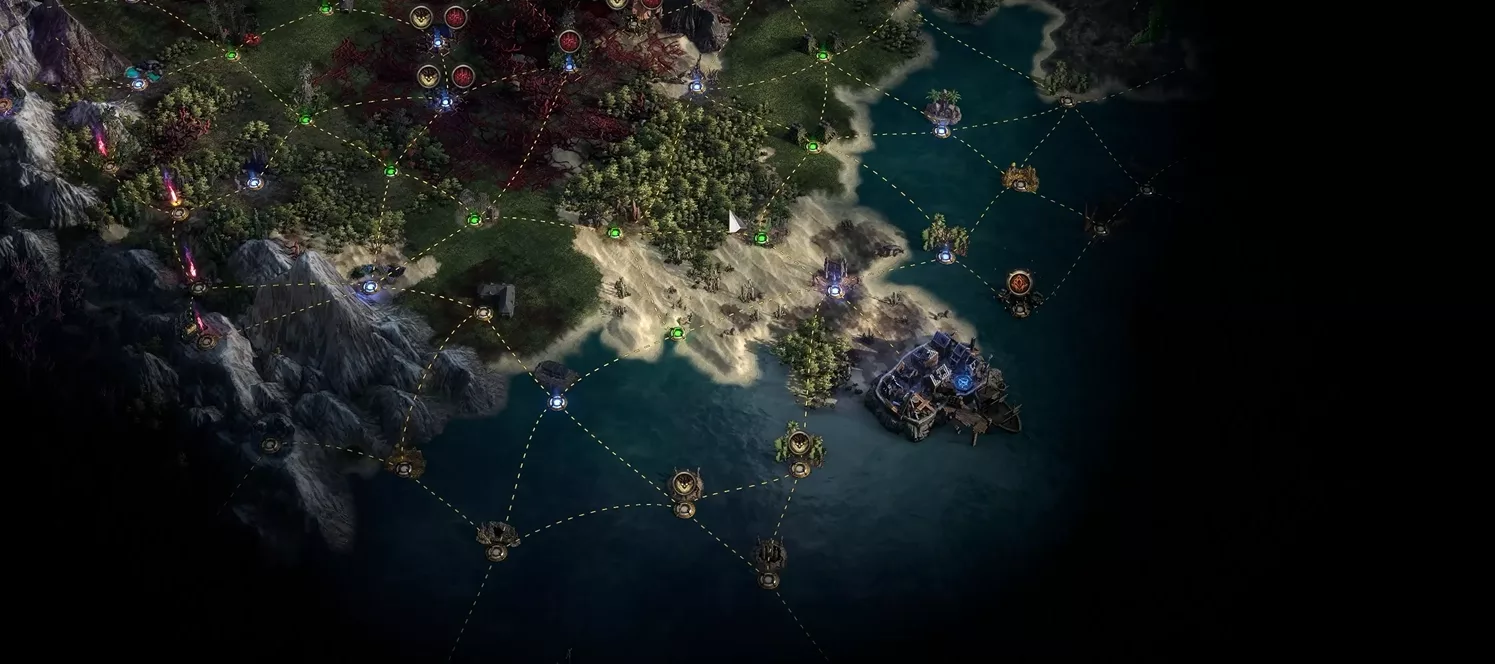
Kingsmarch, which veterans of the Expedition League will recognise, did not survive the cataclysm. The town lies in ruins. Rog has lost his trade, but that is not what consumes him: his wife, Gwennen, has vanished somewhere in the ocean. He wants to find her, and this becomes the starting point for a major new mechanic tied to the Expedition.
Extended oceanic exploration
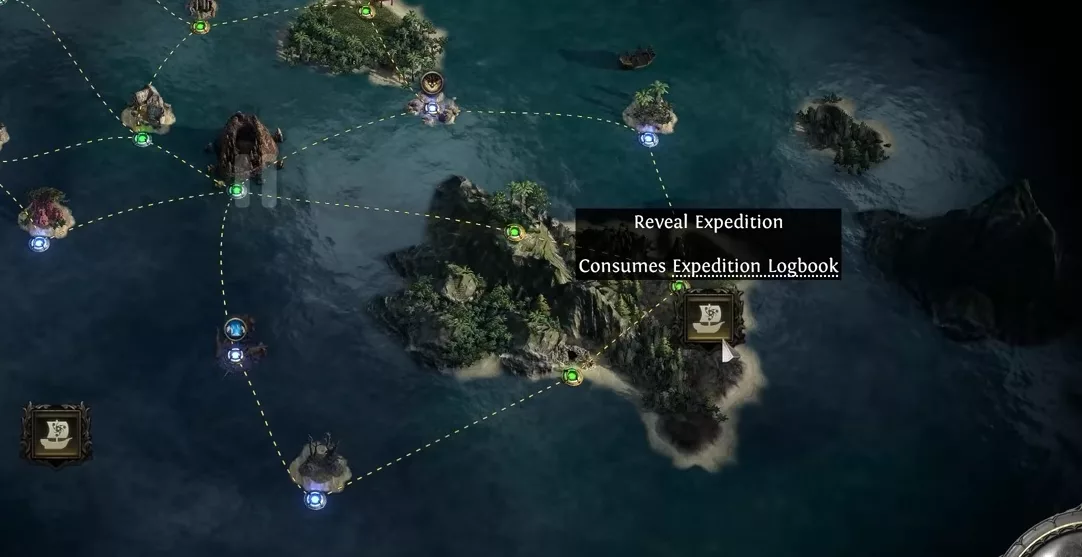
The logbook system changes shape entirely. Before, a single logbook corresponded to a single encounter. With Return of the Ancients, it is used to send ships to explore an area of the ocean to the south-east. Each expedition reveals a set of islands on which you can chain varied encounters: standard expeditions, grand expeditions, new bosses, and all sorts of surprises.
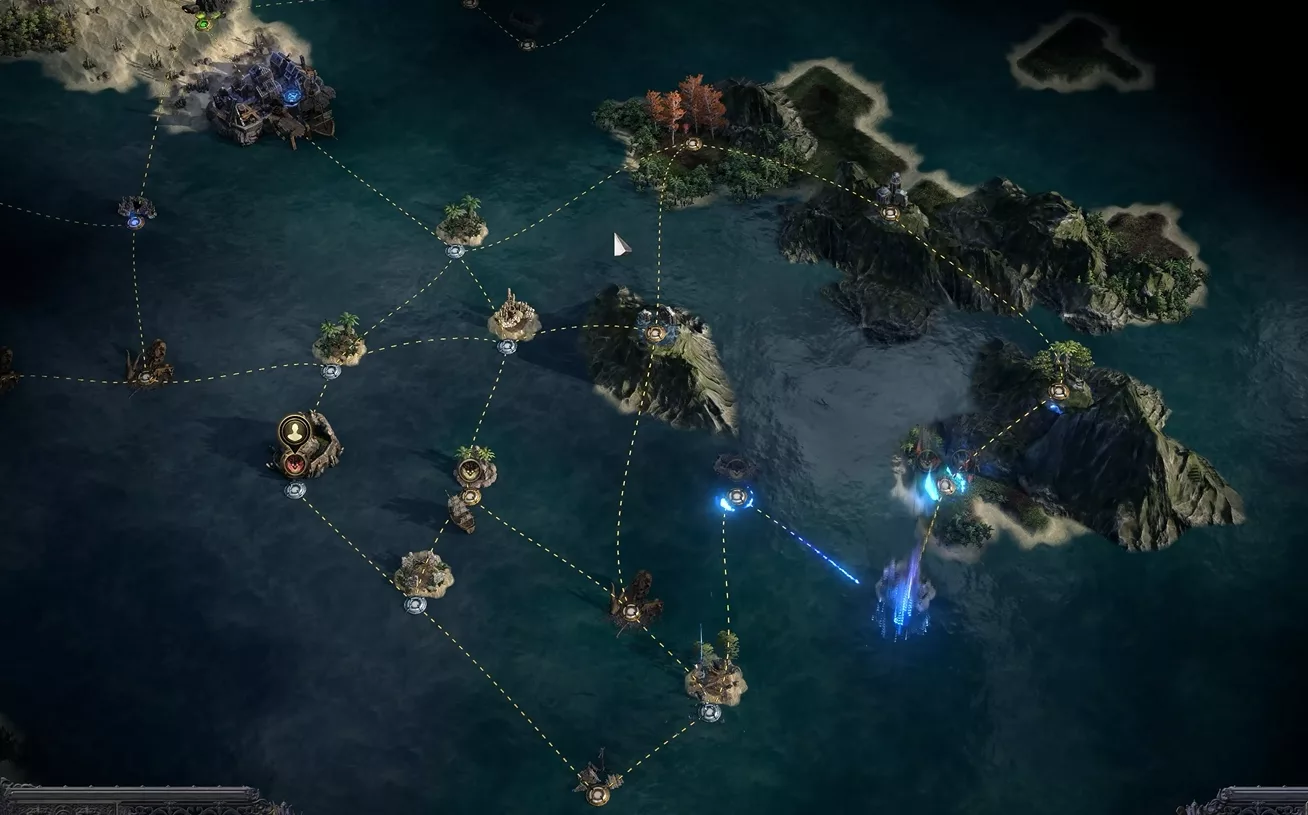
The available island types are numerous and varied. Each voyage opens new possibilities for progressing toward Gwennen, while collecting unique rewards along the way.
While searching for Gwennen, you will eventually find the island where she has taken refuge. She has discovered the tomb of an ancient Kalguuran: Medvid. Excited, she wants to force open the vault and take its contents. The problem: Medvid is not as dead as expected. You must defeat him first before you can proceed.
Once Medvid is defeated, a new logbook appears. This time, you can choose the direction in which to explore the ocean. The map is vast, and each logbook covers a sector. You decide how far to go, with no imposed depth constraint.
The islands hold unprecedented mechanics. On a volcanic island covered in Voltaxic Sulphite, detonating sulphite deposits releases waves of enemies. But there is also a wall with a suspicious glow behind it. Destroying it unleashes a giant ogre whose goal is to ingest as much sulphite as possible. The more deposits you detonated before its appearance, the more powerful the ogre becomes — and the more generous its rewards.
These islands also contain subtle secrets to discover: trapped wisps to free, root doors to blow open, and even ancient precursor technology to restart. The level of detail in the construction of these zones is considerable.
The Triscalian Flame and the final boss
Another vault awaits in the ocean, this one particularly significant: the tomb of Uhtred, the Star Drinker. Uhtred is responsible for calling down the Verisium meteors the Kalguurans used to fuel their ancient magic. After defeating him, he sends a colossally sized meteor crashing into the ocean. As you approach, you notice it is enveloped in a strange energy tied to the Verisium core that composes it. Something is growing inside, and it bodes nothing good.
To enter the meteor, Dannig suggests using the Triscalian Flame, a Kalguuran artefact capable of absorbing and nullifying the effects of Verisium magic. To get your hands on it, you must first locate the tomb of Olroth, the leader of the Knights of the Sun. Defeating him grants access to the artefact, and opens the path toward whatever is growing inside the meteor.
GGG does not reveal the final boss, but confirms one crucial detail: the Verisium that constitutes the meteor’s core is of a purity unseen for millennia. Bringing this material to Pharaoh and Dannig should allow them to forge items of power whose crafting secrets had been lost since time immemorial.
New League recap
The Runes of Aldur League is dense. Here is everything it includes across patch 0.5.0:
- Over 30 new monster types
- Over 30 League runes and over 100 crafting runes
- New currencies and additional campaign quests
- Rune Forging for armour (including uniques)
- Kalguuran skills and supports powered by Runic Ward
- Ocean exploration with its islands, encounters, and secrets
- 5 new bosses including a Pinnacle Boss
- New uniques tied to the Kalguuran universe
🏰 PART 3 — Massive Endgame Overhaul (Origins of Divinity)
Origins of Divinity, the new storyline
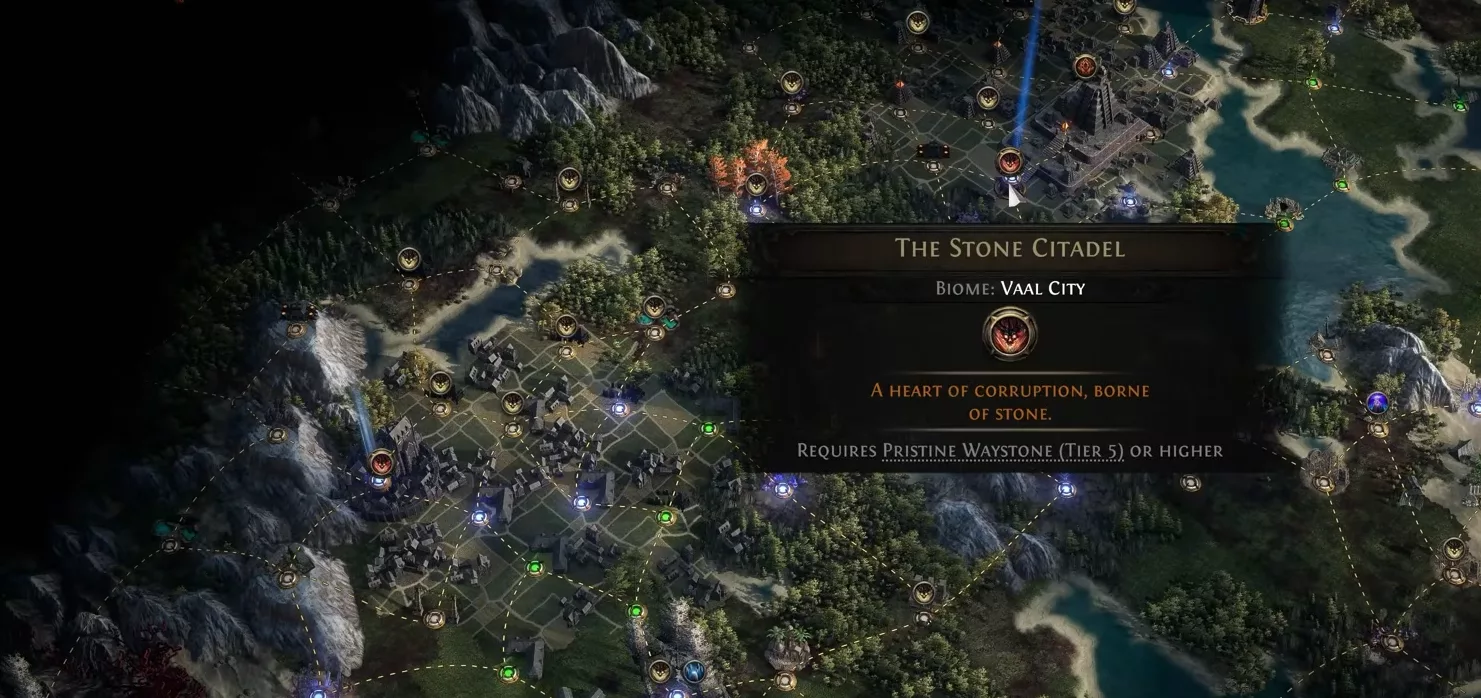
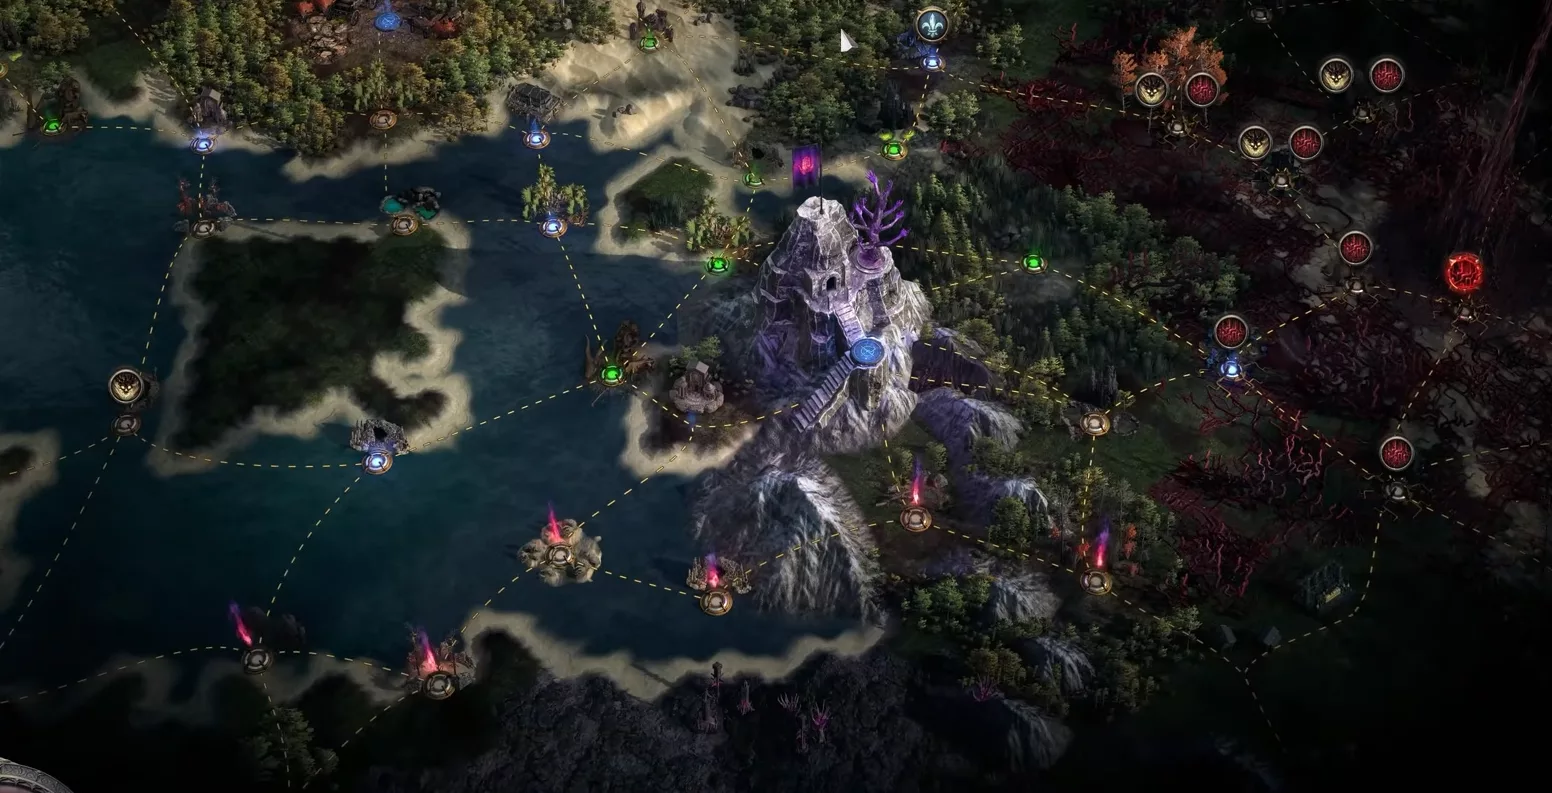
The Atlas of patch 0.5.0 is no longer the same. The southern sea is only the beginning of the changes: the entire area around your starting point now teems with quests and secrets to discover. A strange forest to the west, rifts in the earth to the east, the ruins of a sinister city to the north. The Atlas now offers fixed points of interest at precise locations, with clearly visible objectives right from the start. No more wandering aimlessly without knowing where to go.
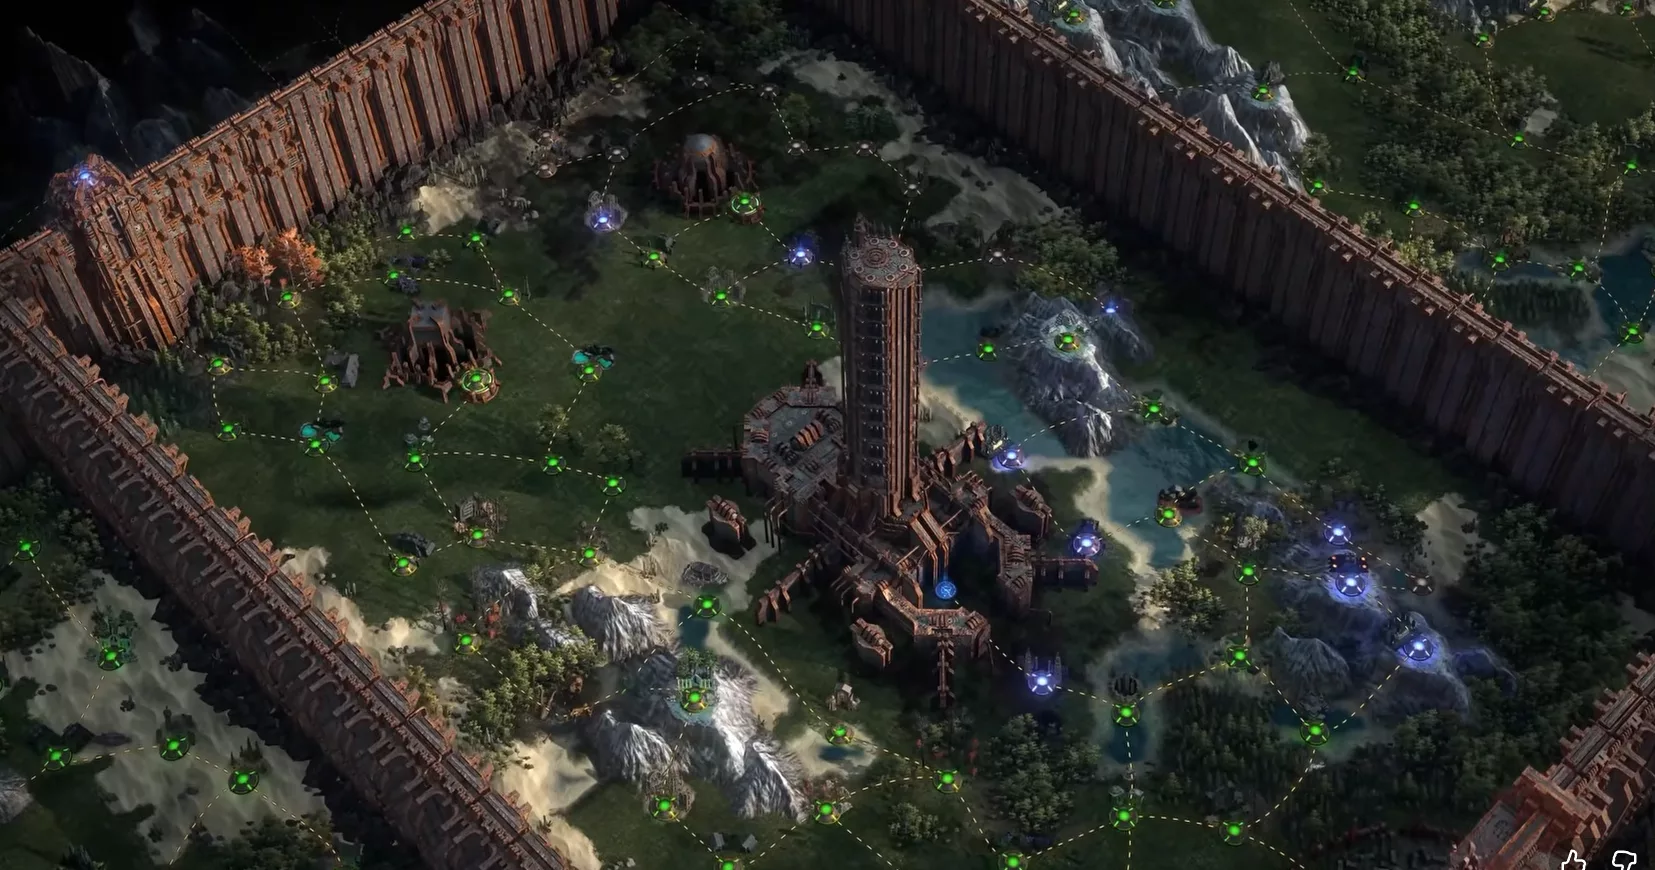
As before, visiting towers remains an excellent reflex for scouting your surroundings. But the first time you do so in Return of the Ancients, something new happens. The ground trembles. A gigantic Precursor Fortress erupts from the earth, a remnant of the ancient Precursor civilisation.
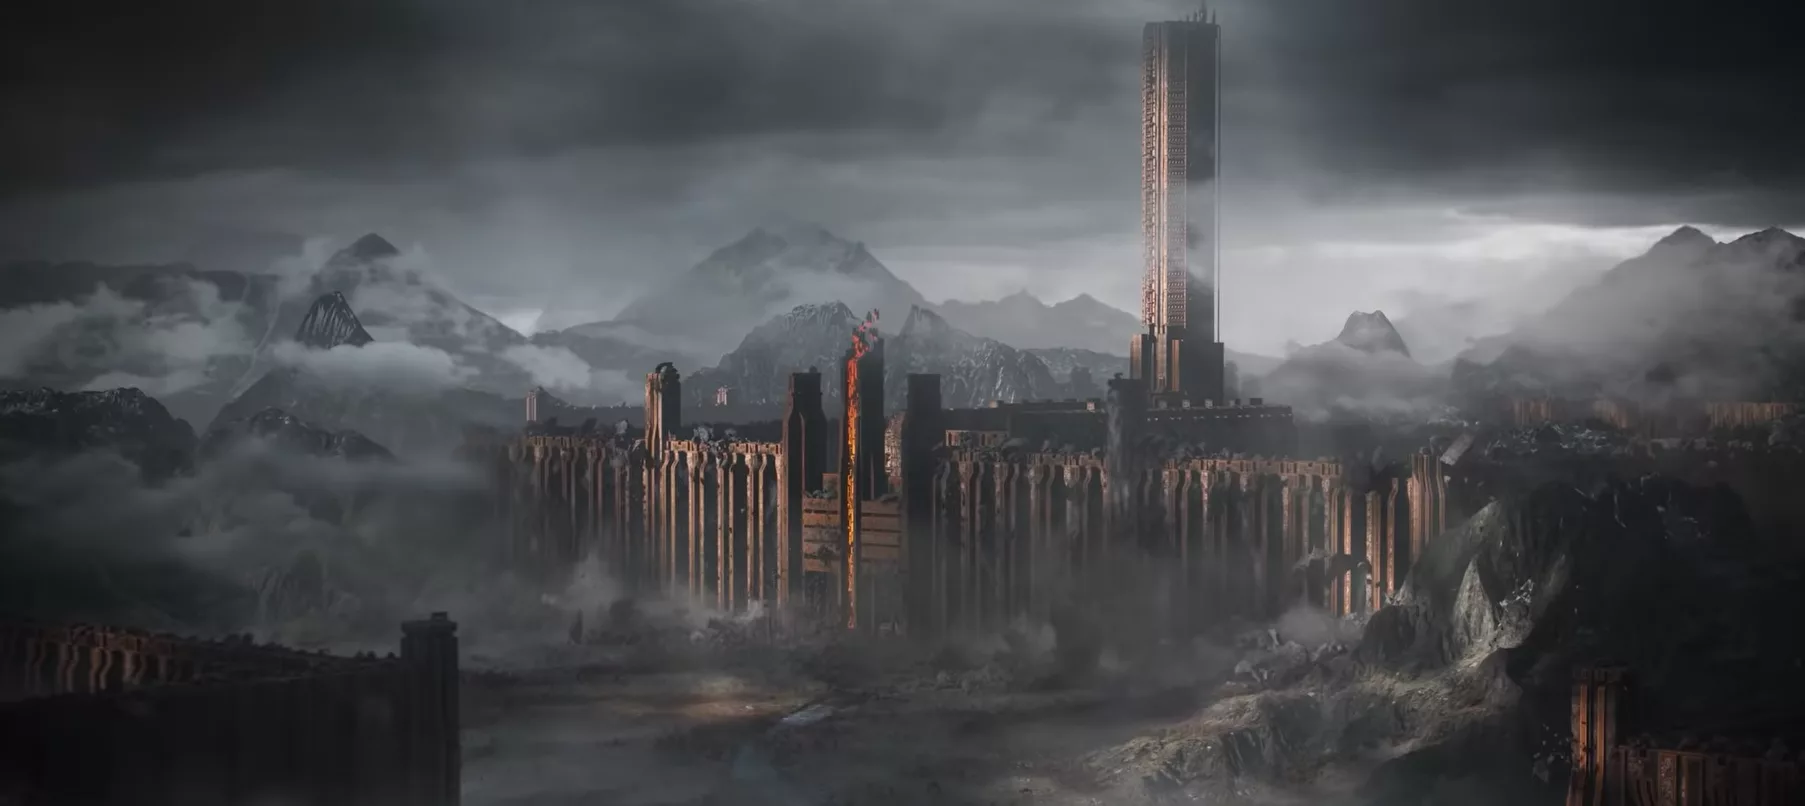
The reason for this appearance? The Ancient Protocol. The beast’s corruption has reached a critical threshold, triggering an automatic Precursor program: the world must be purged. To prevent the worst, you must enter the fortress, activate its portals, and claim the keys that will allow you to neutralise the Precursor weapons before they activate on their own.
The unique mechanics of the Fortress
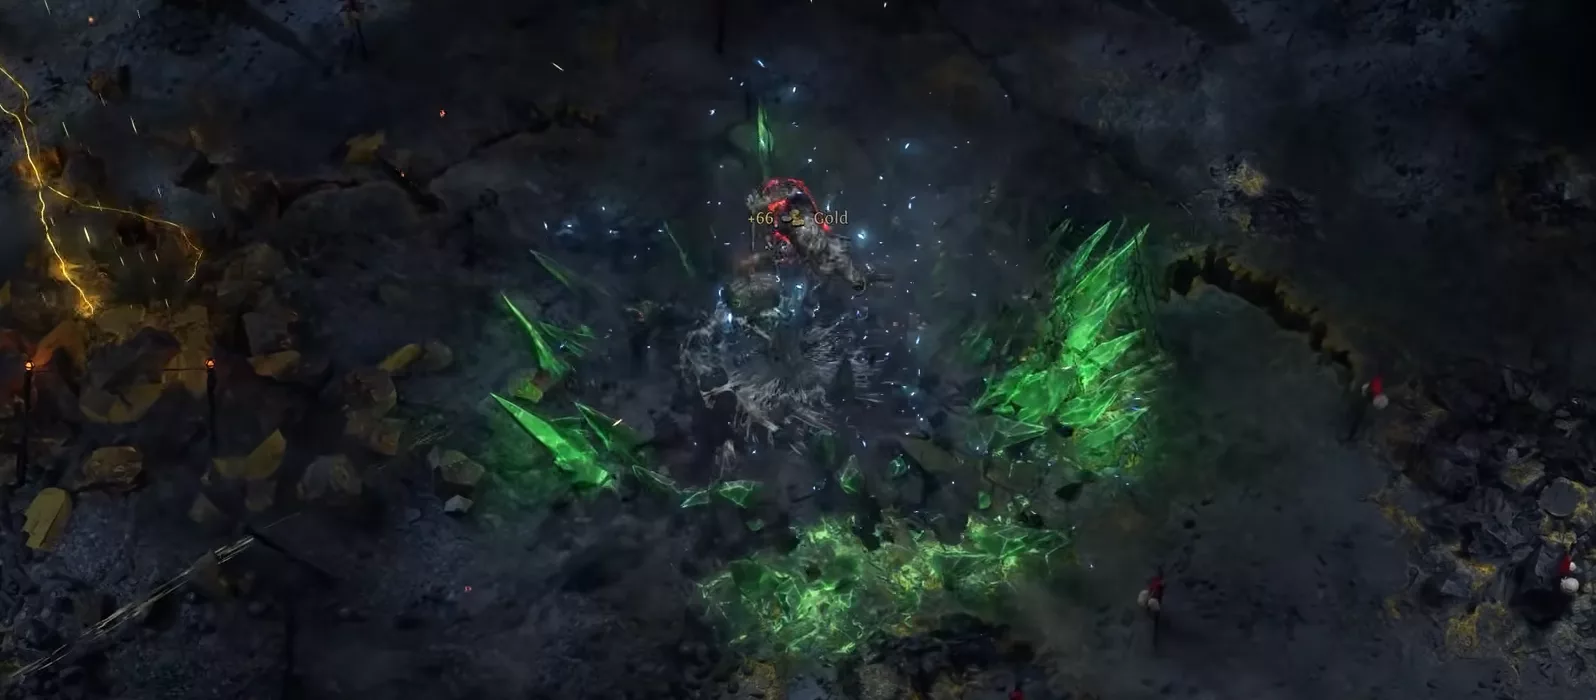
The Precursor Fortress is far more than a simple giant dungeon. Its interior zones operate under their own rules. Certain maps hide unprecedented mechanics, such as a map where all rare monsters are locked inside Essence Crystals. Another replaces all monster packs with Strongboxes. A third causes a mischievous Azmeri spirit to appear that flees from rare to rare after each kill, forcing you to chase it across the entire map.
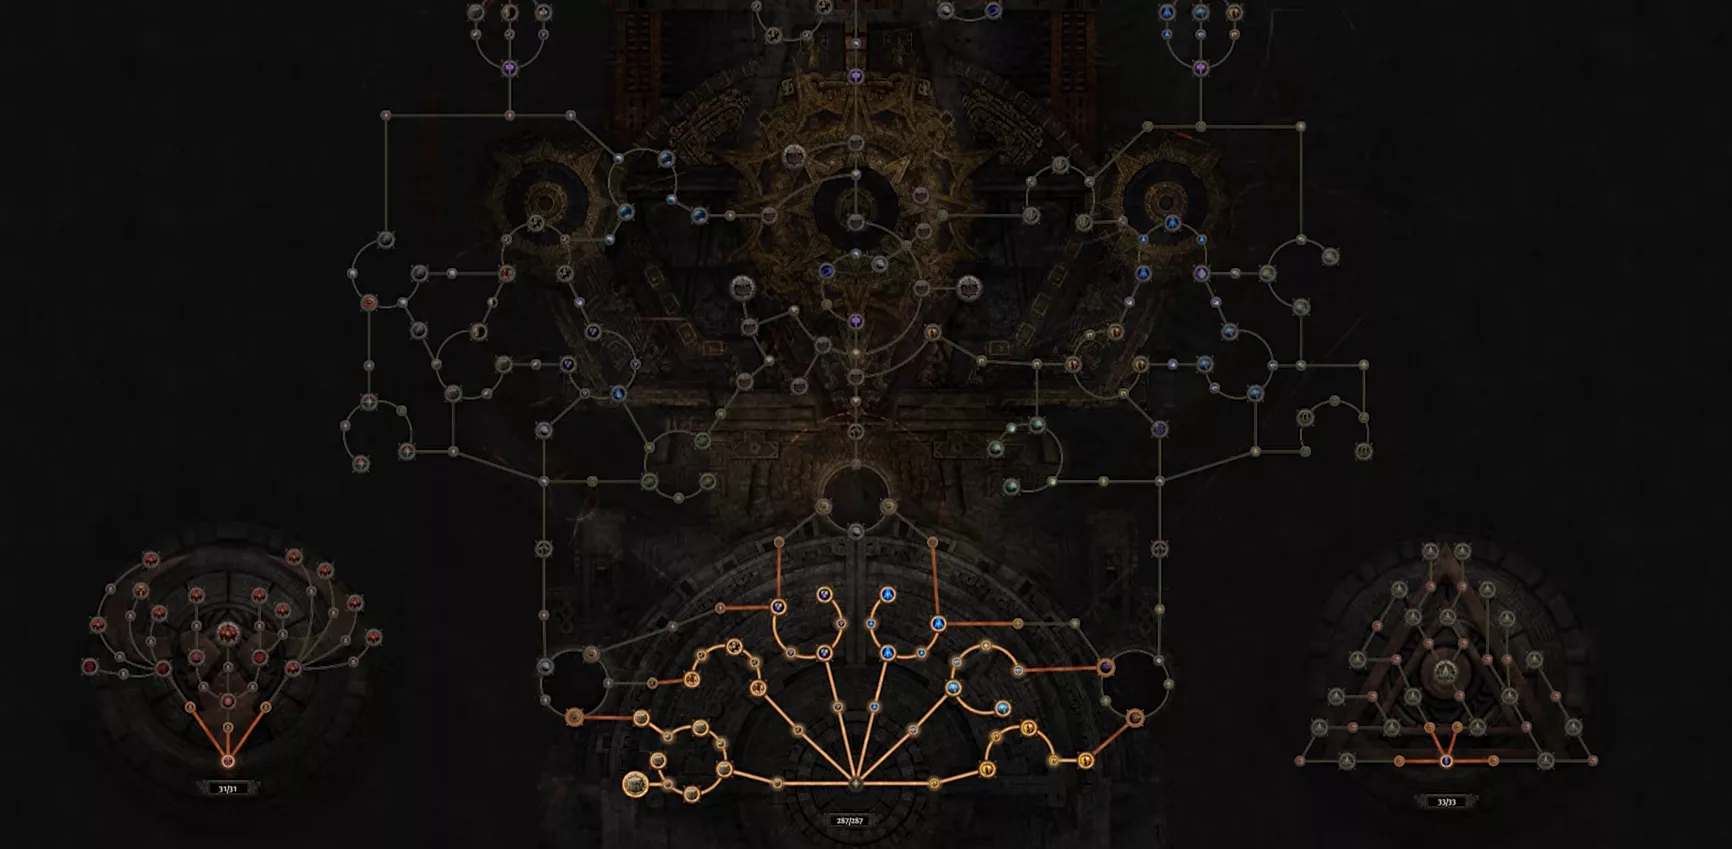
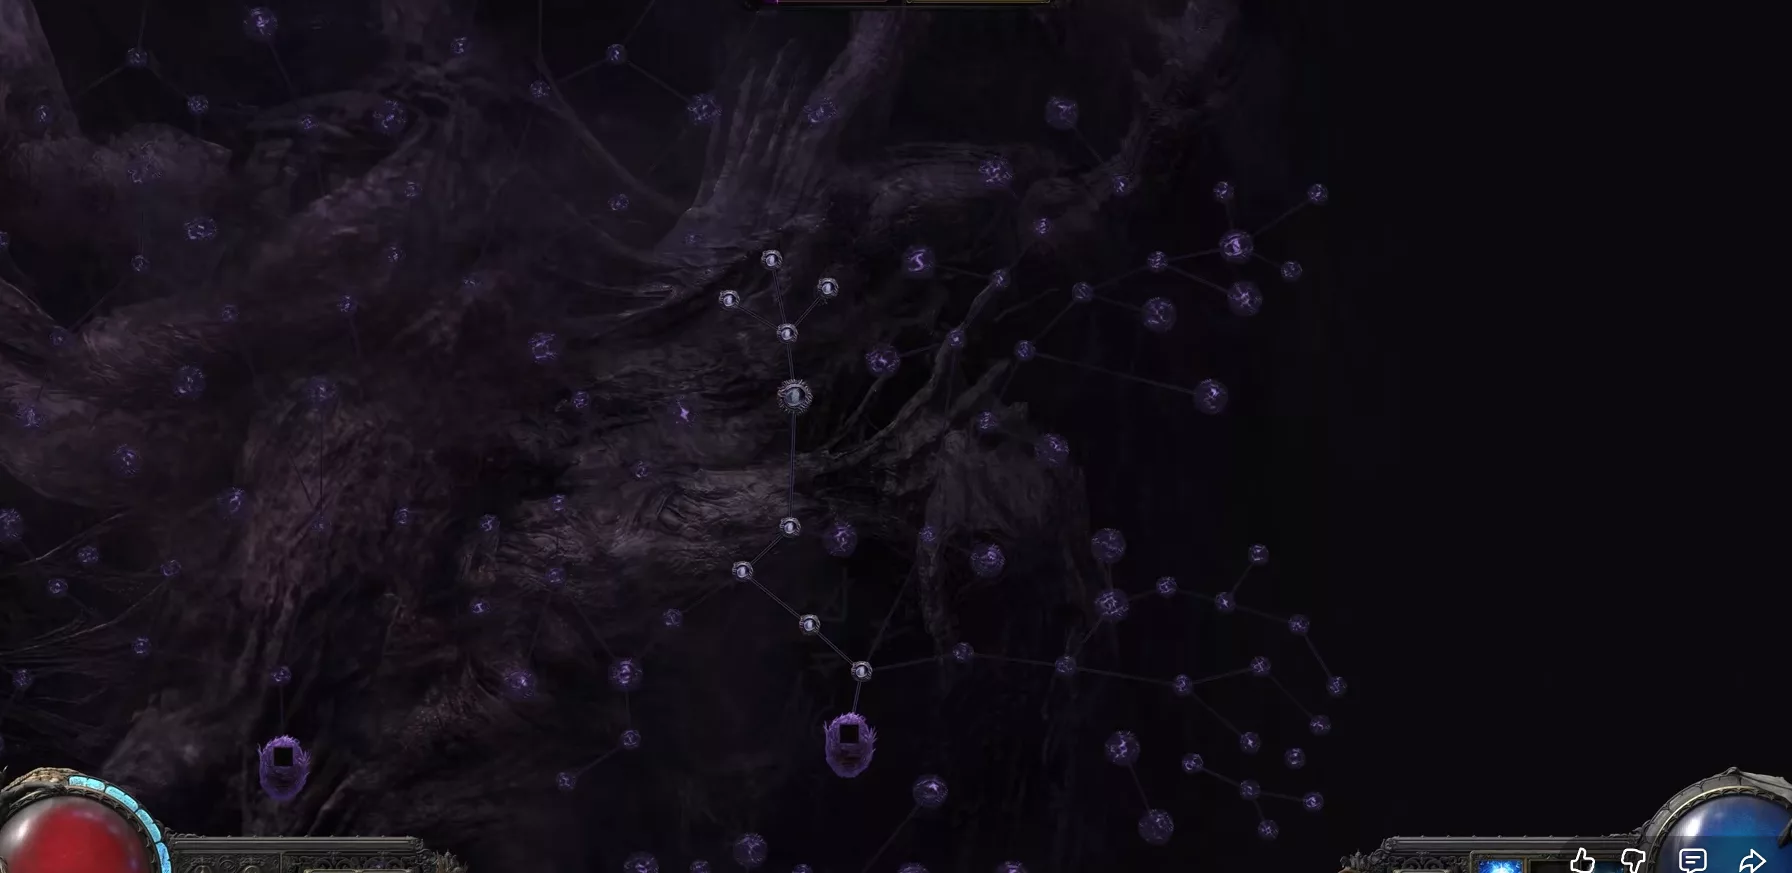
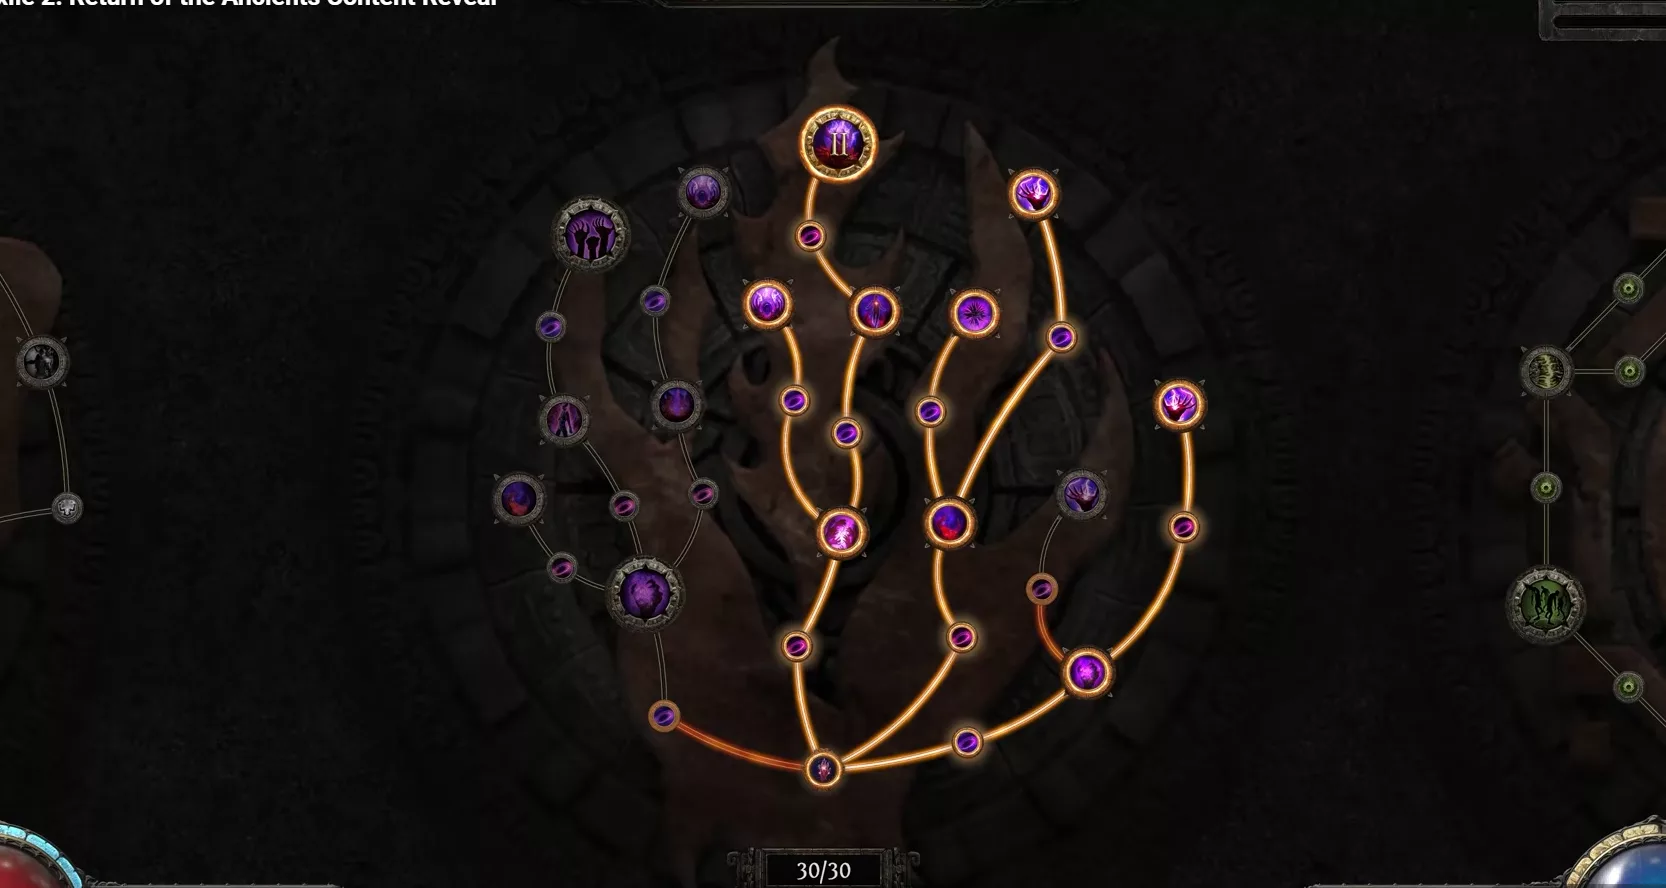
Each fortress map ends by defeating its boss, just like a standard Atlas zone. But after the boss come the Precursor Nodes. Activating these nodes grants points for the reworked Atlas Passive Tree. This is how you progress through the tree, not by wandering randomly across the Atlas.
The Atlas Passive Tree rework
The old Atlas Tree was not up to the mark. GGG says so plainly: it was one of the endgame areas that remained below the expected standard. The Return of the Ancients version works very differently, with far more elaborate mechanics on each node.
A striking example: Rogue Exiles can now flee a fight and move to an adjacent map. Before confronting you again, they gear up and come back with a vendetta. Enemy AI takes on a whole new dimension.
Other nodes combine mechanics in unprecedented ways. For example, one node can allow Azmeri spirits to possess Strongboxes. As a result, all normal monsters that emerge from them are touched by the spirit, and rares are possessed, generating exceptional loot potential.
But the most structurally significant change is full allocation. You earn points for every zone completed in the fortress. And for the first time, this means you can allocate the entire tree. All of it. No more having to spec and respec between two types of maps to optimise your runs.
This total freedom opens the door to nodes that would not have been viable otherwise. For example, a node that gives a chance for cities to be invaded by a rival faction, potentially containing two faction leaders simultaneously, allowing you to obtain two Crisis Fragments at once. Before full allocation, this kind of bonus would have required specing for every city run, then respeccing for everything else. No longer the case.
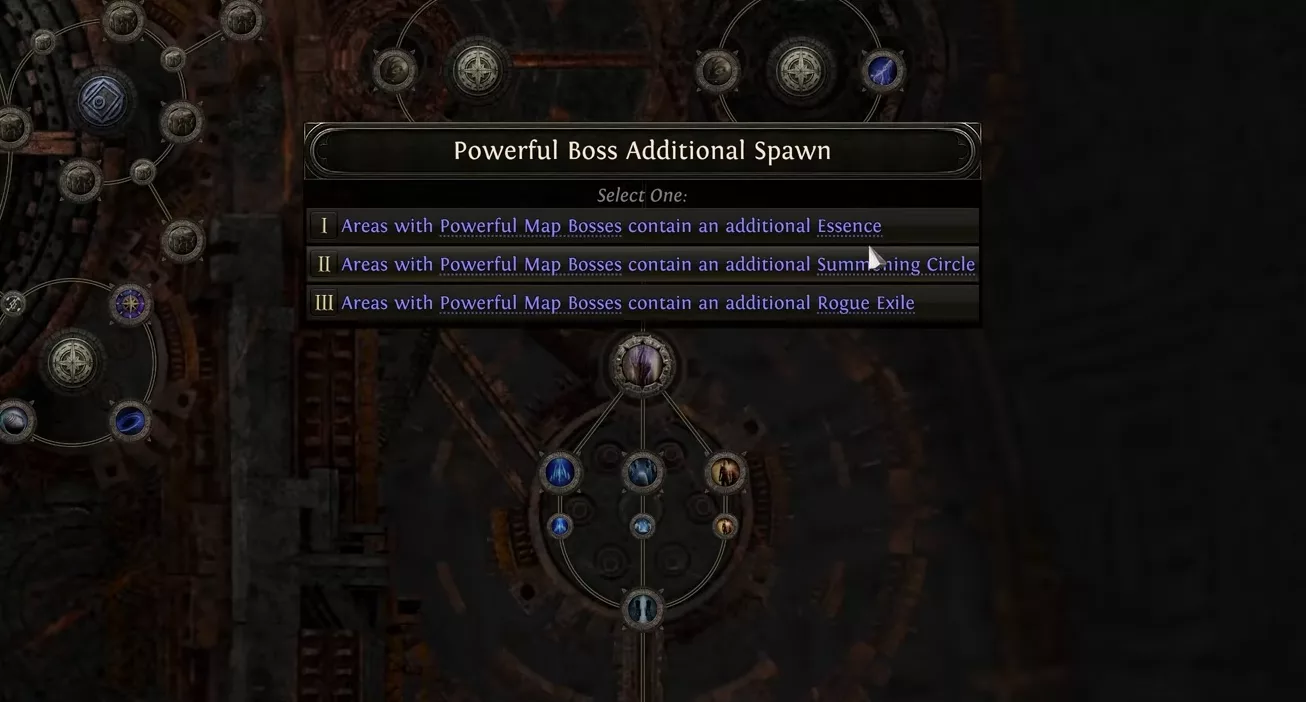
To maintain meaningful choices despite full allocation, GGG introduces MultiChoice Nodes. Everyone unlocks the node, but each player chooses which bonus to activate. Should your powerful boss match contain more essences, more summoning circles, or more Rogue Exiles? You decide. Other nodes offer more unusual options: give shrines to the map boss for a harder fight but with special loot, or receive a shrine buff before entering a boss arena for an easier encounter.
Endgame bosses now accessible via quest
One of the major goals of this overhaul: all endgame boss fights are now accessible through a dedicated quest. No more dependence on RNG to find keys. Locations are fixed, progression is guided. This includes the Arbiter of Ash, which previously required stumbling upon keys by chance. A quest now leads you directly to him.
But the Arbiter of Ash is no longer the ultimate Pinnacle Boss of Path of Exile 2. To reach the true pinnacle, you must go to the centre of the fortress. A challenge of a different magnitude awaits you there — the new pinnacle of Return of the Ancients.
Once the storyline is completed, Pinnacle Boss keys are obtained as usual by exploring the Atlas. GGG has added new map mechanics in the wild zones to enrich this exploration. Certain maps can spawn as Rogue Exile hunting grounds, with several Rogue Exiles hunting rare beasts. You can catch them mid-fight and take advantage to eliminate them all at once. Other maps can transform all their inhabitants into magic monsters, or cause each shrine to release an Azmeri spirit when used.
Once your keys are found, it is back to the fortress to face the pinnacle again. This version will be harder and will offer new exclusive uniques. Each victory lets you activate a section of the fortress. All uncompleted maps in that section are automatically completed, and you retrieve all the corresponding Atlas points.
For players who prefer rushing into the infinite Atlas rather than exploring the fortress in detail, this system still guarantees access to all points. Flexibility is at the heart of the design.
Origins of Divinity recap
Origins of Divinity represents a massive amount of content. Five new bosses including a new Pinnacle Boss, dozens of new zones in the fortress, brand-new uniques, a complete overhaul of the Atlas Passive Tree with full allocation and MultiChoice Nodes, and a collection of new map mechanics found both inside the fortress and across the open Atlas. This is the first of the six new endgame storylines added in Return of the Ancients.
👥 PART 4 — Masters of the Atlas
An Ascendancy for the Atlas Tree
The Atlas Tree already provides room for choice through its « mod choice » nodes, but GGG felt this wasn’t enough to build a true endgame playstyle. The answer: Masters of the Atlas. The concept directly mirrors the logic of the classic Ascendancy for your character, now applied to the Atlas Tree. Each master is a full specialization in its own right, with its own quests, progressive bonuses, and trade-offs.
These masters are scattered throughout Rayclust and agree to train you in exchange for help with targeted quests. The further you progress in their questline, the more points you unlock to allocate into their bonus lines.
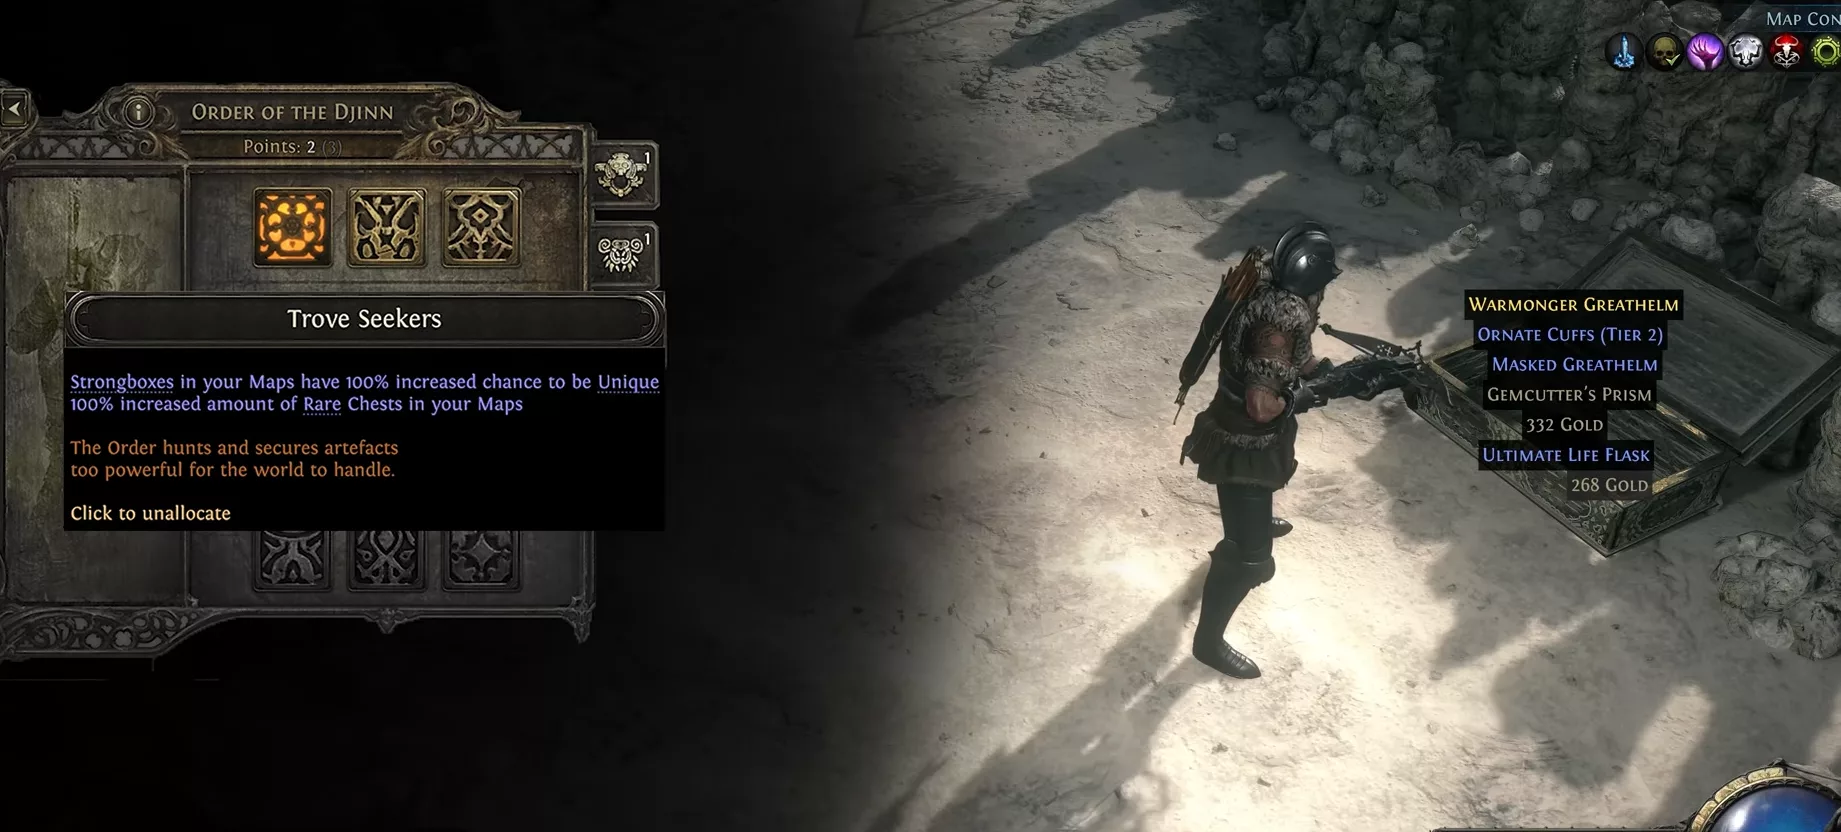
Jado, the Order of the Jin
Jado is a member of the Order of the Jin, an organization that secures powerful artifacts to prevent them from falling into the wrong hands. He sends you to investigate Atlas anomalies and retrieve the artifacts causing these phenomena. Each artifact returned convinces him to teach you more about the Order’s methods.
The first bonuses unlocked with Jado offer a choice between three distinct directions:
- Massively increase the spawn chance of rare and unique chests.
- Make all map bosses drop an additional unique.
- Add a modifier to corrupted waystones, but in return, their destination becomes completely unknown.
Each completed quest unlocks a new bonus line and an additional point to allocate, allowing you to push the specialization further with each run.
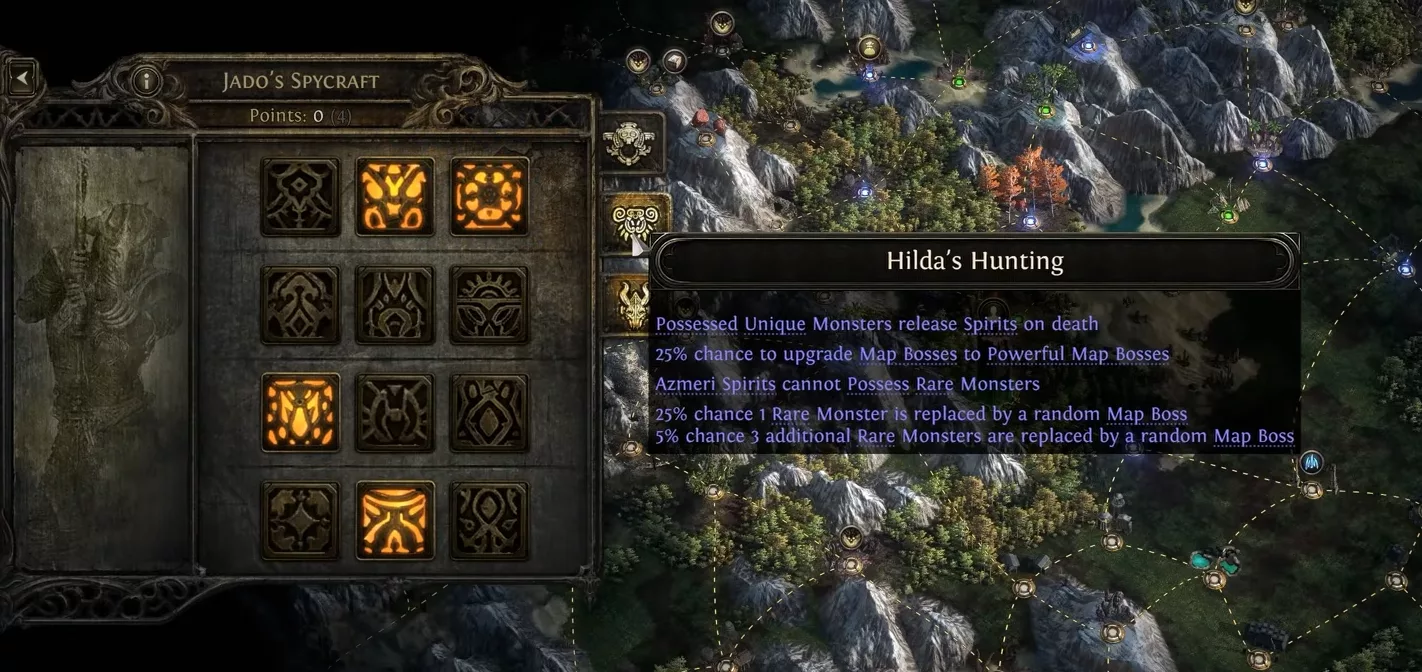
Hilda, the monster hunter
Hilda belongs to a guild of monster hunters. She tasks you with assassinating specific deadly creatures across Rayclust and retrieving parts of their bodies. In exchange, she passes on her hunting techniques.
Her bonuses have a distinctive trait: many operate on a real trade-off, advantage against drawback. A few concrete examples:
- 25% chance to upgrade any map boss to an empowered version.
- Map spirits no longer possess rare monsters — they focus solely on the zone’s unique bosses.
- Only one attempt against pinnacle bosses, but in return, they always drop two uniques.
Quick switching between masters
Since each master involves different strategies, GGG wanted switching to feel seamless. As you unlock masters, they appear on the side of the screen. One click activates the one you want to use for your next map, and all its selected bonuses apply immediately. You can quickly switch between Jado’s drop strategy and Hilda’s pinnacle boss hunting depending on what you’re running.
🔄 PART 5 — Early Access League Rework
The general rework philosophy
The four leagues launched with Early Access in 0.1.0 (Delirium, Expedition, Breach, and Ritual) were clearly lagging behind the more recent leagues. Fate of the Vaal and Rise of the Abyssal offered significantly more content, and GGG wanted to close that gap before 1.0. The result: all four were thoroughly overhauled for Return of the Ancients, with new quests, new mechanics, new crafting systems, new uniques, and new pinnacle bosses.
One of the most structural changes involves Atlas placement. Each league now has a fixed zone on the map. As soon as you encounter one of these mechanics in endgame, a quest triggers to guide you there, with a dedicated Atlas Tree and a pinnacle boss to unlock. This narrative framework applies even to leagues that didn’t receive a major overhaul.
To illustrate this, GGG uses the Abyss as an example. On your first endgame encounter, a quest points you east, where massive abyssal cracks extend from the Soul Well. Traversing these zones closes the abysses across the Atlas and earns you points for the dedicated Atlas Tree. At the end of each rift waits a boss from an abyssal faction, with a key to face the Vessel of Kulemak as the final reward. This type of guided progression makes endgame far more accessible to new players.
Delirium — The Hare and the Raven
The Delirium storyline is called « The Hare and the Raven. » You may recall that during Act 4, you accidentally freed an ancient entity imprisoned by the Kardoui: Tangmazu, the Raven Trickster, a being who delights in shattering the minds of those who pass through its mirrors. Its mechanic involves generating abominations born from your deepest fears.
In endgame, your first Delirium encounter introduces Elder Maddox, frozen in a trance. His mind is trapped in a delusion of Tangmazu’s making, and it falls to you to free him. Once pulled out, Maddox urges you to go rectify what you caused: head west, toward the Withered Willow, the place where Tangmazu is said to have acquired its powers. Maps around the Withered Willow all feature Delirium encounters, and the Raven Trickster will actively try to break you along the way.
The Delirium mechanic itself has been completely reworked. A bar now appears at the bottom of the screen to indicate your depth within the Delirium. The direction of the fog guides you toward deeper layers, and the bar also shows upcoming special encounters if you venture deep enough. The map boss is still at the end, but many new events mark the path.
Among these encounters, two types of Mirror Shards make their appearance. The Purple Mirror Shard, once broken, makes all enemies more « nightmarish »: they grow larger, gain power, and their rewards increase proportionally. The Red Mirror Shard sends you directly into the depths of your own mind; you must escape facing hordes of your worst fears, and if you succeed, you receive a powerful amulet with two instilled notables.
Once at the Withered Willow, Elder Maddox discovers that a fragment of the Grand Mirror is missing. You must track down Tangmazu to retrieve it, which means entering its mirrors. By running Deliriums, certain special encounters drop Liquid Emotions. These resources already allowed you to instil amulets with passive notables, but they have a new function: adding crafted mods to jewels. Liquid Despair grants Critical Hit Chance, Liquid Suffering grants Movement Speed or AoE, and other emotions cover various mods that are difficult to obtain elsewhere.
After enough Deliriums, the location of a Grand Mirror is revealed. This portal into Tangmazu’s realm doesn’t open easily: it reflects the map boss in an absurdly empowered version, then destroys itself. To reach the Raven Trickster, you must let madness fully take hold of you. A strange fruit is left behind; consuming it, you embrace madness and blanket an entire region of the Atlas in fog. Each map run within that fog becomes progressively more difficult as you explore the deepest layers of your mind.
Throughout this descent, you enter a Simulacrum: a twisted reconstruction of your memories, corrupted by Tangmazu. If you complete it, it deems you worthy of a real challenge and lets you take the missing mirror fragment. Back at the Withered Willow, you can finally enter its realm and face it directly in a boss fight promised to be a serious challenge.
Delirium endgame
Once the quest is complete, Grand Mirrors continue to appear on the Atlas after Delirium encounters. Each Grand Mirror lets you choose which zone to spread the fog over, then opens a key to face Tangmazu again in a significantly harder version. This endgame version drops exclusive uniques unavailable during the quest.
Potent Liquid Emotions only appear from certain map bosses touched by Delirium. Like their standard variants, they craft mods on jewels, but these mods are exclusive and impossible to obtain elsewhere. Potent Liquid Melancholy, for example, only drops from human bosses and adds various on-hit effects.
These emotions can also be instilled on amulets to unlock unique notables. Storm’s Rebuke boosts your cold and lightning damage when you shatter an enemy’s armor. Kaom’s Blessing allows you to amplify fire spells through an ancestral war cry. These are notables that exist nowhere else on the skill tree.
The Delirium Atlas Tree has been entirely reworked. Maps in the Delirium zone of the Atlas directly grant passive points upon completion, making progression very readable. Certain nodes add new types of Mirror Shards, others modify drops (time-lost jewels from Simulacrums), and others still affect Atlas mechanics such as the extent of fog after a Grand Mirror.
Delirium recap
Delirium gets an enriched core mechanic (depth bar, Mirror Shards, Simulacrum), a crafting system dedicated to jewels via Liquid Emotions, over 20 new instillable notables on amulets, a new pinnacle boss, and a deeply reworked Atlas Tree.
Breach — Alith and the Hiveborn War
The Breach storyline revolves around Alith, a member of the Keepers of the Flame, an ancient order of monks dedicated to preventing the Hiveborn from invading the world. Seeing you in action against demons, Alith invites you to join the order and asks you to make your way to their monastery in the south.
On the way, you notice the first change to the Breach mechanic: the timer is now visible on screen. You can clearly see how much time remains to keep the breach open, and each kill extends its duration. No more guessing blindly whether you’re holding or not.
At the monastery, you discover the Genesis Tree. Since the events of Keepers of the Flame in PoE1, the war against the Hiveborn has lasted 25 years, and the Keepers have lost ground. The Genesis Tree is an asset wrested from the enemy and gifted to the Keepers by the Dreamer himself. But without Hive Blood, the tree has withered. To obtain this Hive Blood, you must exploit a new mechanic: keeping a Breach open long enough to push it into a stabilization phase. Once stabilized, the Hiveborn send their most formidable creatures. The Breach only closes once you annihilate them, and they drop the Hive Blood needed to restore the tree.
Sometimes, a Marshal of Xesht can appear during this phase: it is one of the deadliest adversaries the Hiveborn can send. These creatures drop Wombgifts. Bringing them to the Genesis Tree lets you craft items to aid you in the war.
The Genesis Tree functions as a 15-point crafting system. You place a Wombgift in the tree according to the item type you want (amulet, ring, belt), fertilize it with Hive Blood, and it generates an item. The more you feed the tree, the more its branches regenerate and the more control you have over the result. For amulets, you can choose the available base types, including some entirely new ones: an amulet that grants a whole spirit skill for free, or another with a rune socket. The left and right branches let you target specific mods and ensure you hit the highest tiers. No respec cost on this tree: nodes activate and deactivate freely with a click.
For rings, Wombgifts unlock new bases and two entirely new sets of mods. The right branch adds caster mods to rings: additional elemental damage for spells, or targeted options such as increased seal accumulation rate for Unleash. The left branch unlocks a set of mods dedicated to minion builds. This gap between attack builds and caster/minion builds, which previously lacked truly interesting craftable slots, closes significantly.
Dedicated trees for belts and currency complete the picture. These include the ability to create new catalysts for jewels, or a belt that grants additional lightning damage.
The Hiveborn Domain
After enough Breach encounters, a Wombgift capable of creating a breach stone can drop. Using it grants access to the Hiveborn Domain, the demons’ true foothold in the world. Their grip on this territory is total: they have not only transformed the land but erected immense Sky Hives.
At the domain’s entrance, you find breach hives. Using the power of the Keepers of the Flame, you can burn them by passing through. Each destroyed hive brings an additional enemy wave during the purge. These encounters are very generous with Wombgifts, so run as many as possible. The ultimate objective remains the deeper Sky Hives, where Breach Lords Tul and Esh reign at the center. Defeating them is essential to cutting off the enemy foothold.
Once the quest is complete, additional Breach Domains appear randomly on the Atlas. Each one requires a breach stone, the destruction of the Sky Hives, and the defeat of the Breach Lords. Completing these domains is what grants access to Xesht, Breach’s existing pinnacle boss, accessible via the Dreamer in the monastery.
The Breach Atlas Tree
The Breach Atlas Tree offers a wide variety of options. One node makes breach hives appear outside Hiveborn Domains on the Atlas. Another grants additional active abilities when attacking a hive, such as making all Hiveborn in the next wave magic, increasing their difficulty but multiplying the loot.
On the reward control side, one node adds new Lineage Supports to the Marshal of Xesht, and another lets you target the Wombgifts you obtain.
Finally, a node directly affects the Genesis Tree: if Xesht drops its head and you bring it back to the tree, a « grasping orchid » grows on the side. The effect remains deliberately mysterious on GGG’s end, but they suggest that placing rings on it would have interesting consequences.
Breach recap
Breach gains a visible timer, a stabilization mechanic to enter the ultimate phase, Hive encounters and Hiveborn incursions on the Atlas, a massive crafting system via the Genesis Tree for jewelry/rings/belts, new bosses (Marshal of Xesht, Tul, Esh), and a deeply enriched Atlas Tree.
Ritual — Rite of the Nameless
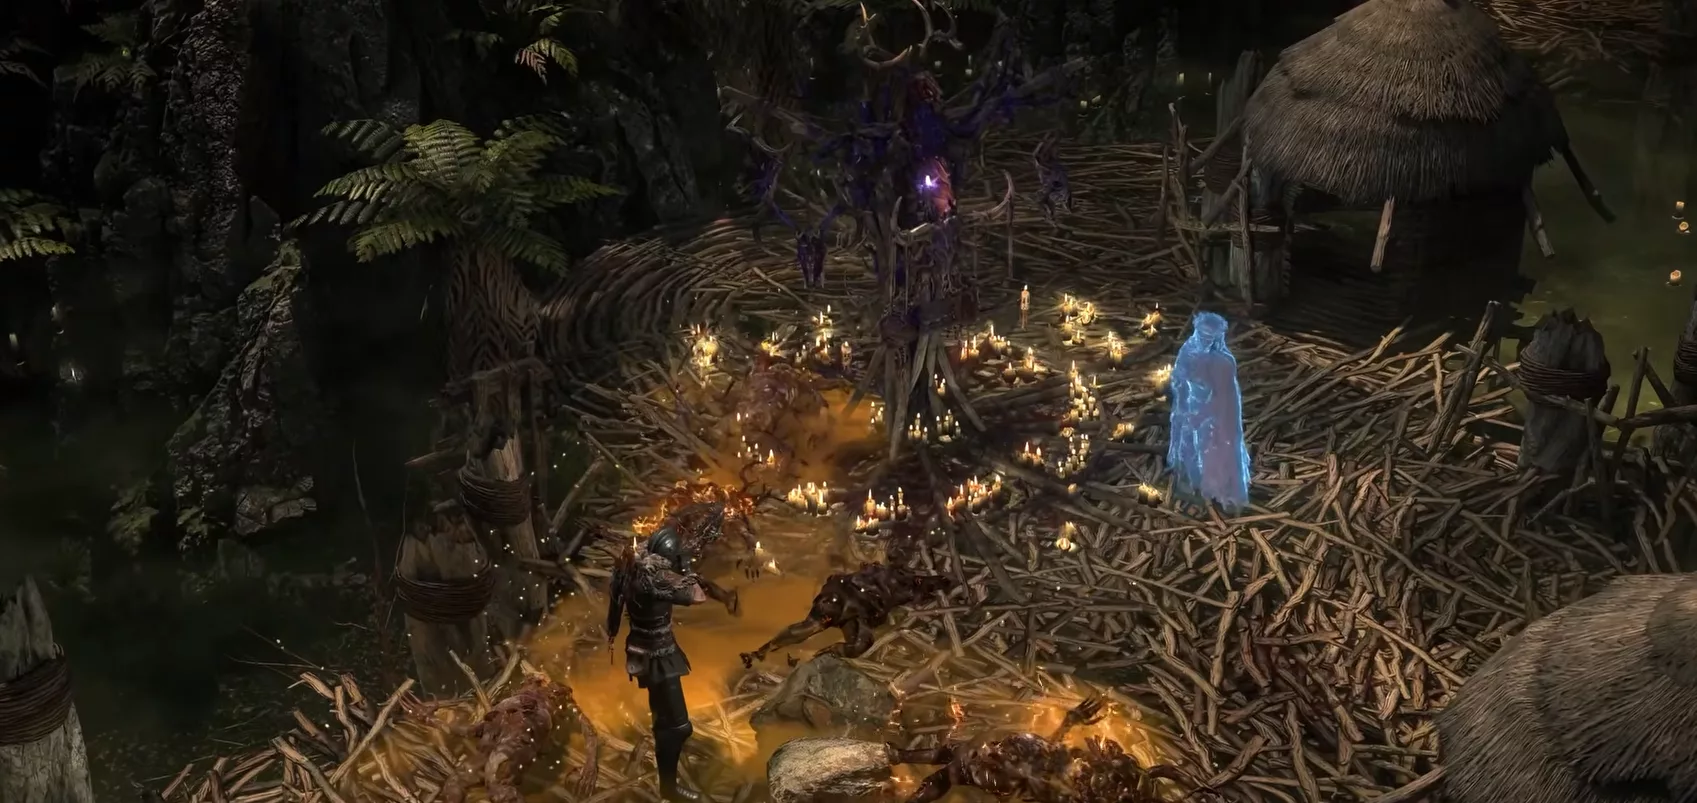
The Ritual storyline centers on Aoife, a lost spirit you encounter after completing your first endgame ritual. She struggles to communicate but guides you toward the Wildwood to the west. There, spirits can take physical form. Aoife has been bound to the Wildwood by the King in the Mists and asks you to free her. To do so, you must retrieve her body, currently in the possession of the King in the Mists. And to reach him, you will need an audience.
Inside the Wildwood, rituals still work on the same principle: trigger the altars to make the bound monsters resurge, kill them to accumulate Tribute. But one rule changes significantly: each ritual performed in the same zone now adds the monsters from the previous ritual to the current one. Encounters therefore become increasingly demanding as you stack rituals.
The rewards in the Ritual window have also changed. All displayed items are now either uniques or omens. The average value level of a Ritual session rises notably.
To obtain an Audience with the King in the Mists, you must sacrifice remaining Tribute (the amount you haven’t spent on items). This sacrifice fills a dedicated bar. Once the bar is full, you return to the Wildwood to locate the King via a Nameless Shrine, then pursue him into the depths, defeat him, and retrieve Aoife’s body.
This is where the real threat reveals itself. The Wildwood rests upon an ancient prison. The King in the Mists had obtained his power from a dark entity called the Bodach, and his use of that power has weakened the prison. To prevent the Bodach from entering the world, a champion must enter its prison and push it back. But only a Nameless being can survive within.
This is the principle of the Rite of the Nameless. The mechanic triggers in a nearby forest. It starts like an ordinary ritual, but the final ritual of the zone includes the map boss. Killing it yields an Effigy fragment onto which you will transfer your name. The ritual doesn’t end there: the Atlas opens and you must choose an adjacent map to continue.
Each adjacent map offers different rewards to entice you. More Tribute in one direction, uniques converted into currency in another, or sometimes a specific item offered as a reward (for example, choosing between five chaos orbs and a Mageblood). This choice is strategic because the encounters in the next map incorporate all monsters accumulated since the beginning of the Rite, including all previous bosses.
The Rite lasts five maps in total. At the end, you return to the Wildwood to perform the final ritual: transfer your name to the Effigy, don the Crown of the Nameless King, and enter the Bodach’s prison. The final fight concentrates all the threats accumulated across the five maps. It is a colossal challenge.
Ritual endgame
After completing the quest, you continue sacrificing Tribute to the King in the Mists to trigger additional audiences. Each additional Rite of the Nameless becomes harder and drops new exclusive uniques.
The Ritual Atlas Tree has been significantly enriched. Certain nodes modify the Rite directly: one extends it to six maps instead of five (fighting six bosses simultaneously becomes the norm). Another adds more reward mods to Rite maps, often two at a time. Nodes also allow you to integrate other mechanics, such as a chance for rituals to form in summoning circles, adding a random boss to the encounter. Finally, a node unlocks an entirely new type of ritual: Audience with the Queen.
Overall assessment of the reworked endgame
In total, Return of the Ancients brings five complete new endgame storylines. Each one has its own zone on the Atlas, its own crafting hub, dedicated NPCs, specific areas, a pinnacle boss, and an independent Atlas Tree. These five storylines form the backbone of the expanded endgame in this update. Each storyline’s progression follows the same model: a guided quest first, then a more difficult repeatable endgame for those who want to go all the way.
From the moment you enter endgame, the quests trigger immediately, and a side panel permanently displays your progress in each of them. No more searching for where you left off: the bar is visible, the objectives are clear, and exploration remains structured from start to finish.
🏆 PART 6 — Challenge League

Return of the Ancients officially introduces challenges to Path of Exile 2. This is the first time the Challenge League exists in PoE2, and its arrival with Return of the Ancients marks a turning point for the seasonal cycle. PoE1 players know the concept well: each league comes with a list of objectives to complete to prove your mastery of the seasonal content. For PoE2, this is a first. The system arrives with 0.5.0 and integrates directly into the league cycle.
The flagship reward is the Knight of Aldur Armor Set, a full cosmetic set unlocked progressively as you complete challenges. The complete armor is accessible after finishing 8 of them. Alongside it, a hideout statue is also available. Its distinctive trait: it remains visible to other players during trade encounters, making it a recognizable mark of progression within the community.
⚔️ PART 7 — New Ascendancies
Spirit Walker — the way of the animal spirits (Huntress)
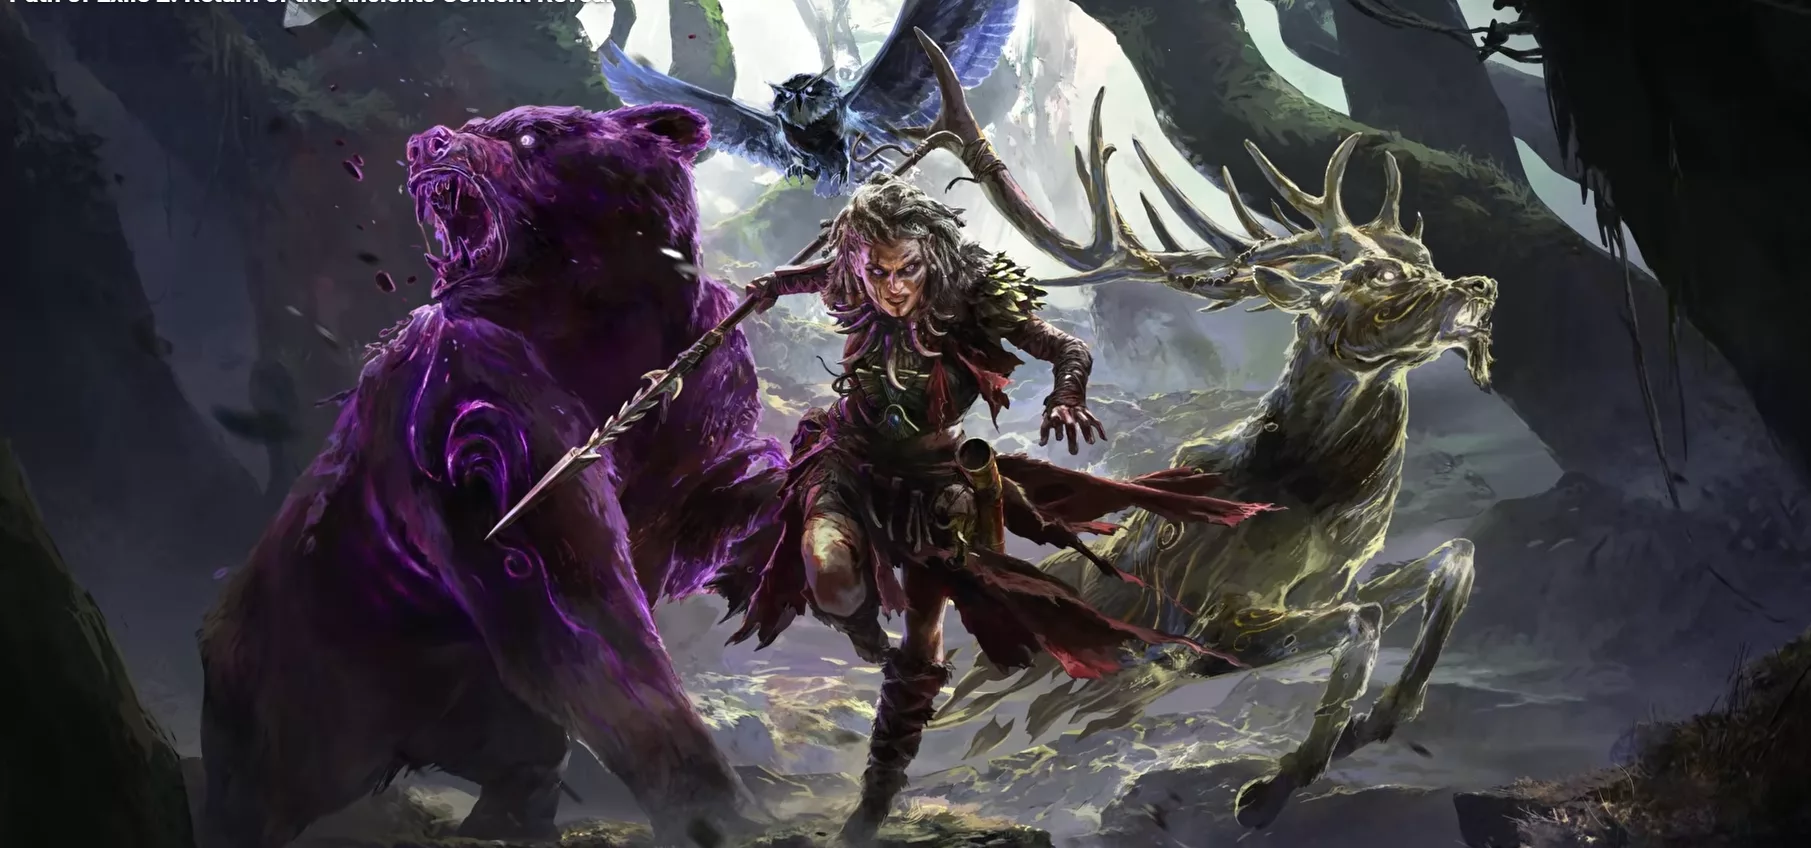
The Huntress receives her Ascendancy: the Spirit Walker. Its core principle rests on an Azmerian Affinity, meaning a deep communion with Azmerian Animal Spirits. The Spirit Walker can choose to infuse the power of multiple spirits simultaneously, granting a build flexibility uncommon among existing Ascendancies.
The lower portion of the tree offers three distinct paths, one per animal spirit. Each path corresponds to a type of wisp and leads to its own unique abilities.
- Stag, Primal path: summon a stampede with each attack. The stags charge aggressively toward enemies, ideal for an offensive playstyle.
- Owl, Vivid path: generate feathers that add extra projectiles and increase the projectile speed of your next skill.
- Bear, Wild path: summon a giant bear companion that strikes, leaps, roars to debuff enemies, and maintains a permanent melee presence.
If you choose to combine all three wisps rather than specializing in just one, a hidden node unlocks: Power of the Sacred Wisps. This node is free and strengthens all three animal spirits at once. The bear shares a portion of the damage you receive and grants you life regeneration. The stags become more aggressive and leap directly onto enemies. Skills boosted by the owl now leave a trail of soaring ground in their wake.
Beyond the wisps, the Spirit Walker has other powers. Idolatry is a node that generates large bonuses if you use inactive socketables in your equipment. In practice, the more idols you place without activating them, the larger the associated passive bonuses grow. For builds built around idols, it is a formidable multiplier.
The Spirit Walker’s most singular ability is Tame Beast Bosses. Having attuned herself to nature, the Spirit Walker can tame beast-type bosses, which then become permanent build companions. Among the candidates: Silverfist in the depths of the jungle, a three-headed Chimera in the Chimera Wetlands, or Rakkar, a massive frozen bird known as the frozen talon. The possibilities are numerous and each tamed boss radically changes the playstyle.
Martial Artist — mastery of the hollow techniques (Monk)
The Monk also receives his Ascendancy: the Martial Artist. After decades of training, he masters three of the seven hollow techniques available in Early Access. These techniques cover survival, zone control, and critical hit amplification.
Hollow Form Technique is the first. While channeling this technique, the Martial Artist generates illusions of himself that replicate a skill of your choice. For skills with low AoE, this is a direct solution: the illusions multiply zone coverage without modifying the skill itself.
If you find yourself too vulnerable while channeling, Way of the Mountain addresses this. When you immobilize enemies, you coat yourself in stone, absorbing significant amounts of damage. The stone can also harden your weapon, increasing the damage you deal at the same time.
Hollow Focused Technique materializes the Martial Artist’s spiritual energy into bells, which appear around him. Any attack can shatter these bells, including those generated by the Hollow Form Technique. This is a direct synergy between the two nodes.
Hollow Resonance Technique pushes the concept further. An additional bell manifests behind the Martial Artist. It rings with each critical hit you land and deals AoE damage to all nearby enemies at the moment of the strike. For crit-oriented builds, this is an automatic high-frequency trigger.
Mastery of internal energy flows has led the Martial Artist to engrave Runic Tattoos around his meridians. In practice, five additional rune slots open in your inventory: one helmet equivalent, two armor equivalents, one gloves equivalent, and one boots equivalent. You can place runes in them just like any piece of equipment.
Finally, Way of the Stone Fist transforms the Martial Artist’s gloves into a new base type, more powerful than standard variants. The modifiers applicable to this base are amplified, making it a piece of equipment in its own right, far beyond a simple passive slot.
💎 PART 8 — New Uniques
Return of the Ancients arrives with a volley of nine new Uniques. Each one carries an integrated skill, its own mechanic, and targets a well-defined build archetype. Here is a complete overview.
Twisted Empyrean
This two-handed mace made of pure Verisium merges raw strength with dark magic. Its main effect: all fire damage from your mace skills is converted to cold damage, visuals included. Your Volcanic Fissures transform into icy fissures, completely changing the look of the build.
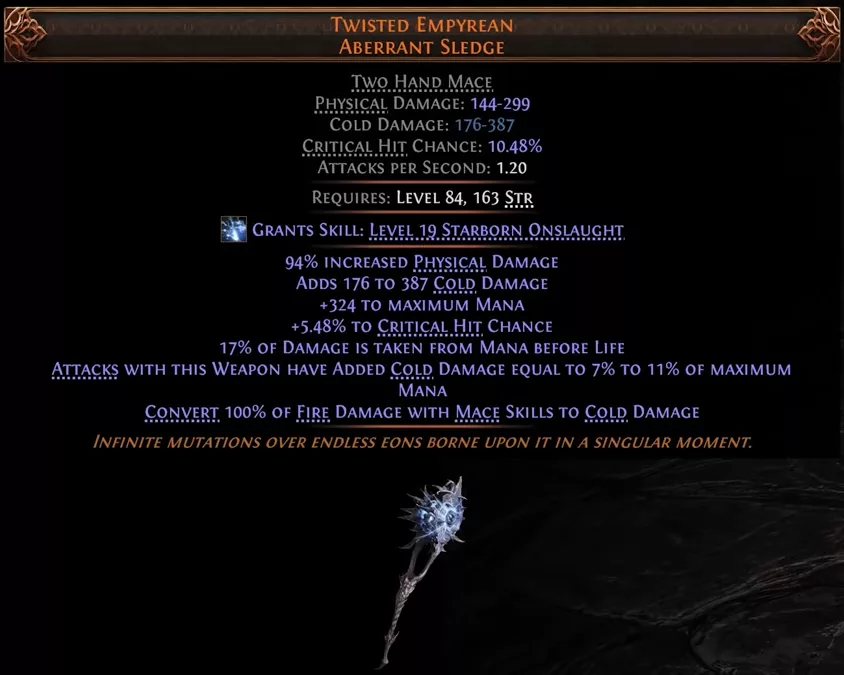
The mace also brings its own skill: Starborne Onslaught. By consuming glory, you leap backward while throwing your mace to the ground, creating Verisium fissures. In the wake of the impact, a storm of frozen metallic projectiles rains down from the stratosphere onto the impact zone. The visual result is spectacular.
Eventide Petal
This amulet plays on cold and crit mechanics. It grants runic ward and integrates a reservation skill: Midnight Zenith. On each critical hit, arctic petals form around you. Once a certain number have accumulated, they are consumed to generate a floral ice crystal near an enemy.
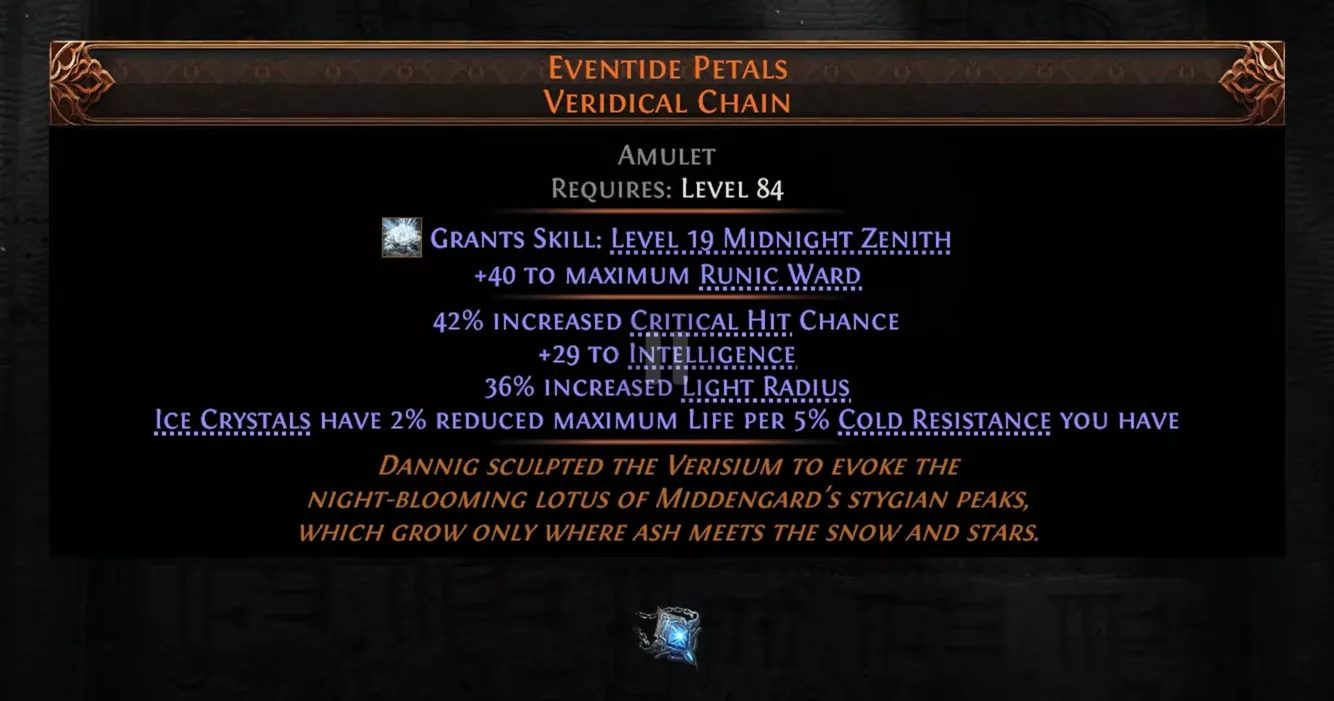
Destroying this crystal triggers a cold damage explosion on everything within range. The cycle of crit, petal accumulation, and crystal detonation creates a rhythmic loop that rewards builds oriented toward high critical strike chance.
The Raven’s Flock
This staff is built for minion builds. It increases Spirit reservation efficiency and minion damage. Most importantly, it allows your minions to inflict « grueling madness » with each hit: enemies are slowed, and all other slow effects on them are amplified. An excellent foundation for crowd control.
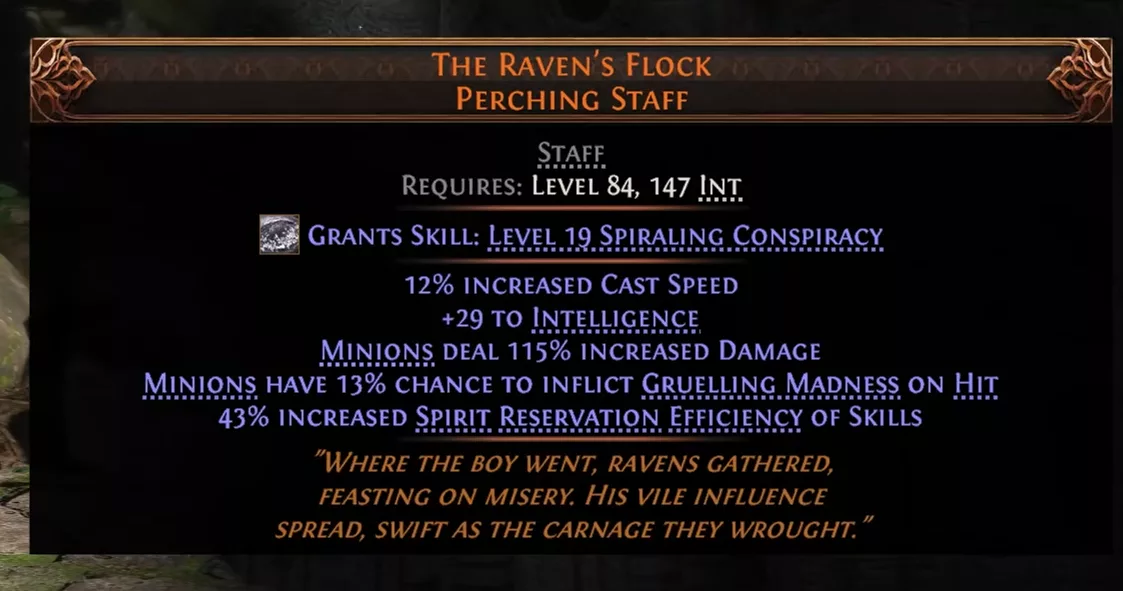
The highlight remains the Spiraling Conspiracy skill. A flock of ravens permanently circles around you, continuously dealing damage to any nearby enemy. The swarm grows with kills or simply by staying close to unique enemies. PoE1 players will recognize a Righteous Fire in raven form. And since these ravens are fully-fledged minions, they benefit from all sources of minion damage. Their command skill, Mad Flight, sends them to create a deadly damage corridor between two illusory mirrors, destroying everything in between.
Horror’s Flight
These gloves instill pure fear into your adversaries. As soon as you equip them, enemies fear you. Each kill generates stacks of Fear Incarnate, a resource that increases your cull threshold — that is, the percentage of remaining life below which you can finish an enemy in a single hit.
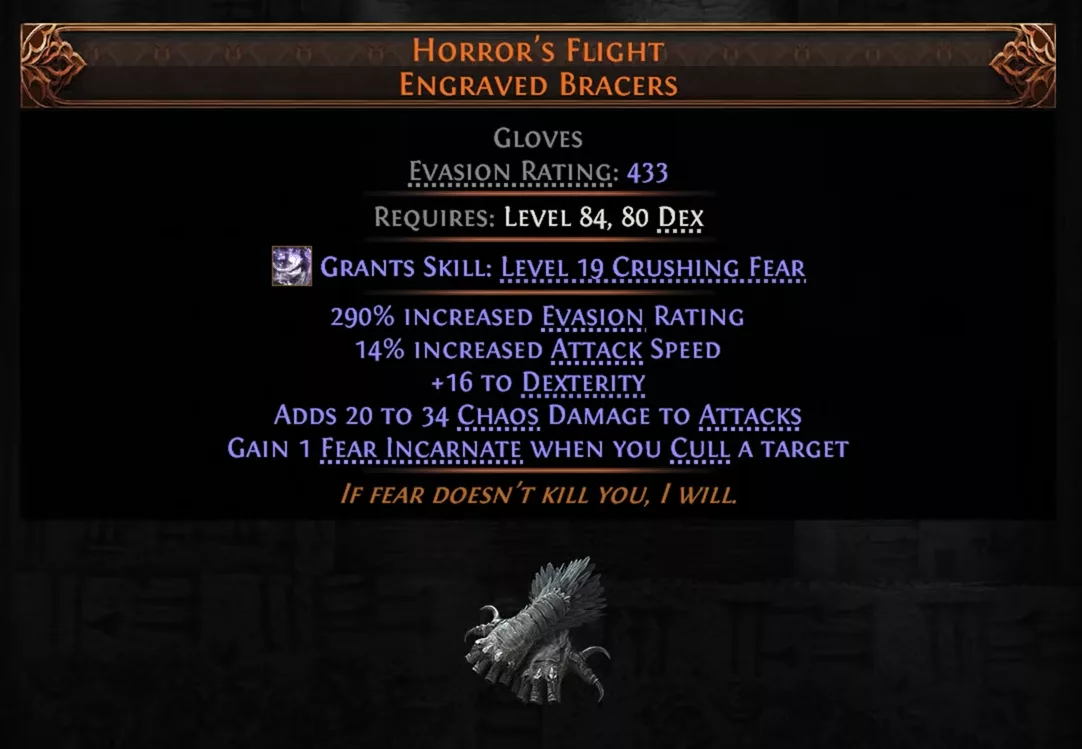
To facilitate accumulation, the gloves offer the Crushing Fear skill. Close to the Monk’s Killing Palm, it deals chaos damage whose power and AoE scale with the strength of the targeted enemy. With enough Fear Incarnate, your cull threshold rises to the point of finishing some monsters at full health. Ideal for builds focused on chaos damage and dense pack control.
Sylvan’s Effigy
This scepter breaks the usual companion limit. Normally, you can only have one companion of each type. Sylvan’s Effigy removes this restriction and lets you stack multiple companions of the same type. This opens up build combinations that were previously impossible.
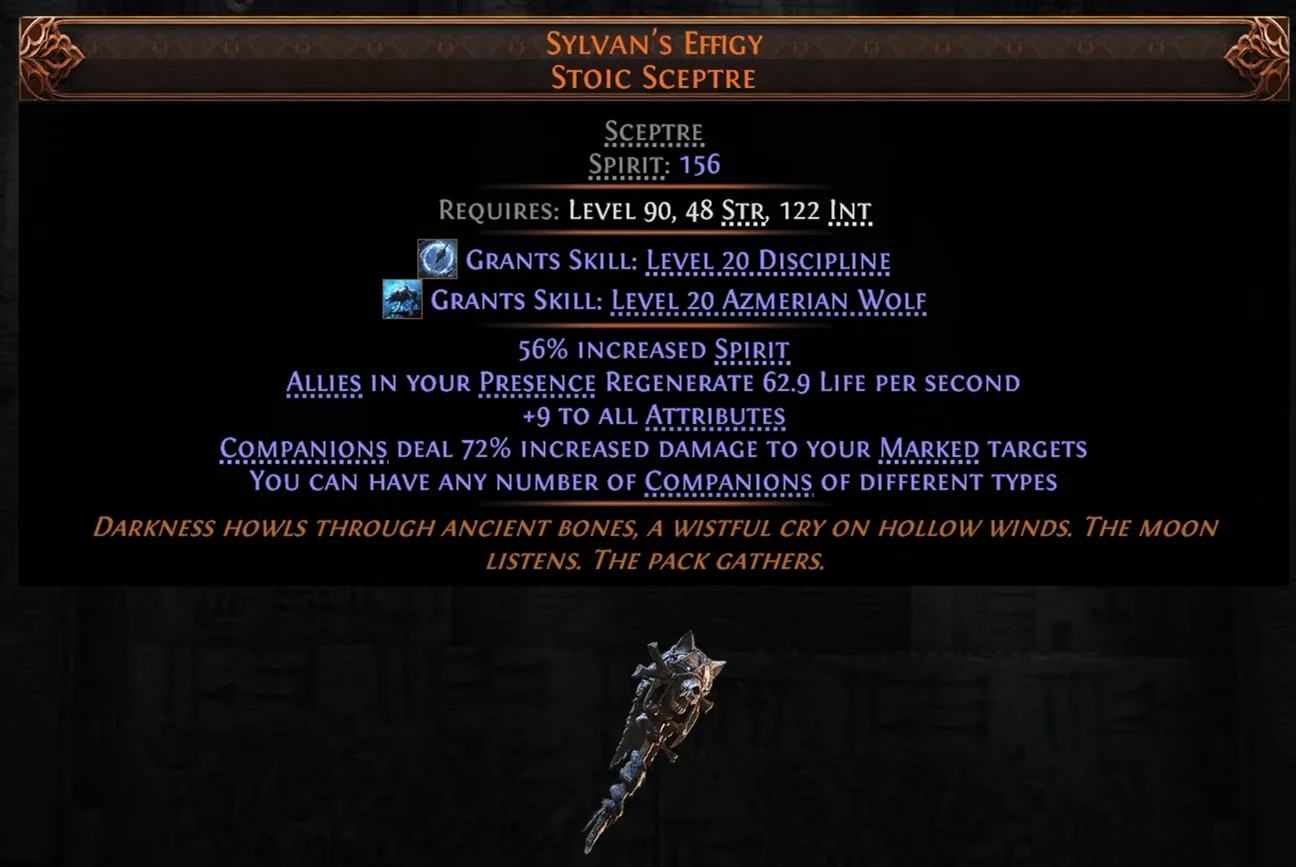
The scepter also introduces an exclusive companion: the Azmerian wolf. This persistent minion bites enemies to maim them, performs leaps to cause bleeding, and howls to reinforce nearby allies. Its command skill, Eternal Hunt, makes it let out a howl calling spectral wolves that surge in to surround and strike all enemies around you.
Liminal Coil
This wand pushes the curse mechanic in an unexpected direction. You can apply as many curses as you want on enemies, with no limit whatsoever. But here is the catch: these curses have no direct effect on the targets. So why bother?
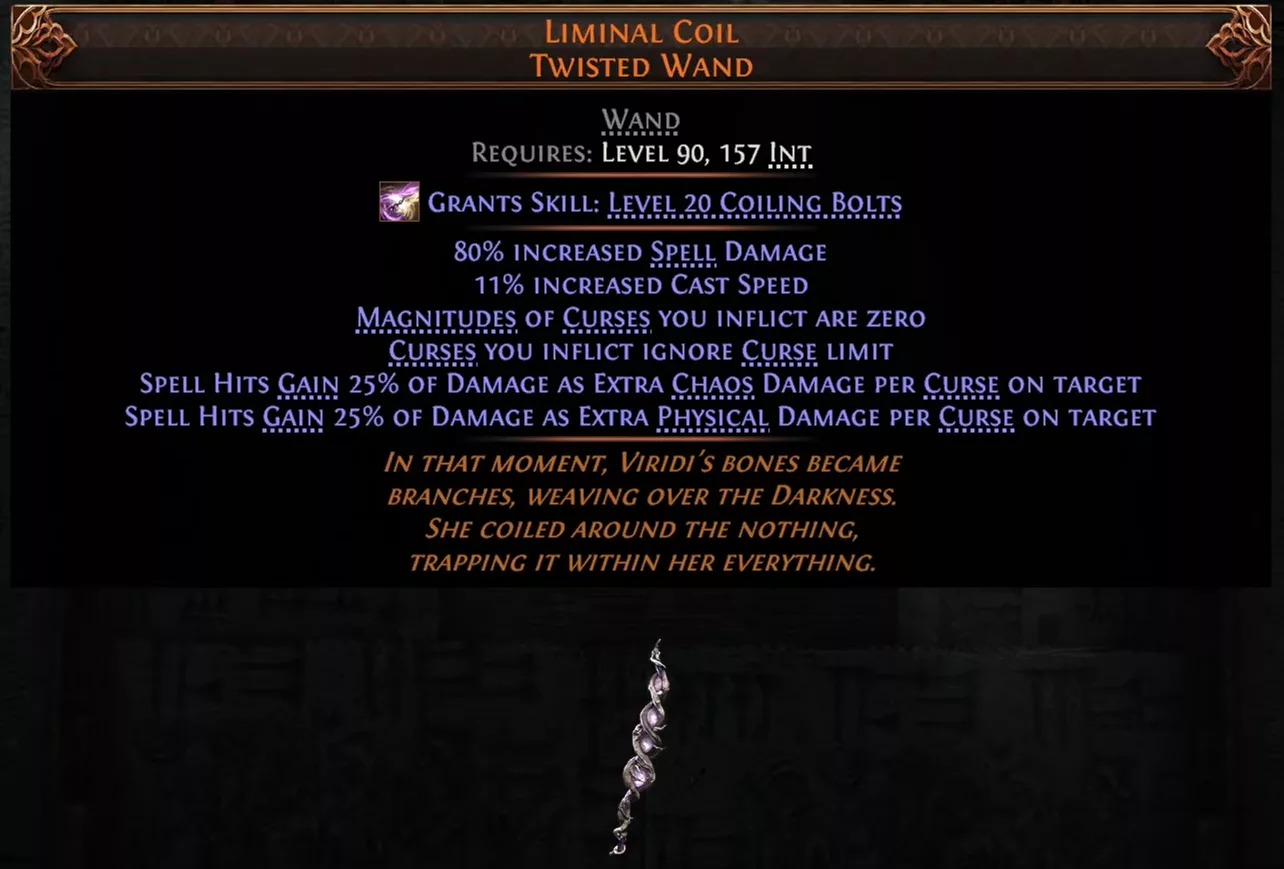
Two reasons. First, each curse on an enemy increases your physical and chaos damage. The more you stack, the more your power rises. Second, the wand grants the Coiling Bolts skill: physical and chaos projectiles that split and automatically chain onto every cursed enemy in range. The more curses you have in play, the more the chaos spreads. The visual result is explosive.
Periphery
This unique bow concentrates the full power of the Azmerion spirits. It deals damage of all elements simultaneously, and each of those elements can trigger all of the corresponding ailments. A single bow to cover the entire elemental spectrum.
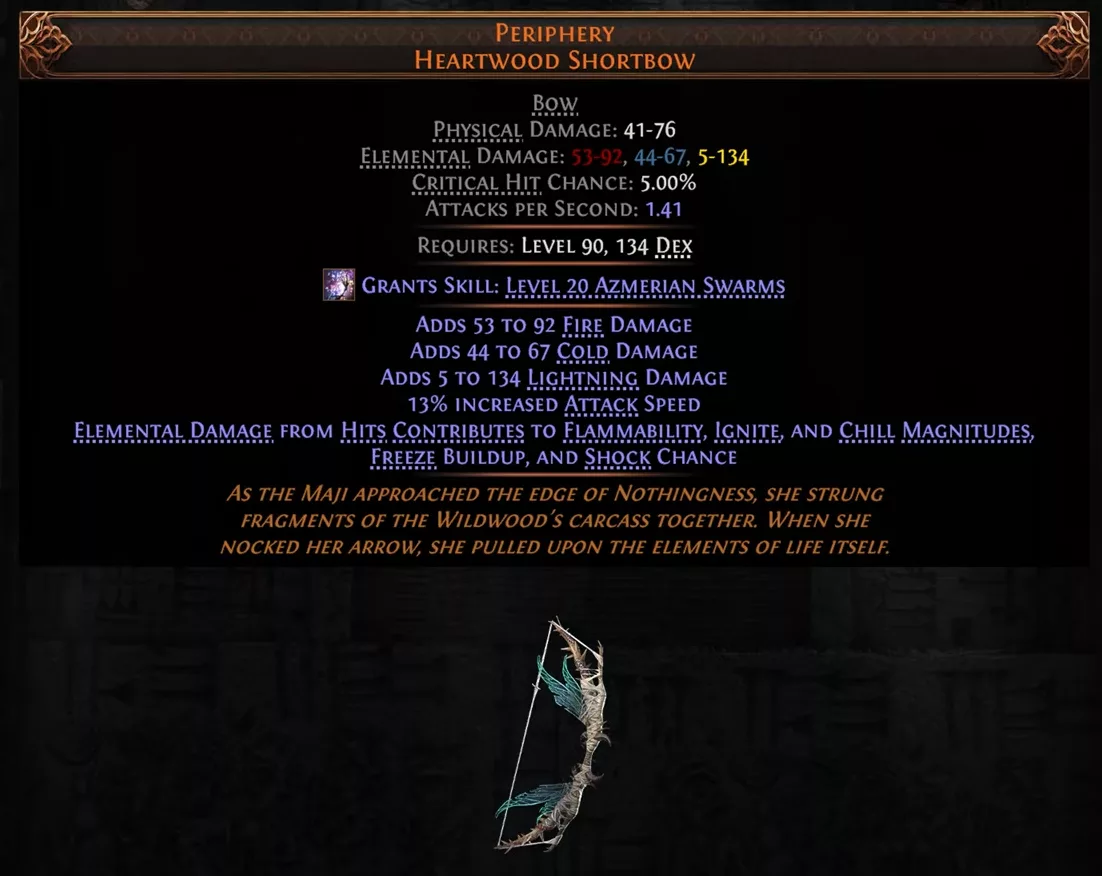
Its major asset remains the Azmerion Swarm skill. On each kill, swarms of Azmerion wisps appear and chase nearby enemies. In addition to the direct damage they deal, they apply a debuff that amplifies your elemental damage. The screen quickly transforms into a light show as the swarms descend on packs, melting enemies one after another.
The Ordained
This spear bets on physical and lightning with a high base critical strike chance. Its core mechanic: you leech Life not only from physical damage, but also from lightning damage. A rare form of sustain that solidifies hybrid physical/lightning builds.
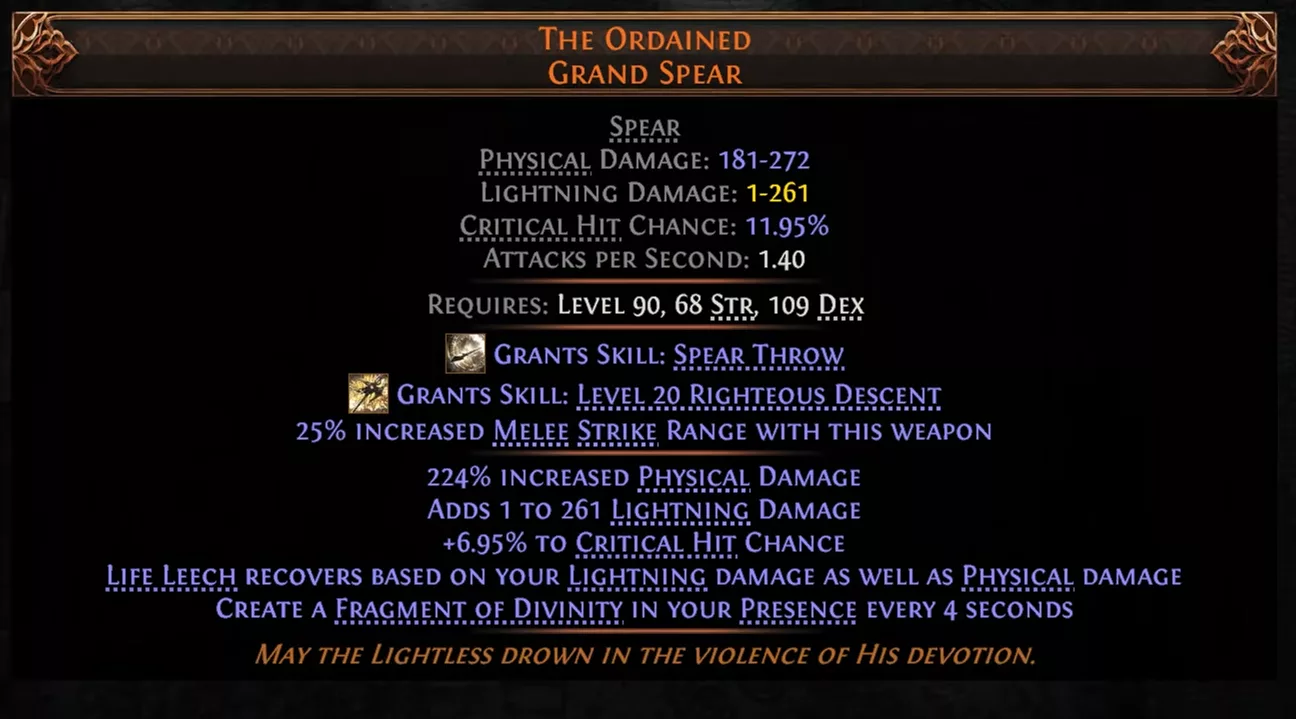
The spear periodically generates divinity fragments nearby. Their usefulness is revealed with the Righteous Descent skill: a spectacular divine leap, sustained by angelic wings. If a fragment is present when you use the skill, the impact becomes boosted, with significantly higher damage, massive AoE, and crucially no cooldown. Against a boss, you let several fragments form, then chain Righteous Descent activations, each fueled by a fragment to devastate the target.
Voices
Voices is a unique jewel that belongs to a category of its own. Its power is simple but drastic: it adds extra jewel sockets to your passive tree. Three variants exist depending on rarity, adding 2, 3, or 4 additional slots respectively.
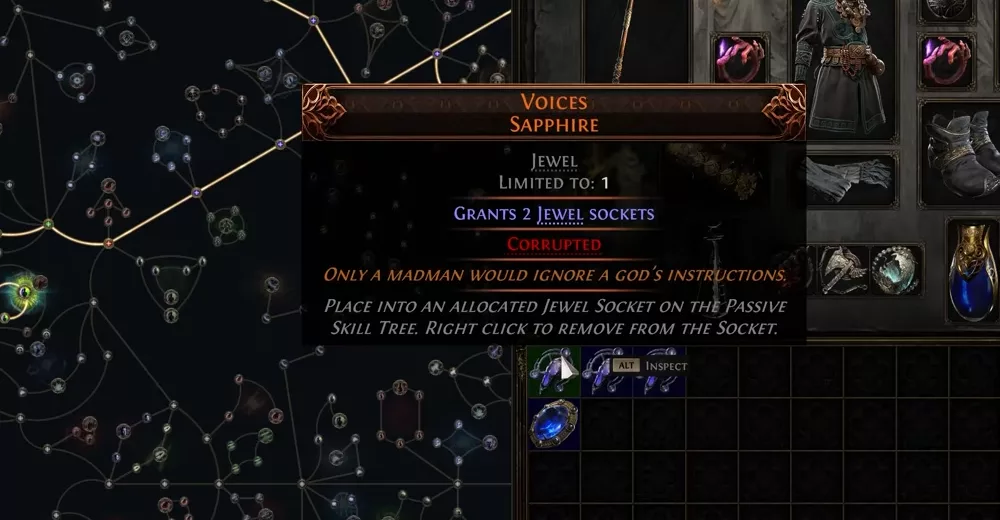
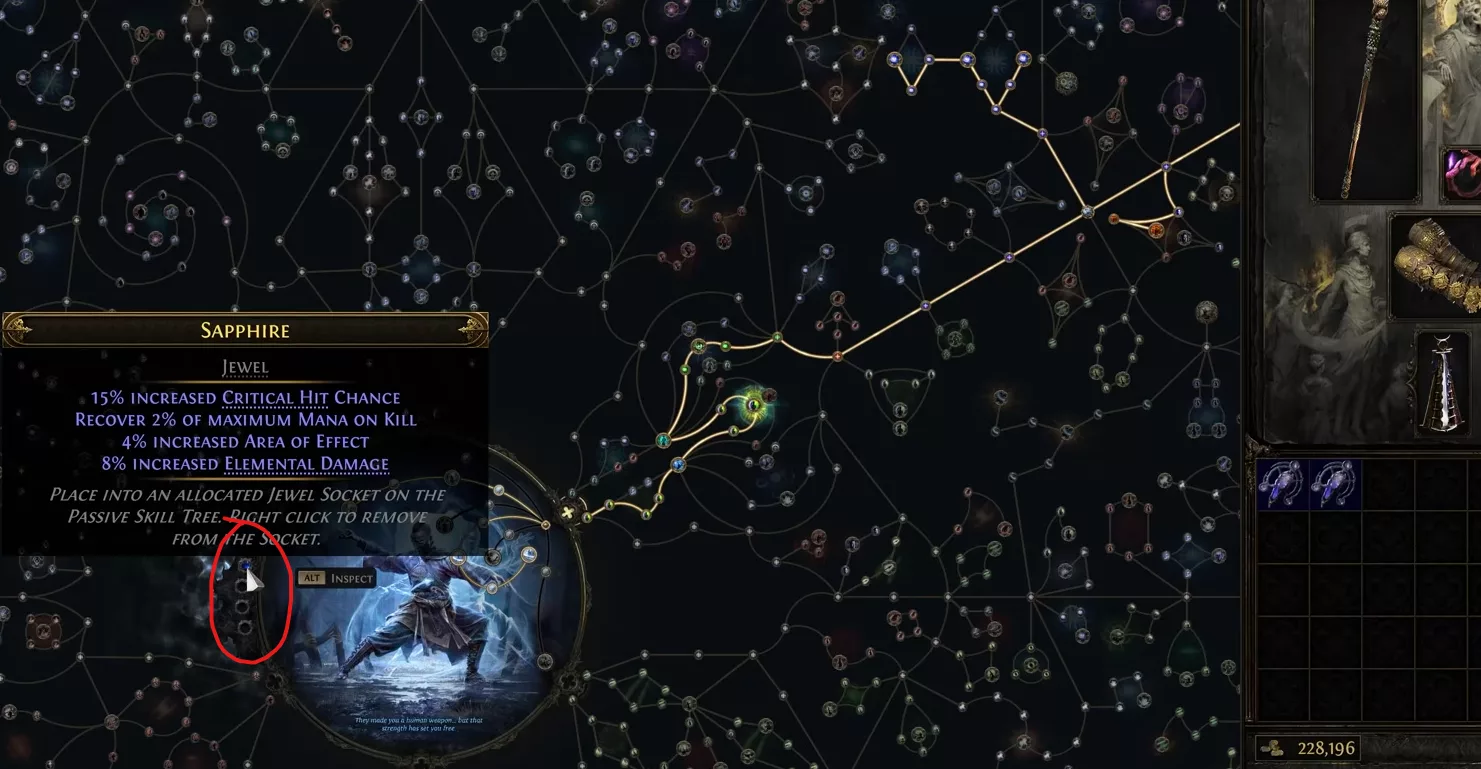
The jewel slots into a dedicated socket placed directly next to the character portrait at the center of the passive tree. Each additional slot created can hold any other jewel. For jewel-heavy builds, Voices opens up configurations of considerable power.
🎮 PART 9 — Quality of Life
Campaign — signposts and guidance
GGG worked on a well-known pain point for experienced players: the campaign becomes tedious to replay at the start of each new league. The solution follows the Path of Exile 1 model: adding visual cues in zones to guide those who know what to look for. Here are a few examples, one per act.
In the Hunting Grounds in Act 1, a large open area with multiple entrances and encounters, the changes are concrete. After completing the ritual encounter, a trail of locusts appears and leads directly to the entrance of Freythorn. No more combing the entire map. Carcasses of animals killed and pecked at by ravens are also scattered throughout the zone: following the blood trail leading away from them brings you directly to the boss. A signpost placed along the road also indicates the direction of Auggum Village. Three distinct cues for a single zone.
In Act 2, in the Mastodon Badlands, finding the Lightless Caverns to locate the Abyssal is now faster. Cracks appear on the ground in the zone: simply follow them to reach their lair and unlock access to the Well of Souls. No random cartography, a clear path.
In Act 3, jungle zones now have explorer camps that serve as vendor locations. These explorers now do more: speaking to them tells you the direction of the next zone to reach and reveals that zone on the minimap. You know exactly where to go before you even set foot there. GGG notes that these examples are just a few cases among many others, and that more of these adjustments will be made progressively.
Atlas Quality of Life
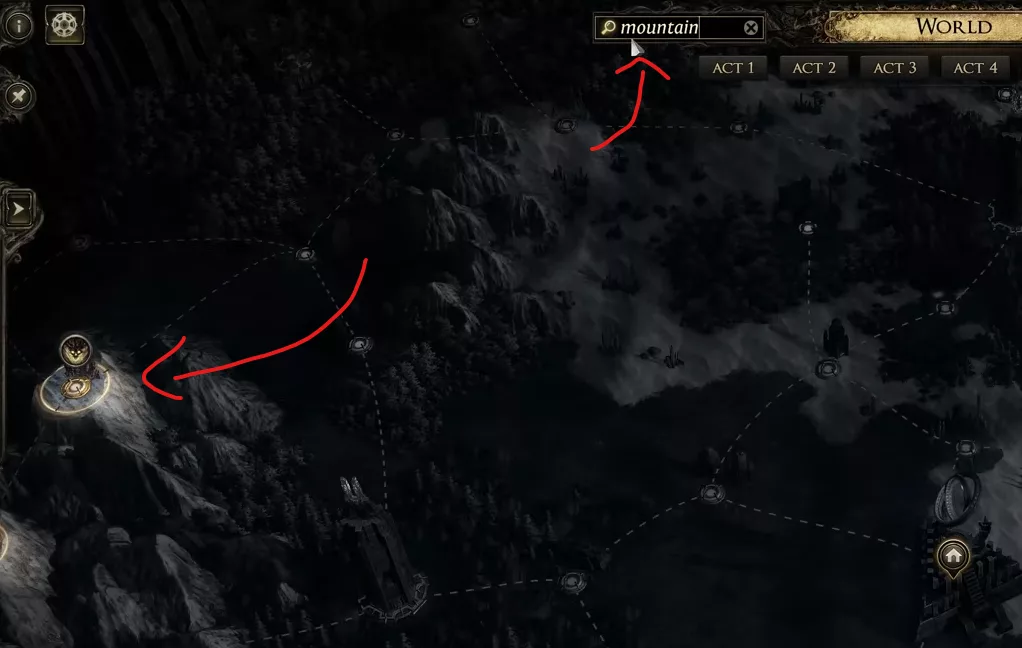
On the endgame side, a direct improvement has been made to Atlas navigation. A search box has been added and its results update in real time as you type. Looking for a specific Map? It appears immediately in the list. If multiple Maps match the search, pressing the Enter key cycles through them one by one. Simple and effective for those who have dozens of Maps available.
The integrated Build Guide System
Building a build in Path of Exile 2 takes time, and many players prefer to follow a community guide rather than designing everything themselves. GGG wanted to improve this experience directly in the game client with the introduction of a native build guide system.
It works through a new file format: the « build » format. Community guide creators can now produce a file in this format. Once downloaded, the build appears in the in-game client. By selecting it, the player sees everything they need to assemble that build.
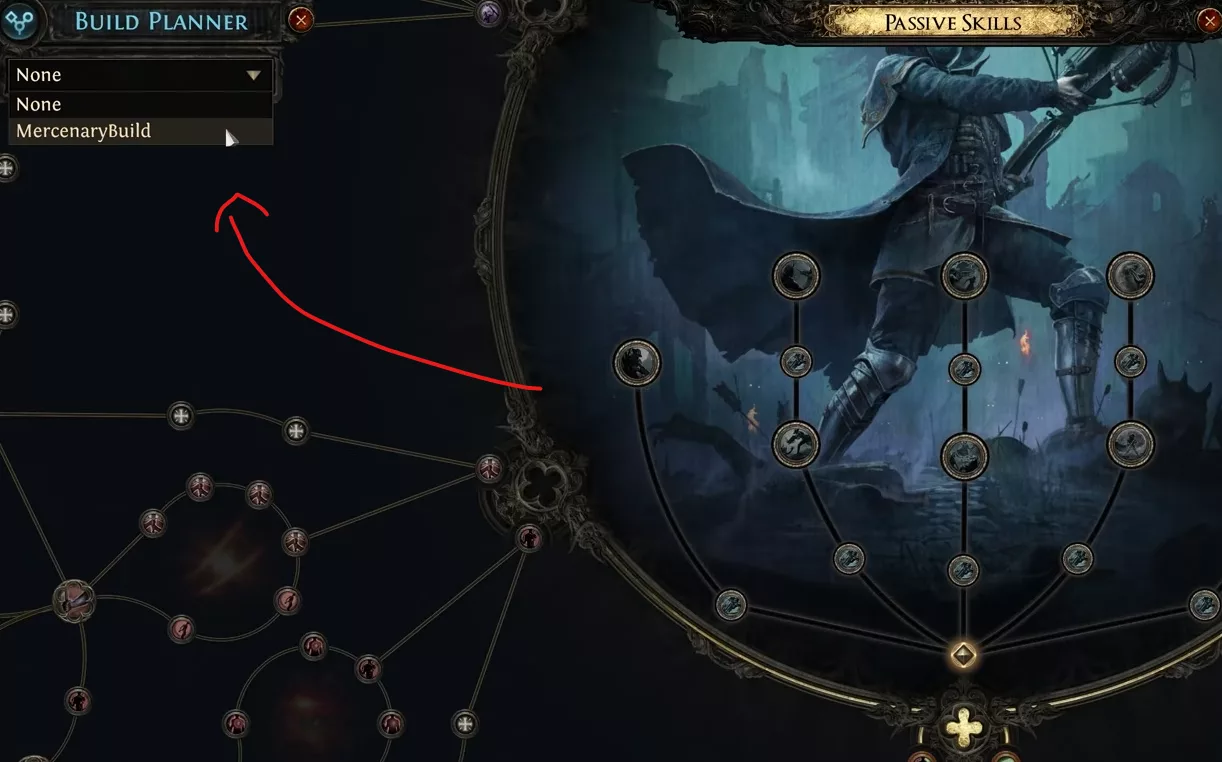
The in-game display is complete. The passives to allocate on the tree, the ascendancy points to take, the skill gems to equip, the support gem recommendations: everything is visible on a single screen. For items, the build creator can specify which unique to use in each slot, or simply leave a text note to clarify what type of item is needed if no specific unique is required.
Creators can also add contextual notes in any section of the guide. A note can explain a trade-off, justify a gem choice, or provide information on how to use a particular element. Level ranges can also be assigned to each element of the guide: the recommendations then evolve based on the character’s level, which is particularly useful for builds that require a respec at a certain stage.
All of this relies on a standardized format. GGG anticipates that existing community tools, such as Path of Building, will adopt this format to export builds directly into the client. The ecosystem already built around build creation will be able to connect to it without friction.
The integrated Trade Market
The Trade Market is now directly accessible from within the game, and GGG is taking the opportunity to add a quick price check shortcut. Ctrl+Alt+Click on an item launches an automatic search on the Trade Market and displays current prices for that item. No more opening an external tab or manually copying data.
For rare items whose value depends on the combination of mods present, it is possible to toggle each mod individually in the search interface. Disabling a mod lets you see its precise impact on the item’s price: this helps identify which affixes truly have value and to what extent each mod contributes to the item’s final worth.
💰 PART 10 — Supporter Packs
GGG presents two new supporter pack series to accompany Return of the Ancients: the Blood Reaver Series and the Divinity Pack Series. Each tier includes the face value in store points as well as several exclusive microtransactions. As always, all of this content is 100% cosmetic and has no impact on character power or progression.
The Blood Reaver Series
The Blood Reaver series groups six exclusive microtransactions around a gothic and gory aesthetic.
- Exsanguinator weapon effect: this weapon effect drains blood from defeated enemies and channels it directly into the character’s weapons. The visual result is particularly striking on ranged attacks.
- Bloodreaver Charges: endurance, frenzy, and power charges transform into blood globules orbiting around the character. The more blood the player absorbs near enemies, the larger these orbs grow. Two variants exist: pure blood (no type distinction) or orbs that retain a visual marker indicating their nature.
- Elite Blood Reaver Armor: armor featuring crimson leathers and golden accents, designed to stand out visually. It comes with a colossal bat-wing dorsal attachment.
- Gargoyle pet: the series mascot. This creature takes the form of a stone statue when the character is stationary, then animates and springs into action as soon as the player starts moving again.
- Blood Reaver Manor Hideout (Eternal pack): a two-story property called Manor Hideout. It features an organ, a large banquet table, and cages for « visitors. » The partitions are modular to create as many rooms as desired.
- Henchmen vendor: this servant, eternally bound to the Blood Reaver order, takes charge of managing the shop while his master spreads blood across the battlefield.
The Divinity Pack Series
The Divinity series adopts the opposite artistic direction: divine light, celestial lightning, and sacred grandeur. It also contains six exclusive microtransactions.
- Divinity Dodge Roll: when the character performs a dash or sprint, true divine lightning wings unfurl from their back and leave a trail of radiant light behind them.
- Storm of Divinity Portal: summons a divine portal offering a safe passage to retreat during the most critical situations.
- Knight of Divinity Armor Set: a set reserved for those deemed worthy of the divine cause. The ensemble is presented as a venerated armor with majestic finishings.
- Divine Surge character effect: envelops the character in a whirlwind of divine energy. Each skill activation triggers an explosion of this energy around the character, pouring raw divinity into the surrounding area.
- Arbiter of Divinity Wings: the centerpiece of the series. This ancient Precursor machine, recovered from an ultra-secure vault, has been repurposed as a map device. It powers maps through the pure and permanent divinity housed within it. The pillars surrounding it visually indicate the number of portals still available for the current map. It also tracks the progression of the new Origins of Divinity storyline added with this expansion.
- Available on PoE1: all microtransactions from both series will also be usable in Path of Exile 1 from launch.
Mystery Box and Stash Tabs
Two additional additions are planned to accompany the patch launch.
- Return of the Ancients Mystery Box (available launch weekend): this mystery box contains armor sets, map devices dedicated to endgame, a new tracking scroll that records the amount of currency earned through the currency exchange or personal shop, finishers, and affinity stashes. Dense content for players who want to expand their collection at launch.
- Fragment Stash Tab: this is the big storage addition. This tab, already present in PoE1, is finally coming to PoE2. It features several dedicated sub-tabs: boss key fragments, precursor tablets (six slots), gen barriers, and ultimatums (six slots as well). A long-awaited addition for players who have been juggling many generic tabs to manage these resources.
📅 PART 11 — Roadmap & Conclusion
Release date for 0.5.0
Jonathan Rogers concludes the presentation by going over everything Return of the Ancients brings: six new endgame storylines, brand-new pinnacle bosses, new crafting systems, hundreds of items, several Ascendancy classes, and much more. His conclusion is direct: this is the biggest update ever released for Path of Exile 1 or 2.
Due to the volume of endgame content, GGG has planned a longer testing period than usual between the announcement and the release. Patch 0.5.0 will be available on May 29. The patch notes will be published the preceding Friday, on May 21.
The road to 1.0
With Return of the Ancients, GGG considers it has reached the content threshold needed for an ARPG to legitimately claim the title of successor to Path of Exile 1. The feedback received during Early Access played a central role in the improvements made across updates. Patch 0.5.0 is therefore announced as the last major-scale league in Early Access. The next big update will be directly version 1.0.
Normally, the following update would have been expected in August. But version 1.0 requires more preparation time than usual leagues, and GGG wants the scale to be there. Version 1.0 will launch this year, after ExileCon.
Between 0.5.0 and 1.0, the priority will not be to add more content, but to polish what already exists. The focus will shift to global game polish, balance, and incorporating feedback on the new endgame. To maintain regular activity, GGG plans to run a few event leagues alongside each intermediate update. These events will take the form of remixes of mechanics or features already present in the game.
ExileCon 2026
ExileCon will be held on the weekend of November 7 in New Zealand. The event brings the community together and serves as a showcase for GGG’s plans for Path of Exile 1 and 2. This edition will be particularly anticipated: it is there that GGG plans to reveal content the team has been working on for some time, including Acts 5 and 6.
Tickets for the in-person event are sold out. However, all announcements and presentations will be streamed online so the entire community can follow the reveals.
The presentation ends on that note before making way for the Q&A session with Jonathan Rogers and Mark Roberts. See you on May 29 for the release of Return of the Ancients.
📖 Retrouvez tous les builds et guides Path of Exile 2 : Voir tous les builds PoE2 →


0 Commentaires
Aucun commentaire pour le moment. Soyez le premier à commenter !