
Sunwell Plateau
Ascension raid guide
Written By Draz & Sarizia
Strategies by TITO
Google doc version: https://docs.google.com/document/d/1gzhF9GLIjqYM3kHtcwgGB63fUgNcJOWWxGjHpBp0MrY/edit?tab=t.0
Important information
Default raid comp
- 2 tanks
- 1 healer per 5 raiders approx
- 10 man raid group = 2 tanks, 2 healers, 6 dps
- 25 man raid group = 2 tanks, 5 healers, 18 dps
- Melee dps should be less than half of the total dps players
- Range/Caster dps should be at least half of total dps players
- Most of your dps should be range/casters. Most fights in Sunwell Plateau have large advantages to this. Melee can be acceptable, but be aware that they will have a disadvantage in many fights.
Kill Videos
Kalecgos – https://youtu.be/PrNpNqRFAGU?si=PVuwkGFV1IbZlEeO
Brutallus – https://youtu.be/i7Vbx3DXBFY?si=a7SmeKZrBJoINYYw
Felmyst – https://youtu.be/yS8MgUu9MIA?si=zoPVSlQeZSWOALsE
Arynyes – https://youtu.be/Dg96i7_-Iu4?si=11Dnz12MY_Bynr8x
Twin Eredar – https://youtu.be/BwCHPsdsnGI?si=2oUohtHs2zzx_O1X
M’uru – https://youtu.be/hOQnSJgxaN8?si=nFd1WLeG3wFHmpM_
Kil’jaeden:
Caster POV – https://www.youtube.com/watch?v=c7tDx_8QSzo
Healer POV – https://www.youtube.com/watch?v=jS4ssJ-FT_s
Raid plan links
These are where we got the images below. You can use these links and make a copy of them so that you can edit and update things as you need for your raid group. Some have multiple pages, make sure to check them all (top left of the window)
Kalecgos – https://raidplan.io/plan/q3J-UwUvqgd-4ba_
Brutallus – https://raidplan.io/plan/IyAv3ffiNGc1xjHT
Felmyst – https://raidplan.io/plan/RufLsL8SOJHumXrX
Arynyes – https://raidplan.io/plan/X038dC8eXGdOO25w
Twin Eredar – https://raidplan.io/plan/xvDOyGGNu_MNV1md
Muru – https://raidplan.io/plan/OUggNzKkJuy85CKf
Kil’Jaeden – https://raidplan.io/plan/0ZgeN1lCbjzzt7JM
Weakaura pack
Full weakaura pack that assists with most major mechanics. Adjust this to your needs by disabling weakauras that are not helpful to you. Many are either disabled or only loaded under certain conditions. This may contribute to client side lag.
https://wago.io/ItUTOzzoh
Kalecgos
Video link: https://youtu.be/PrNpNqRFAGU?si=PVuwkGFV1IbZlEeO
Raid comp: Default
Tanks x2 (Parry or Block)
Healers x2 (ST with group heals. Low Tide and Mending tide are highly recommended)
DPS:
Melee dps x2-4
Caster dps x2-4
Hunters are not preferred because they can’t use Kick
Lust:
After the first group enters their first portal. It should only be used by the outside realm group.
Mechanics:
Kalecgos:
- Spectral Blast – Targets the FURTHEST player away from Kalecgos and does AOE damage to all players near them. Sends all players hit into Spectral Realm and leaves a portal.
- Arcane Buffet – Inflicts arcane damage to all enemies and applies debuff that increases all arcane damage taken by 100%
- Frost Breath – Dispellable Deals damage in a frontal cone & applies stacking debuff that increases frost damage taken by 5% each.
Spectral Realm:
- Portal – See Spectral Blast
- Spectral Reflection – You have a copy of yourself in the other realm. This copy moves to match your movements, always staying on top of you. If your copy takes damage, it is copied to you.
Sathrovar:
- Mind Wipe – KICKABLE Inflicts shadow damage to all players in the spectral realm and applies debuff that increases all shadow damage taken by 100%.
- Corruptor’s Touch – Deals shadow damage to Sathrovar’s target and leaves a stacking DOT dealing shadow damage.
- Curse of Boundless Agony – DECURSEABLE Applied to 1 player and deals ramping shadow damage. If removed by any means, it deals a large burst of damage and spreads to other players.
Ascended:
- Mind Break – Deals damage in a section of the boss arena. The area is only shown to those in the spectral realm, but deals damage to both realms.
Strategy:
- Split the group in 2 even groups. Total DPS should be approx the same across them. Establish a kick rotation for each group. 2 kicks + 1 backup.
- Half of the group goes into the Spectral Realm on pull. Kick Mind Wipe.
- 1 person in Spectral Realm needs to call out where the Mind Break is targeted if it’s near where the group is standing. Everyone but tanks dodges this.
- The people who take the Spectral Blast need to use Cloak of Shadows to avoid getting 1 shot.
- Healers need to cleanse the tank from Frost Breath on the outside realm to prevent them from missing the portal and/or dying.
- Swap in/out of the Spectral Realm when the next portal spawns. 1 dps stay behind during the transition to ensure no kicks are missed.
- Curse of Boundless Agony should be dispelled when it starts doing about 2.5k damage. Tanks should also dispel.
Recommended Abilities:
- Cloak of Shadows, Judgement of Light (1 per group) to heal Kalecgos in the Spectral Realm
Brutallus
Video link: https://youtu.be/i7Vbx3DXBFY?si=a7SmeKZrBJoINYYw
Raid comp: Under healing to pump dps
Tank x2 – Parry for easy mode, Block is viable.
Solo heal – Low Tide or Tree of Wrath
Full single target dps builds. Self heal is great (Harbinger)
Lust: Sub 20% for execute. Line up with 2min CDs
Mechanics:
- Meteor Slash – Inflicts large damage to all targets in front of Brutallus. Applies debuff increasing all fire damage taken by 100% per stack
- Excitement – Deal damage to Brutallus to drop his excitement buff. Damage thresholds are 10%, 10%, 13%, 15%, 15%
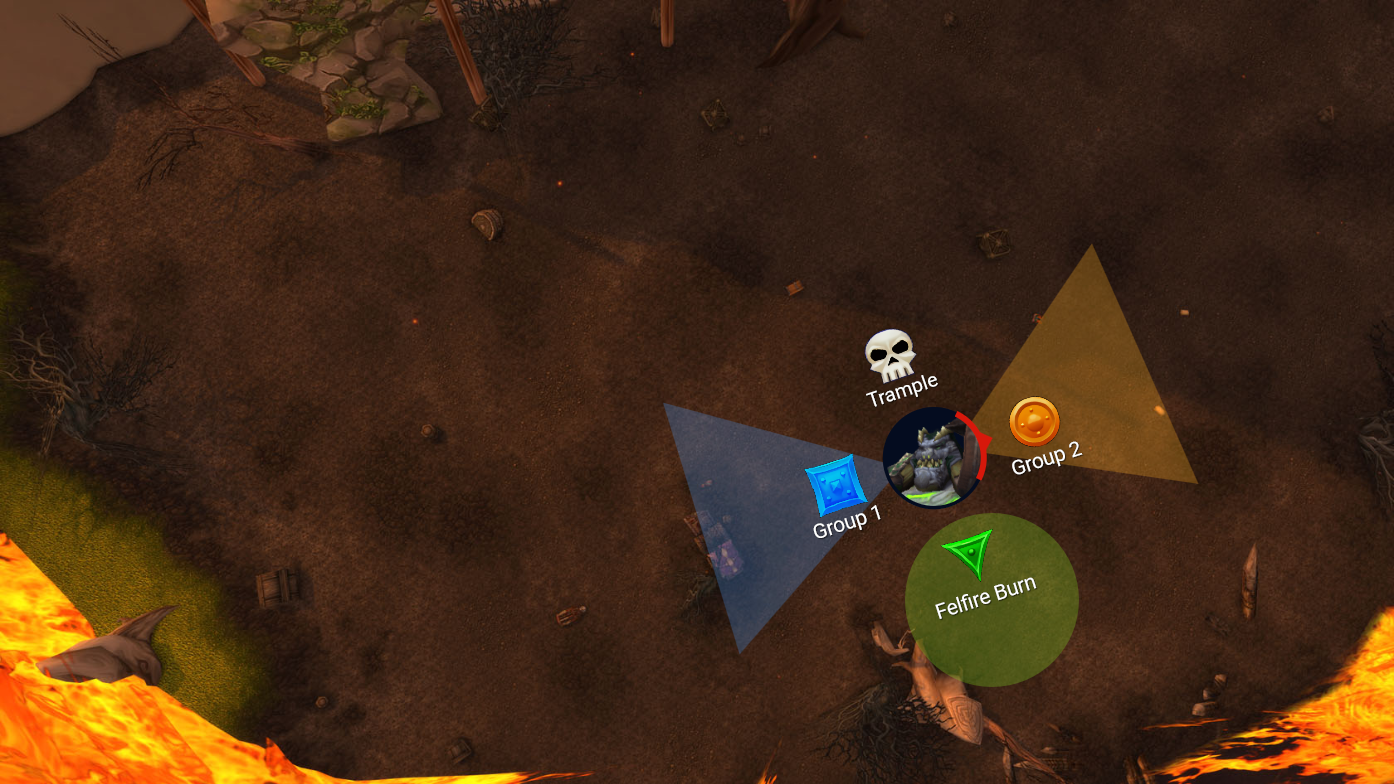
- Trample – Does damage to all targets near Brutallus’ main target (active tank). Applies debuff reducing armor by 25% per stack, stacking 4 times. Triggered when Excitement damage threshold is met.
- Felfire Breath – Debuffs 1 player with Felfire Burn
- Felfire Burn – Deals damage to player which increases over time. Spreads to other nearby players
Ascended:
- Fel Rain – Fire spawns randomly around the room, doing damage to players who stand in it.
Strategy:
- Split the group in 2, sand on either side of the boss to split the Meteor Slash stacks.
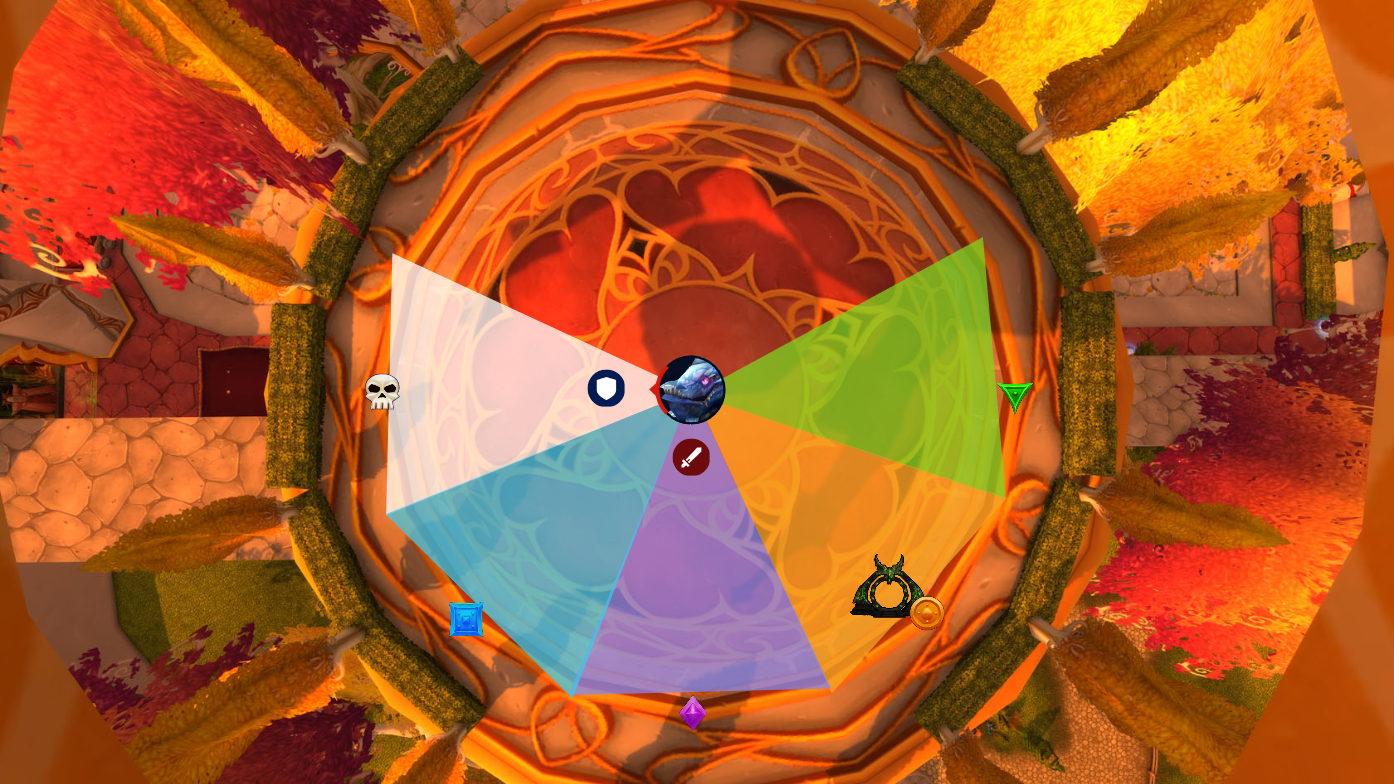
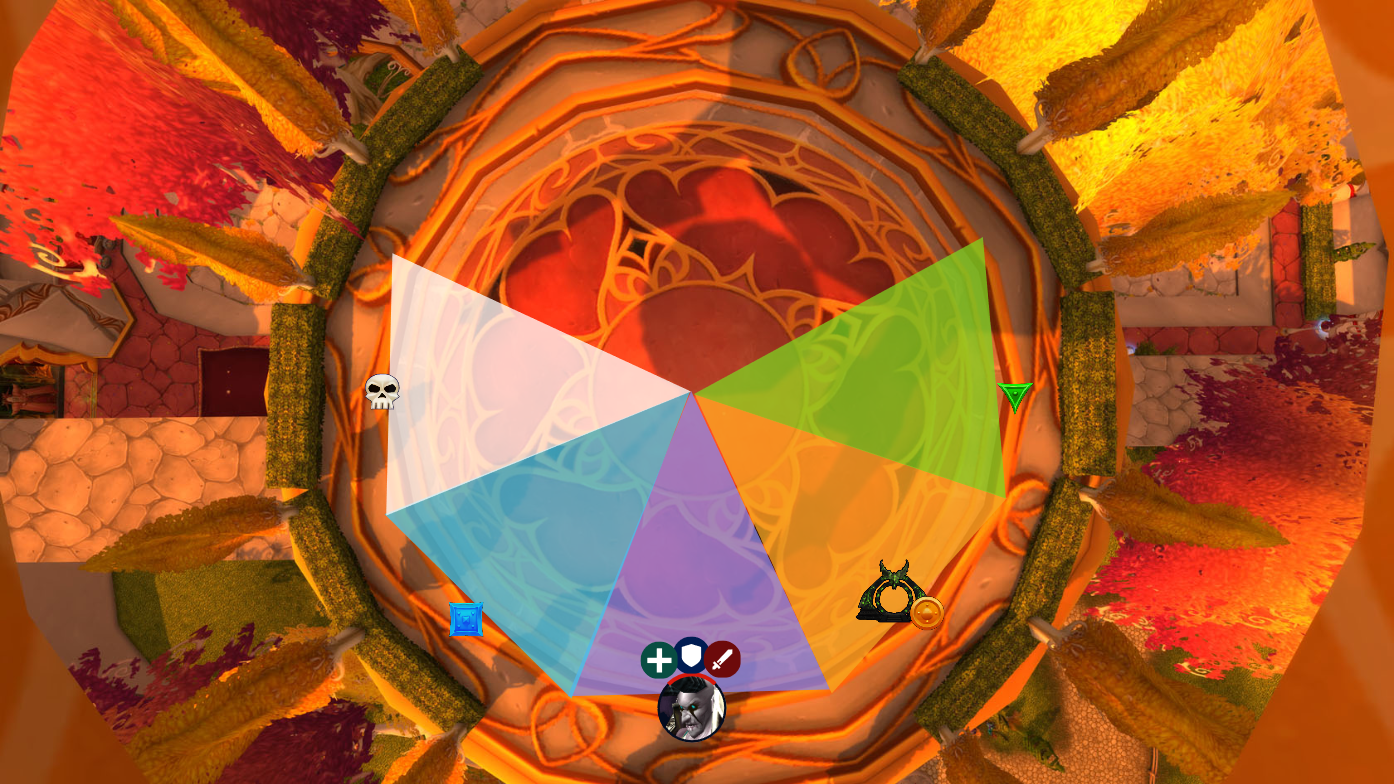
- Trample happens at set health %. Find how many Meteor Slashes you will get and plan them. You can roughly expect 5 slashes per Trample. Tank moves out from group after 1st slash to avoid group getting 1 shot. Parry tanks are very strong for solo soaking Meteor Slash. Example for Slash assignments:
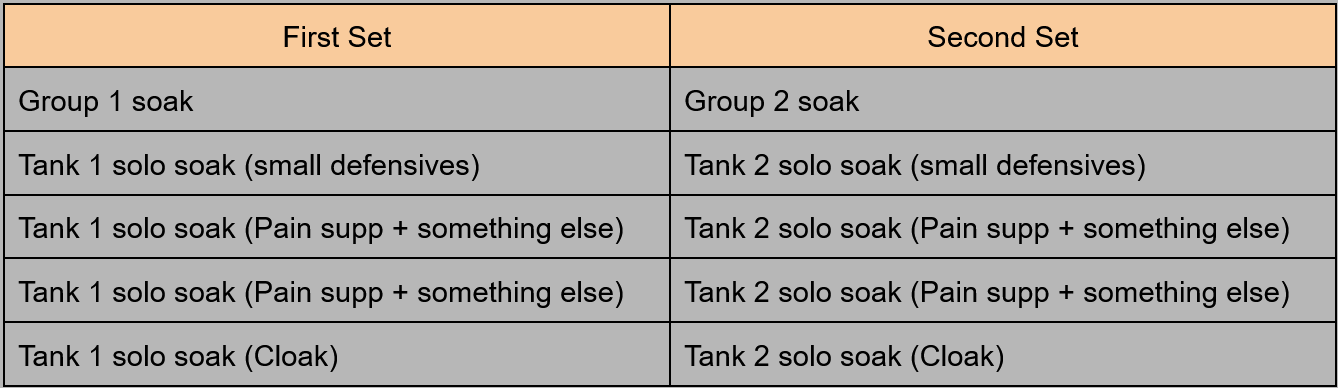
- If the tank can’t solo soak, you’ll need to do a buddy system, where a DPS soaks slash with the tank by using Cloak of Shadows and standing in front of the boss.
- After boss HP has been lowered enough to meet the current Excitement threshold, the boss will Trample. Tank needs to move out of the group and use a large defensive CD when trample is about halfway done.
- When the boss casts Felfire Breath, 1 person will get a debuff. The debuff does fire damage and spreads to people around you. Shimmer immediately, avoid soaking Meteor Slash, and do not stand near anyone to stop it from spreading.
Recommended Abilities:
- Shimmer for Felfire Burn
- Cloak of Shadows in case you need to soak multiple Meteor Cleave stacks
- Pain Suppression to help healer and tanks
Felmyst
Video link: https://youtu.be/yS8MgUu9MIA?si=zoPVSlQeZSWOALsE
Raid comp: Solo tank
Solo tank (Parry, Block)
Heal x2 – rejuvenation spec and aoe/hybrid
Lust: Last ground phase is typically better to secure a kill. Line up with 2min CDs
Mechanics:
- Acidic Breath – Frontal breath that deals nature damage. Applies a debuff that increases nature damage taken by 5% & reduces armor by 5% per stack
- Corroding Gas Nova – Applies a debuff to all players. Debuff is poison and can be dispelled.
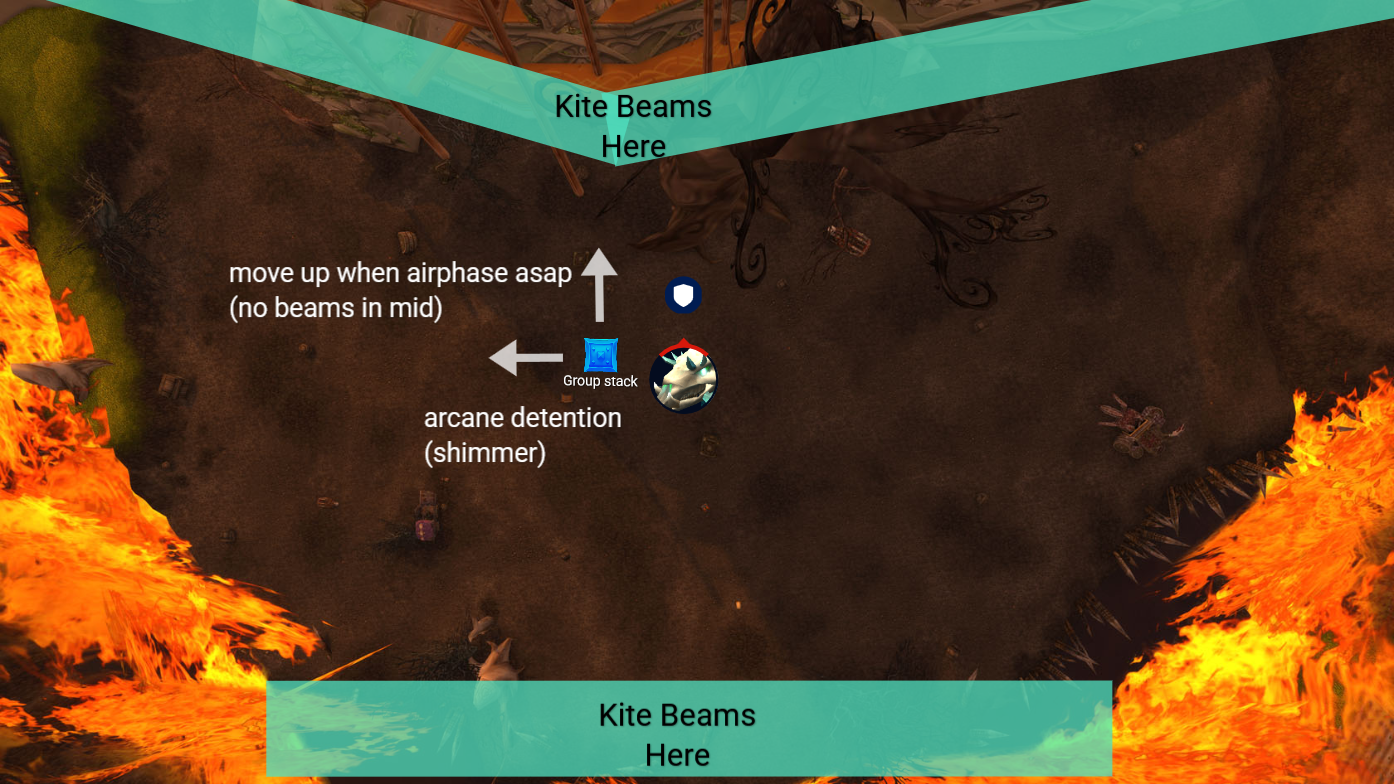
- Arcane Detention – Sends 1 player into the air & has them pulse arcane damage to all players. Damage is lowered the farther you are away from the target. This damage can’t be prevented through Cloak of Shadows.
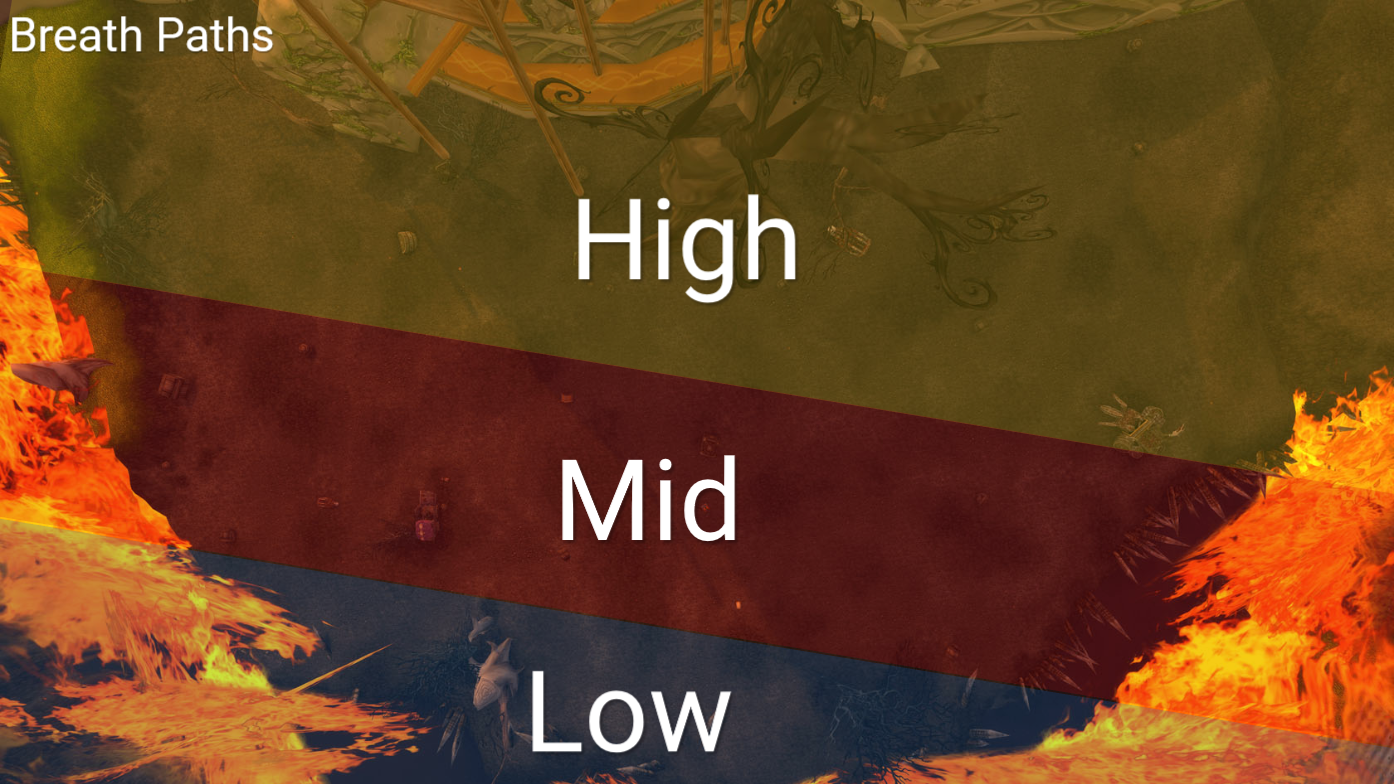
- Necrotic Breath/Freezing Breath – Felmyst flies & breathes in 1 section of the arena. The breath remains dealing damage to players in it until the next breath happens. 3 breaths per air phase. The breath also spawns adds where they previously died.
Strategy:
- Stack on 1 side of the boss, tank near the middle of the room
- If targeted by Arcane detention, Shimmer behind the group stack
- Healers pre-cast mass dispel (see weakaura) to get Gas Nova debuffs off asap. Last Gas Nova should be cloaked to minimize damage.
Air Phases:
- Immediately move to a wall to bait both beams away from the middle of the room
- Group and kill adds while avoiding the breaths. If the adds overlap with the boss, the tank will need big defensives to survive.
- Breath tip: When the boss is in the air, he will move to 1 side. He will move into his center point, then move to 1 of the 3 positions where he will breathe. Watch for him to go to the center point and then when he moves, it should be easy to tell which of the 3 sections of the room will be dangerous.
- Mass dispell tip: Use the weakaura provided at the top. The weakaura will tell you when to begin pre-casting Mass Dispell so that damage is minimized
Recommended Abilities:
- Shimmer for Arcane Detention
- Other movement abilities for air phases
- Cloak of Shadows for when in a bad position or in danger.
High Commander Arynyes
Video link:
Healer POV – https://youtu.be/GYu5B2UAIHU?si=mJ_9UpIrS9NZOygB
Caster POV – https://youtu.be/Dg96i7_-Iu4?si=6C_WdNJuwRP882Ai
Raid Comp: Default
Tank 2x – Parry, Bear and MFB are very good here.
Try to bring more AOE damage than normal. Single target is less important, as the Arynyes portion has no dps check.
Lust: When pulling Arynyes, to focus down remaining adds.
Mechanics:
Arynyes:
- Vengeance – Arynyes stores a percentage of all damage she takes, increasing her attack power
- Impenetrable Bulwark – Arynes channels a frontal shield, absorbing all damage from that direction. Stores damage this as vengeance
- Vengeful Retaliation – Arynyes deals damage to all players, increased by how her Vengeance
- Judgement of Vengeance – Stuns the tank & deals damage in a cone behind the tank.
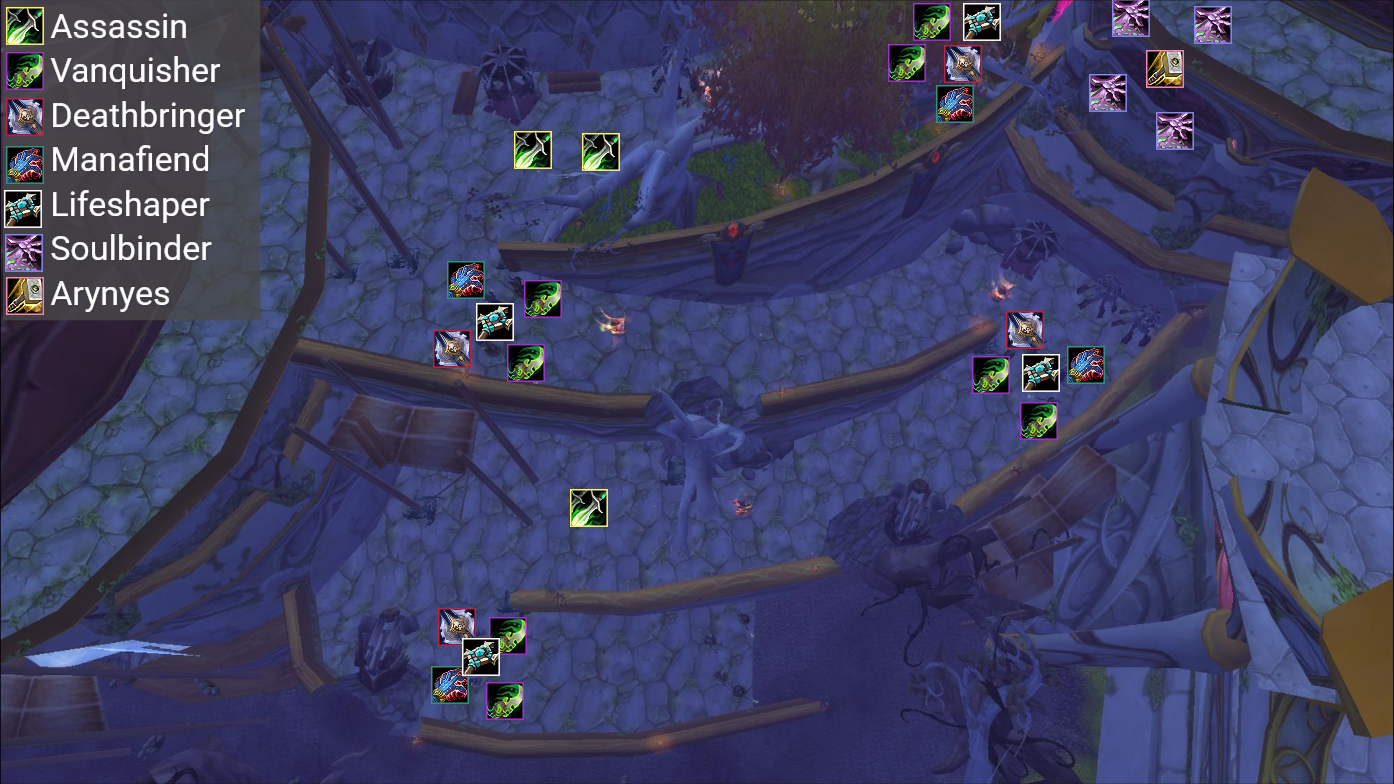
Mobs:
- Volatile Fiend:
These spawn and run down the hill towards players.
Normal/Heroic – 1 of these spawn at a time, around every 30 seconds
Mythic/Ascended – 1 of these spawn + 1 each time. Second wave spawns 2, third is 3, etc
Blast Wave – Deals damage & knocks players back
Imp-plosion – Blows up, dealing large damage - Felguard (Ascended only):
A portal spawns after the first set of adds, continuously spawning a Felguard.
Bladestorm: The Felguard starts channeling bladestorm towards the group when they come close to anyone in the group, dealing deadly damage.
Mortal Strike: Felguard will spam Mortal Strike if their Bladestorm ends or is interrupted, reducing all healing taken by the target by 50%. - Infernal (Ascended only):
Circle spawns on the ground, indicating where a meteor will spawn. The infernal spawns where the meteor lands. The infernal indicator will spawn on a random raid member, meaning it can be baited.
Eruption: Does raid wide damage as long as it stays alive - Assassin:
Able to teleport behind a random raider and then backstab, can turn to face them to avoid the backstab. Be ready to fade. Tanks ready to taunt - Vanquisher:
Melee attacks apply a stacking shadow damage DOT
Judgement (Ascended only): A casted ability that deals massive damage to everything in front of them, potentially 1 shotting tanks if combined with something else. - Deathbringer:
Casts Death Grip. Make sure tanks get aggro first to avoid dps getting gripped. Places death and decay
Desecration: A ground effect placed on tanks that will slow everyone in the area by 75%, and reduce their healing taken by 75%.
Guillotine: Deals a lot of physical damage to tanks. - Manafiend:
Casts Mana burn. It drains mana. - Lifeshaper:
Able to heal a small amount. Forgettable - Soulbinder:
Forgettable. Only inside Arynyes room
Strategy:
- This is a control fight. Prioritize attacking the mobs in the order I’ve listed above, top down. Deathbringers and Vanquishers are the most threatening permanent mobs, imps and infernals are the most threatening overall and should be prioritized when they spawn.
- Use CC, kicks, and dispels to lower incoming damage. AOE stuns like Holy Wrath and Cap totem help a lot. Banish imps as you’re able, preferably on a Banish rotation.
- Use Windwalk Totem to overcome the massive slow from Deathbringers.
- Use Solar Beam on a rotation to prevent tanks/raid dying on the packs of adds.
- Use Holy Wrath when a Felguard starts channeling Bladestorm on the group to stun it and avoid dying.
- If the assassin shadow steps to you, turn to face him to avoid the backstab. Fade works too
- When you reach the top, pause to clear as many adds out as you can before you engage Arynyes & 4 soulbinders. Cleave the binders down
- Arynyes does not have many abilities, but they are all very impactful. They’re cast in the same order on a set rotation, pay attention to them and handle accordingly.
- Bulwark – Get behind her and stop attacking immediately. Once behind, you may attack
- Vengeful Retaliation – Use a defensive. Healer CDs should be coordinated for this
- Arynyes is typically the easy part of this fight. The difficulty is the ramp and ensuring that nobody dies on their way up.
Recommended Abilities:
- Defensive CDs, Divine Sacrifice, & Healing CDs for Vengeful Retaliation
- Solar Beam
- AOE stun, Kicks, dispells to reduce damage in the add phase
- Fade
- Banish for imps
- Holy Wrath for Felguards
- Windwalk Totem
Eredar Twins
Video link: https://youtu.be/BwCHPsdsnGI?si=2oUohtHs2zzx_O1X
Raid Comp: Solo tank, no melee
Solo tank, 2 can be safer in large groups. Melee is HIGHLY discouraged here because of how the stacks work. Avoid melee at all costs..
Lust: When Sacrolash becomes attackable.
Mechanics:
- Tank Combo: Fling + Kick + Crash. Tank is CCed and dealt heavy damage. Tank needs to pre-use a large defensive cooldown, as you cannot use (most) abilities once it’s started.
- Solar Burn: Stacking debuff applied by Alythess. Reduces healing received by 1% each stack
- Lunar Burn: Stacking debuff applied by Sacrolash. Reduced movement by 1% each stack
- Dance: Both sisters can send out reflections of themselves, which do massive damage on players that come close. These are sent towards the furthest player away from the boss and are slightly different for each sister.
- Fire Dance: Sends out a line of fire clones that do massive damage on the charge and apply a lot of Solar Burns to anyone close.
- Shadow Dance: Sends out a line of shadow clones that do massive damage on the charge, and each clone will charge Left or Right afterwards, dealing deadly damage and if survived, will apply Lunar Burn stacks. The clones always go Left – Right – Left – Right, leaving a safe spot for everyone if positioned correctly.
- Proliferate (Shadow or Fire): Each Twin will sometimes teleport to a random target and double their current stacks of Lunar or Solar burn. This is the main mechanic why melee is very bad here.
- Permanent Pirouettes: The outer ring of the arena gets covered in dancing blades that circle around it, dealing a lot of damage and knocking back players who come in contact with them.
Phasing:
- Pre phase: Both bosses are active on pull. The lower HP sister leaves after 10 seconds.
- Phase 1: When the first sister hits 50% HP, they swap and the second sister comes out.
- Phase 2: When the second sister hits 50%, both sisters become attackable.
- Phase 3: When EITHER sister hits 0%, both sisters combine into Sacro’lythess
Ascended:
These will happen after every tank combo, including on combined phase.
- Bird Cage: Spawns fire beams in a circle around the room. The circle moves towards the center of the room. One small section of the circle remains behind, allowing the group to move through it undamaged. Video of mechanic: https://www.twitch.tv/videos/2281445506
- Pirouette: Spawns 1 dancing blade for each member in the raid, following each player for a long time. They spawn from the outer ring of the arena. These will only stop spawning after Sacrolash is phased.
Strategy:
- If you bring 0 melee, you can 1 tank this fight.
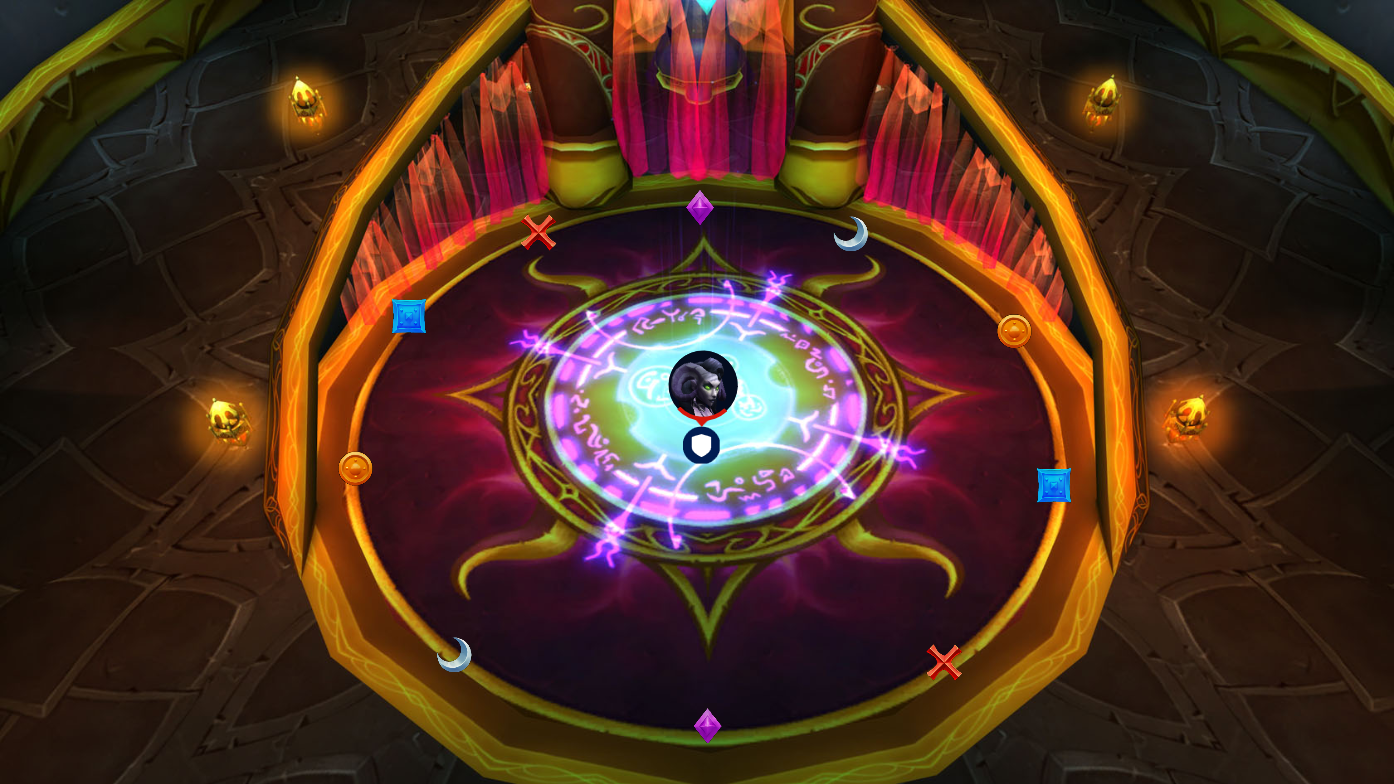
- The dances/charges can be baited by a mobile healer or a tank. It’s preferred to do this on the X marker, next to the pillar. DPS should not stand on the other X marker.
- Pre-assign all range/healers to a mark. These marks should be 10 yards apart from each other.
- On pull, do as much AOE as possible. Get both bosses as low as you can, keeping Sacrolash lower hp than Alythess.
- Tank should use Dispersion every other tank combo with improved dispersion (1st, 3rd…)
- Use Pain Suppression + Guardian Spirit for the Tank on every other tank combo (2nd, 4th…).
- Alythess should be your first solo boss. Zug her down to 50%. Her mechanic after the tank combo is really easy to deal with. You can either shimmer out of it, or find the safe spot and walk through, then go back to your marker.
- When Sacrolash comes out, zug her down to 50% too. Her mechanic after the tank combo is very deadly. Mitigate RNG and deaths by using Divine Sacrifice and baiting the dancing blades to the back of the room (away from the baiter). When the dancing blades come close to the group you can either use Cloak of Shadows or Shimmer to avoid dying here.
- Dodge the reflections by safespotting them, they can potentially 1 shot.
- When both bosses are active, mark one of them and bring her to 10%. After, bring down the other one as low as possible (preferably sub 10%), then kill one of them.
- When the bosses combine, they will do their mechanics normally as if both were up, doing one charge and shortly after the other one. 30 seconds after the combined phase starts, everyone will need to Fade or the boss will randomly drop threat and kill people who didn’t Fade. After this, the boss will either spawn a Fire Cage or a set of Pirouettes. After this, the fight cycles and the tank combo will be every 40 seconds after the first.
Recommended Abilities:
- Defensive CDs, Divine Sacrifice
- Fade
- Pain Suppression + Guardian Spirit
- Tank with Dispersion + Improved Dispersion
- Shimmer
- Cloak of Shadows
M’uru
Video link: https://youtu.be/hOQnSJgxaN8?si=nFd1WLeG3wFHmpM_
Raid Comp: 3 heal, mobile casters
Bringing 3 healers is recommended, but 2 heal is possible with the correct specs.
Melee aren’t bad here and they’re good for void sentinels. Mobile casters are preferred though.
Lust: P2 after first cutter. Can be before cutter as long as it lines up with 2 minute CDs
Mechanics:
Both Phases:
- Darkness: Circle in the middle of the room. Reduces healing received & movement speed by 75%
Negative Energy: Deals shadow damage to all players - Void Cutter: Spinning beam which kills players that touch it. It will also silence/pacify anyone that is too close. This beam starts with 2 arms. In ascended the beam gains additional arms up to 4, gaining 1 arm each time this is cast.
- Dark Fiend: Summons mobs in the middle of the room which fixate random players. These must be dispelled. Players who dispel gain a stacking debuff called Last Laugh which deals high shadow damage for 10 seconds and is dispellable.
Phase 1 (100% – 50%):
- M’uru: Muru stands in the middle of the room and does not move
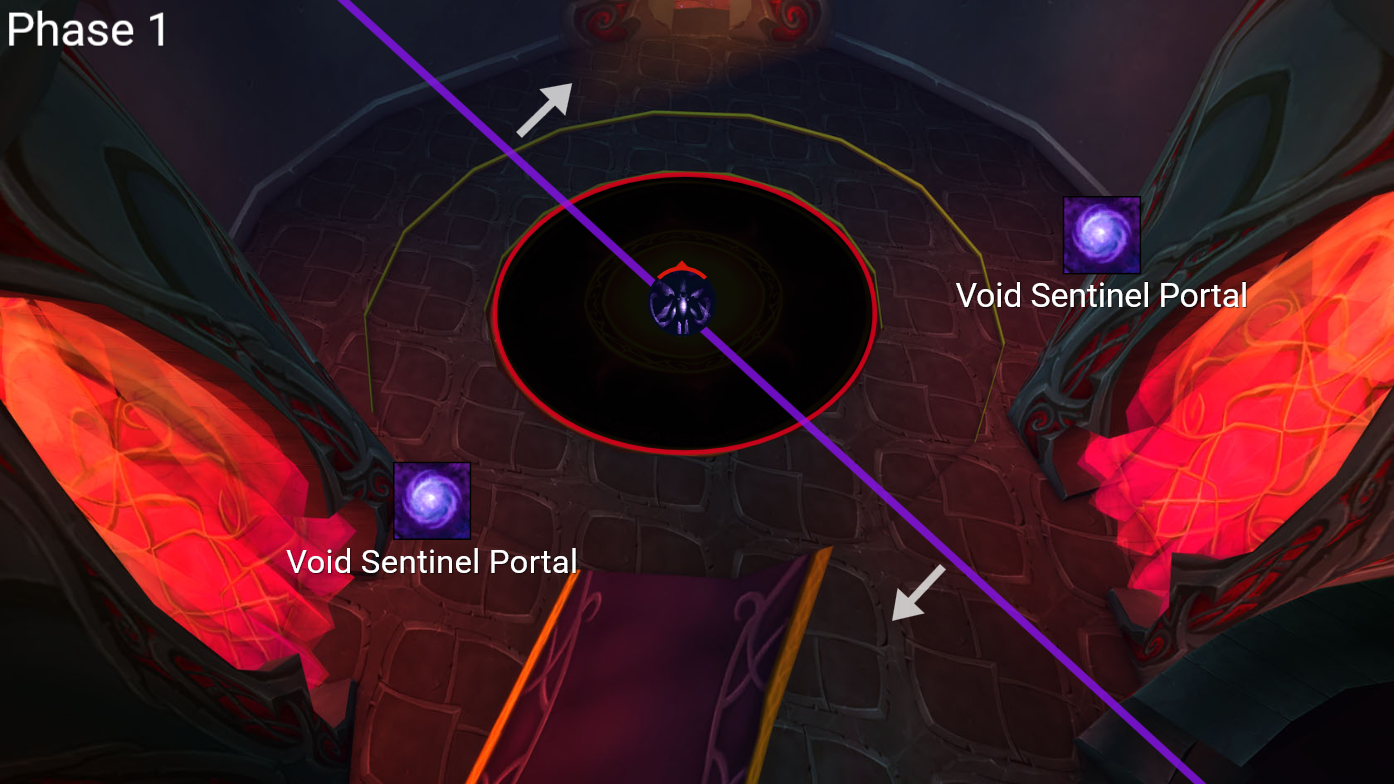
- Void Sentinel: Opens a rift which summons a void sentinel which needs to be kicked. When killed, many smaller adds come out. Both the Void Sentinel and the smaller mobs attempt to move to M’uru. If they reach M’uru, he will be healed for 1% hp and receive a stacking 2% damage buff.
Phase 2 (50% – 0%):
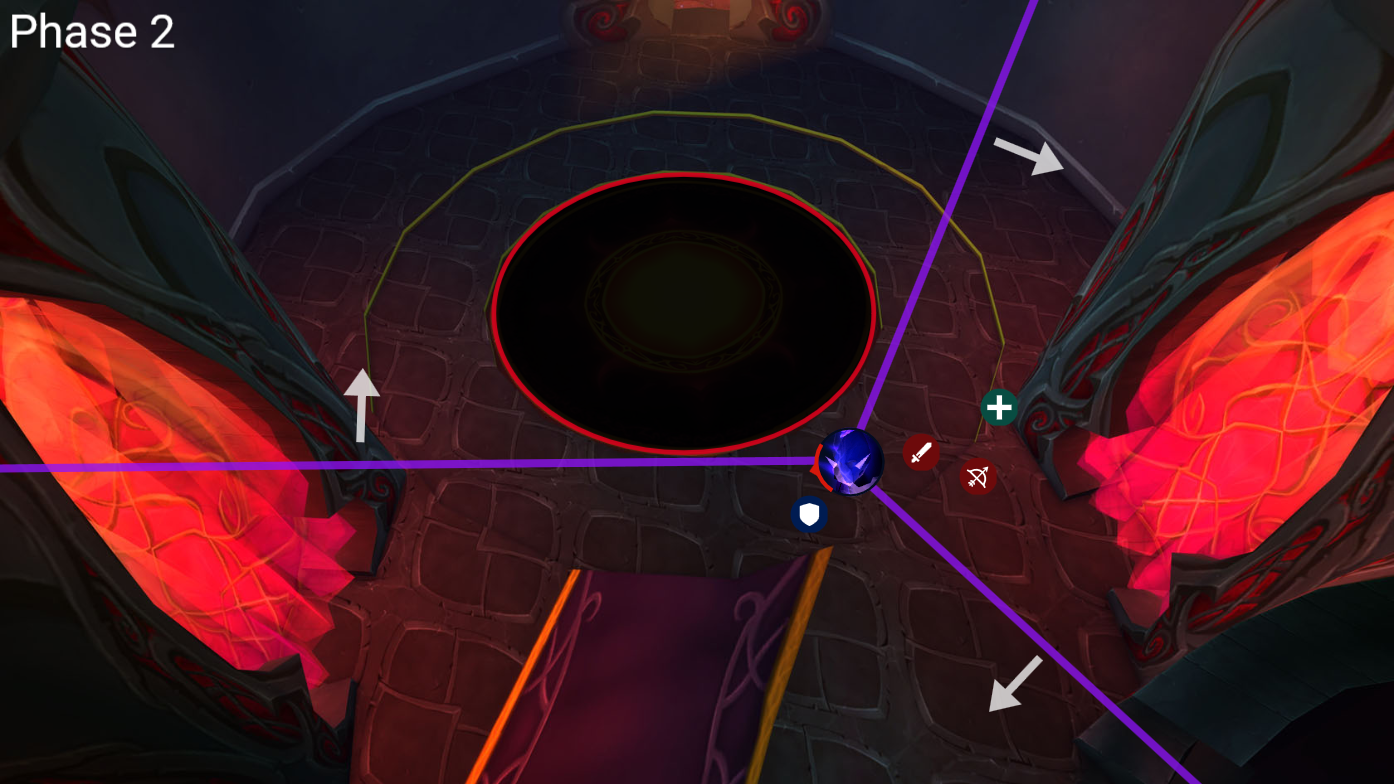
- Entropius: M’uru turns into Entropius. He now moves like a regular enemy, following whoever has aggro.
- Black Hole: A purple orb that spawns and moves around the room. Players who come near it are sucked into it dealing high shadow damage.
Strategy:
- Group stacks for most of the fight to make healing easier.
- Assign people to Kick and kill Void Sentinels. Plan on 2 or 3 of these to spawn before the boss hits 50%. Ursols Vortex, Light’s Hammer and Shockwave/Shadowfury are very strong here
- Use Divine Sacrifice when the small adds that come out of the Void Sentinel are about to die to avoid wiping to excess damage.
- All healers need Mass dispel & Cloak of shadows with 2/2 talent points in Elusiveness. Use this to dispel the Dark Fiends as soon as they spawn. Pre cloak, then mass dispel to avoid receiving any damage. Note: If you take 2 healers, you’ll need 2/2 talents into Elusiveness, if you take 3, you’ll only need 1/2 into Elusiveness.
- Most dps should be pumping damage into M’uru, aim to have only 2-3 Void Sentinels spawn. Control when the boss hits 50% hp. Try to push right after the 3rd adds die for a clean transition.
- When boss hits 50%, Entropius spawns and begins to attack the tank. Keep him near the center on the edge of the Darkness circle. When Void Cutter spawns, drag the boss around the circle’s edge to counter the beam rotations.
- Watch for Black Holes. Most mechanics here are purple and they’re difficult to see. There’s typically 1 or 2 up at a time, never more than 2. NOTE: As of 18/03/2025 patch, you can’t immune or get out of the Black holes anymore.
Recommended Abilities:
- Mass Dispell + Cloak of Shadows (+2 talents into Elusiveness)
- Divine Sacrifice
- Movement to get out of Black Holes
- Shimmer, Shadow Step, Leap of Faith
- Kick + Ursols Vortex + AOE stun for Void Sentinels & small adds
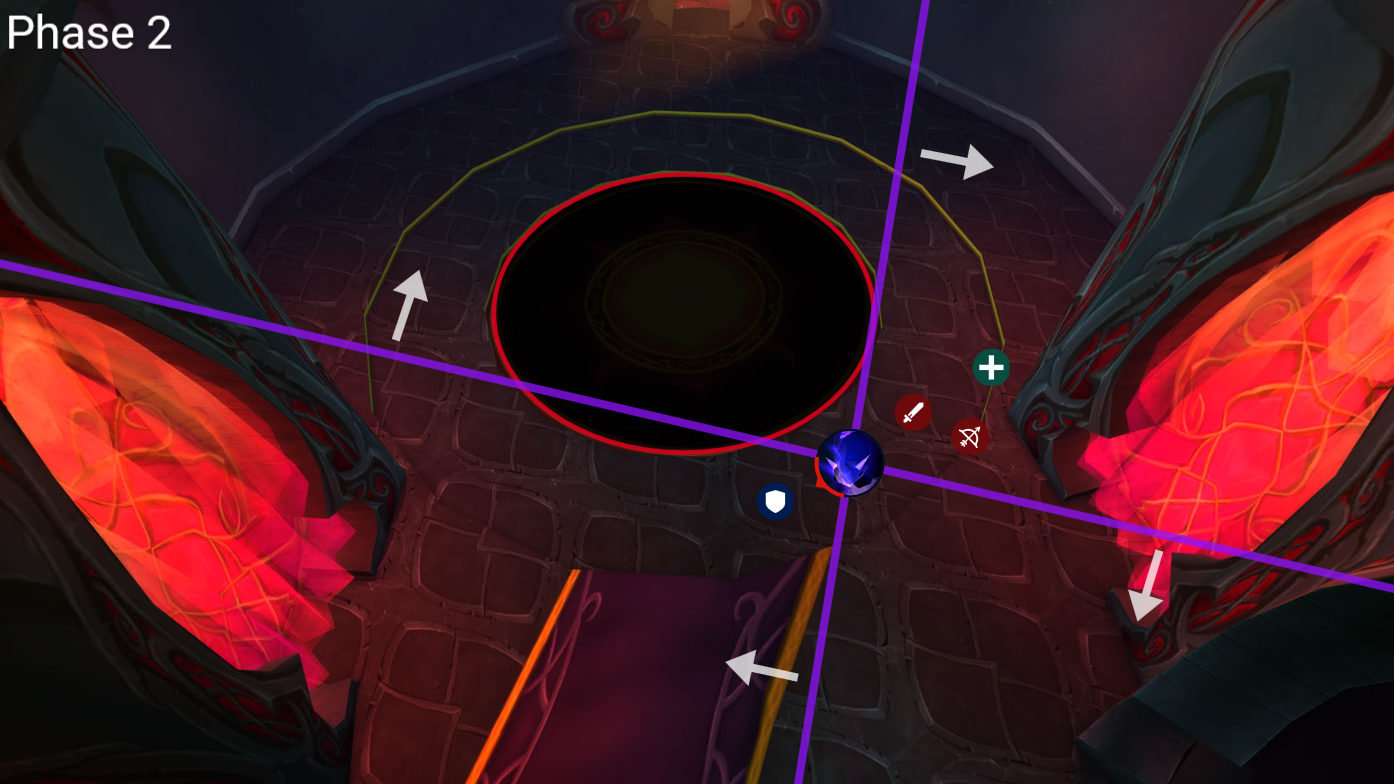
Kil’jaeden
Raid Comp: Default, 2 melee maximum
Lust:
- Normal/Heroic: Anywhere across the fight, preferably after Armageddon or when the boss becomes attackable
- Mythic/Asc: On pull & again when boss begins his secret phase. Line up with 2min CDs
We’ve included a full list of the mechanics throughout the fight in the following list, but there’ll be a simpler explanation per phase, as this is a very long fight with a lot of things going on.
Full mechanic breakdown
Mechanics in all KJ phases:
- Legion Lightning: Cast if there are 0 players in melee range. Deals damage & drains mana to the players hit. Jumps to other nearby players. Doubles in effectiveness with each jump.
- Fire Bloom: Cast every 30 seconds outside of events. Debuff applied to random players which deals fire damage to themselves and anyone around them.
- Supreme Strikes: The boss will do additional damage to non avoided melee attacks to everyone in an 8yd radius. This damage can be split.
- World Breaker: Cast at tank with aggro. Deals high damage in a cone to everyone in it and applies a debuff reducing armor by 100% for 15 seconds. Knocks tank backwards.
- Shield Orb: Spawns occasionally and flies around the room. Deals shadow damage to players
- Sinister Reflection**: Summons a copy of all players, mimicking all of the player’s actions. Damage dealt to your reflection deals damage to the player. Increased by damaging your own.
- Darkness of a Thousand Souls: Long cast which kills all players. Can be avoided using the orb dragon’s shield
Event & Transition mechanics:
- Annihilate: Casts a beam that will 1 shot anyone in contact in a clockwise or counterclockwise direction from where the boss is looking at. The path of the beam is then covered in darkness that can be cleaned up by a person in a dragon. When enough time passes or the path gets cleaned, a lot of Dark Spawns will spawn out of it.
- Annihilate mini event: This will only cover around ¼ of the room, instead of the original size of ¾ in the beam and darkness. Once this event is over, the boss will cast World Breaker on the closest target.
- Obliterate: Cast first when the boss reaches 60% health. This will cover 2 of the 3 lanes in the boss’ arena in circles that will 1 shot anyone in them. The boss will cast 10 sets of obliterate circles, always leaving one lane open as a safe spot.
- Obliterate mini event: This will only cast 3 sets of obliterate circles instead of 10, and when the event ends, the boss will cast World Breaker on the closest target.
- Armageddon: Cast first when the boss reaches 40% health. This will spawn various sets of tornadoes that rotate around the arena and deal massive damage to anyone that touches them, as well as spawning a rain of small meteors and 3 big meteors that also deal massive damage. The tornadoes will always have a safe spot where you can walk through them. This mechanic will last for about 60 seconds.
- Ascended only: The big meteors will also spawn an infernal after landing. These infernals will apply a 100% fire damage taken debuff every time they perform a melee attack, and their damage type is only fire damage.
- Armageddon mini event: This will only last for 10 seconds, instead of 60, and will only spawn 1 big meteor. The boss casts World Breaker on its closest target after this finishes.
Mechanics in KJ secret phase ASCENDED ONLY:
- The All Consuming Darkness: The floor where you fought the boss originally will be consumed by darkness.
- Platforms: The arena gets replaced by platforms that you can jump from one to another. If you fall between platforms, you will die to the darkness.
- Soul Flay – Cast if there are 0 players in melee range. Deals massive damage to a player and slows them by 50% over a 3 second channel.
- Armageddon: Cast every 60 seconds after first cast when entering the secret phase. This will spawn a rain of 4 small meteors on all players, the meteors are delayed and don’t spawn all at once, they will spawn 1 by 1 with a small delay between each other. Additionally, there will be 4 big meteors around the boss (always in a square formation) that will spawn Blazing Infernals.
- Blazing Infernal: After spawning, they will assemble themselves up and start casting Blaze for 5 seconds (Kickable). If the cast finishes, then they will channel Blaze (Kickable), dealing massive raid wide damage and gaining more damage with each tick.
- Obliterate: 10 seconds after Armageddon. This will cast 3 sets of obliterates, making random platforms around the boss will be covered in an obliterate. Each obliterate explosion has a 4 second cast timer, when the cast finishes, obliterate platforms will explode and will 1 shot anyone standing on the platform that’s not a tank.
- Annihilate: 10 seconds after Obliterate: The boss will turn in a random direction, and start casting Annihilate for 4 seconds before channeling it for 20 seconds. This mechanic will 1 shot anyone in its path and will cover around ¼ of the room either clockwise or counterclockwise. Note: The cast doesn’t deal damage, only the channel, meaning there’s 4 seconds to react to where he’s facing.
Chronological phase breakdown
Phase 1: Mini bosses
- Shadow Infusion: Upon dying, each miniboss will buff the remaining minibosses with 20% max HP, 50% damage, and reduced ability cooldowns.
Apolyon:
- Soulrend: Casts a large purple circle around himself which deals large shadow damage and applies a 75% max hp reduction to all players hit for 20 seconds.
- Soul Bomb: Places a bomb on the tank which later explodes killing any non tank players hit.
Archonisus:
- Conflagration: Kickable. Cast at a random player, inflicting fire damage in an area around them. Applies 50% fire damage taken increase for 20 seconds.
- Summon Wild Volatile Imps: Summons a group of imps which deal some damage. They die and cast Imp-plosion which will kill anyone standing on their corpse.
Agamath:
- Fel Rage – Dispellable(Tranquilizing Shot): Enables Agamath’s abilities and makes him unkillable.
- Crashing Leap: Jumps to the player who is farthest away, knocking them up.
- Raging blow: Physical damage ability casted on the target with the highest threat. This is potentially dangerous, as it can begin casting on someone else and if the threat changes, it will perform it on that target regardless.
Phase 1 strategy:
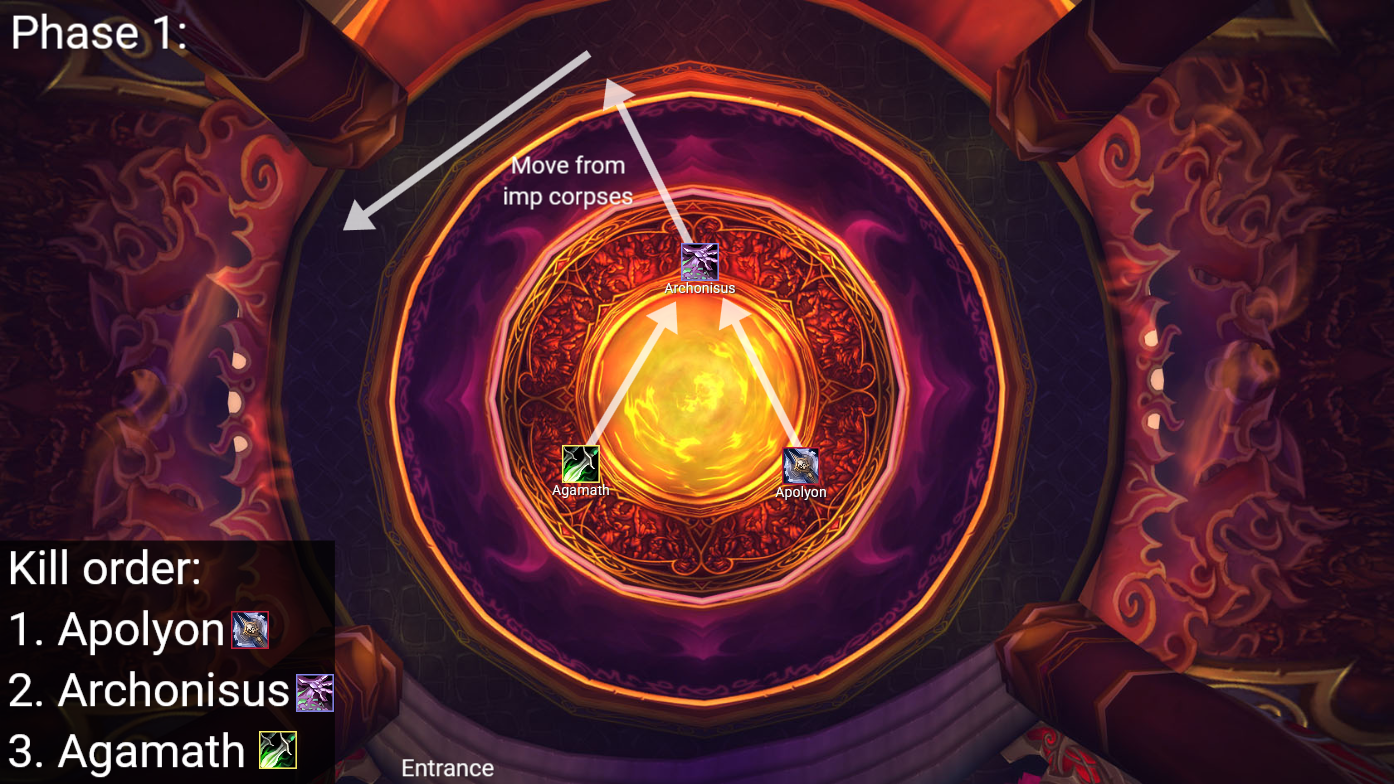
- Kill order: Apolyon > Archonisus > Agamath
- Drag Apolyon & Agamath onto Archonisus to cleave them all together
- One person should be baiting Agamath’s leaps further away from the group (preferably closer to a wall to make it easier to come back). Note: It’s preferred to move backwards (backpedal) to get knocked back into the wall instead of forward when Agamath leaps at you.
- Move all 3 when imps spawn & die. Never stand near an imp’s corpse
- One tank should start on Archonisus, and the other on Apolyon and Agamath. When the second tank gets Soul Bomb, the first tank should grab all three and move them together. After the soul bomb, the second tank will function as baiter for Agamath’s leaps.
- When Apolyon casts Soul Rend, it’s highly recommended to use Cloak of Shadows to counter it, since it should be dying pretty fast and you shouldn’t get a second Soul Rend.
- Have a kick order for Archon’s Conflag. All dps & tanks should have a kick
Phase 2: Annihalate
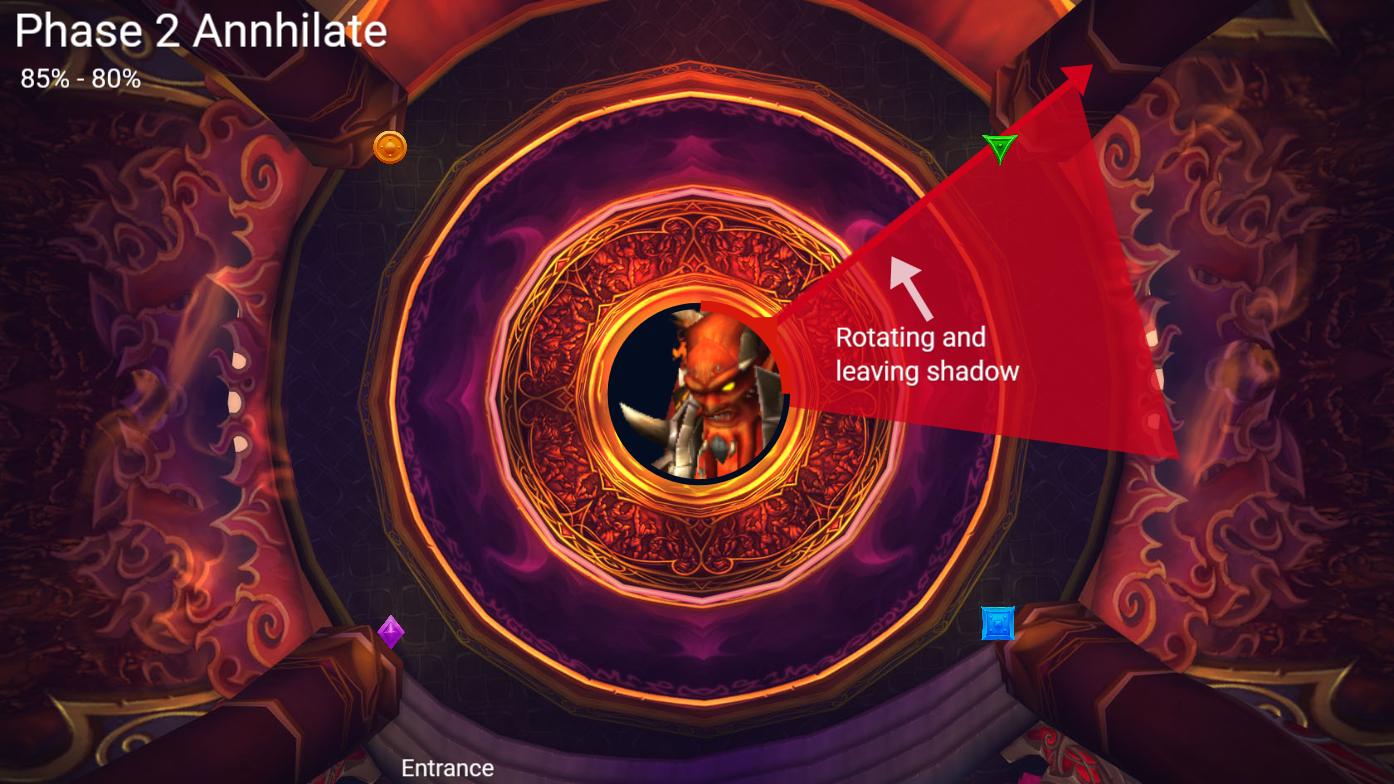
- Annihilate – KJ casts a beam in front of him and begins to rotate (random direction). Beam is a 1 shot. Leaves behind a shadow cloud. This is cast as a major event at 80% and can be cast as a minor event afterwards.
Phase 2 strategy:
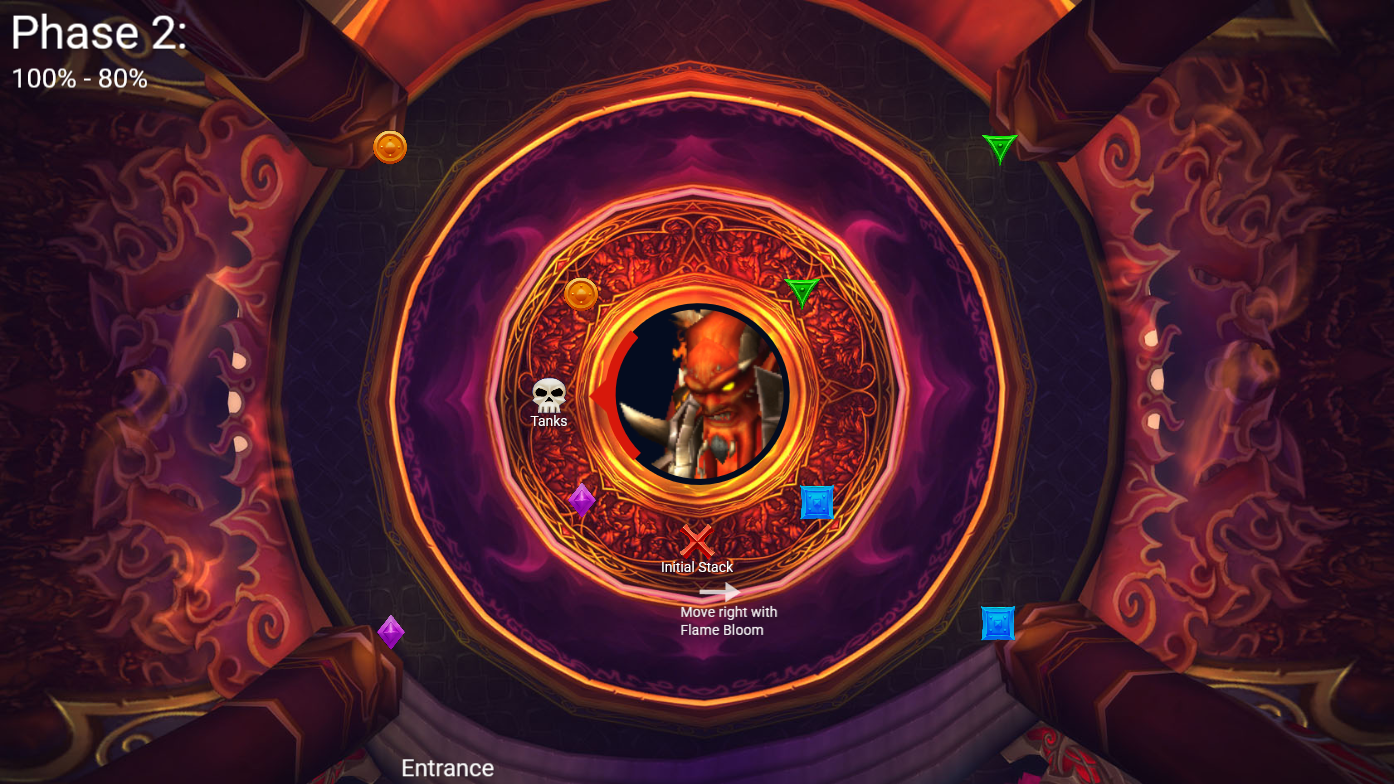
- Group stacks at X, both tanks around skull
- Tanks taunt swap on World Breaker.
- Move right if you get Fire Bloom. This deals damage to people around you
- Kill other people’s sinister reflection. Avoid hitting your own, as you’ll do damage to yourself
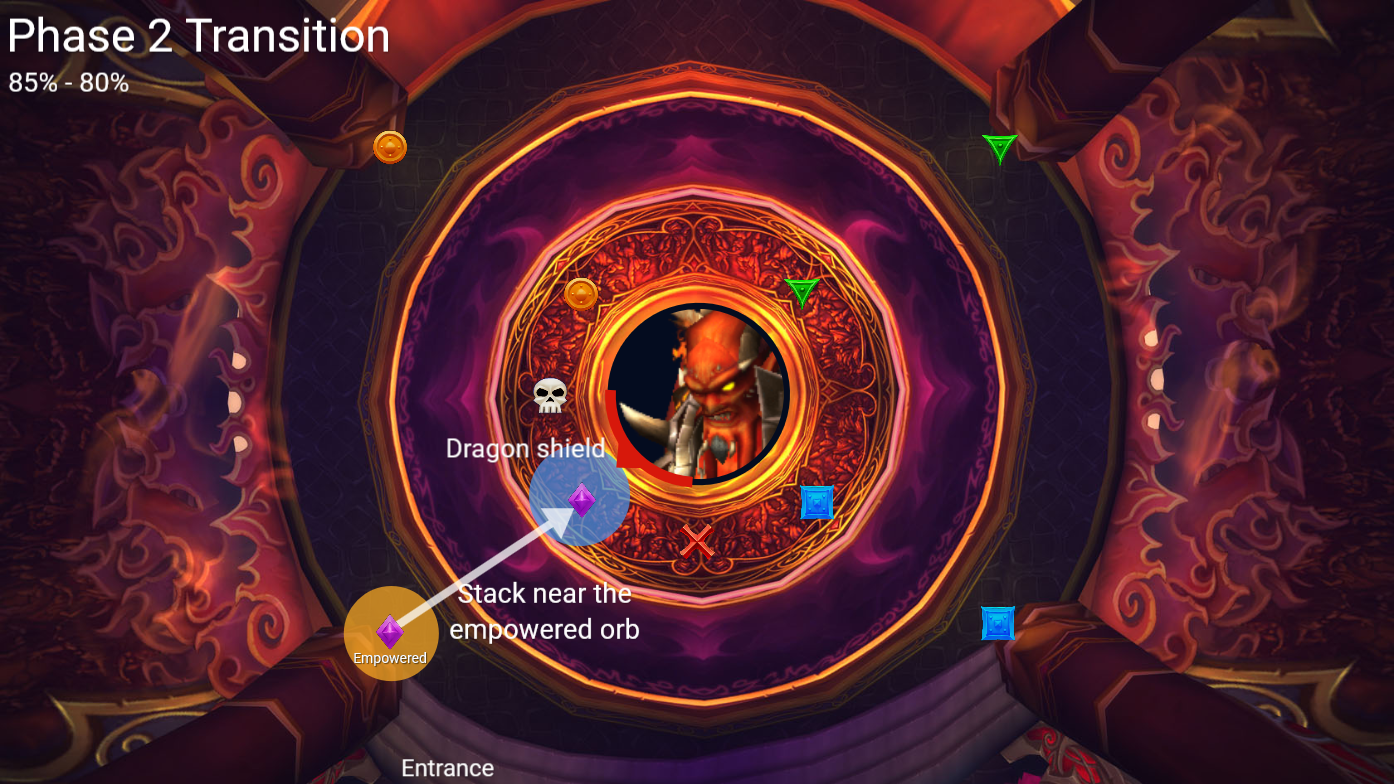
- At 85% KJ will put shadow at 1 of the 4 orbs. This shadow will spread, so move to the opposite orb (If he casts at Triangle, move to Diamond)
- He will then cast Annihilate which will rotate towards the group. The group must follow the pink orb, killing adds on the way. Kill the adds quickly or the Annihilate beam will catch up
- Ascended only: There will be 3 pairs of Eye Demons that will block your path with a beam, and when a player comes in contact with them, it will stun them until the beam is broken. This beam can be broken by killing one of the 2 eye demons that form the beam. Killing them both at the same time is ideal, otherwise the eye that is left alive will deal massive raid damage and slow the raid.
- When Annihilate is about to finish, one tank should pop a big defensive, taunt the boss and step into the inner darkness circle to avoid Legion Lightning or someone getting clipped by a Supreme Strike. This way, it guarantees a smooth transition.
- After Annihilate finishes, move to the empowered orb’s mark. 1 person clicks it and puts a shield on the group at the appropriate time to avoid Darkness of a Thousand Souls one shot. Scroll to the bottom for more assistance with this. Keep in mind the Annihilate will always do a full 360 from where it started, meaning the orb will always be behind the boss.
Phase 3: Obliterate
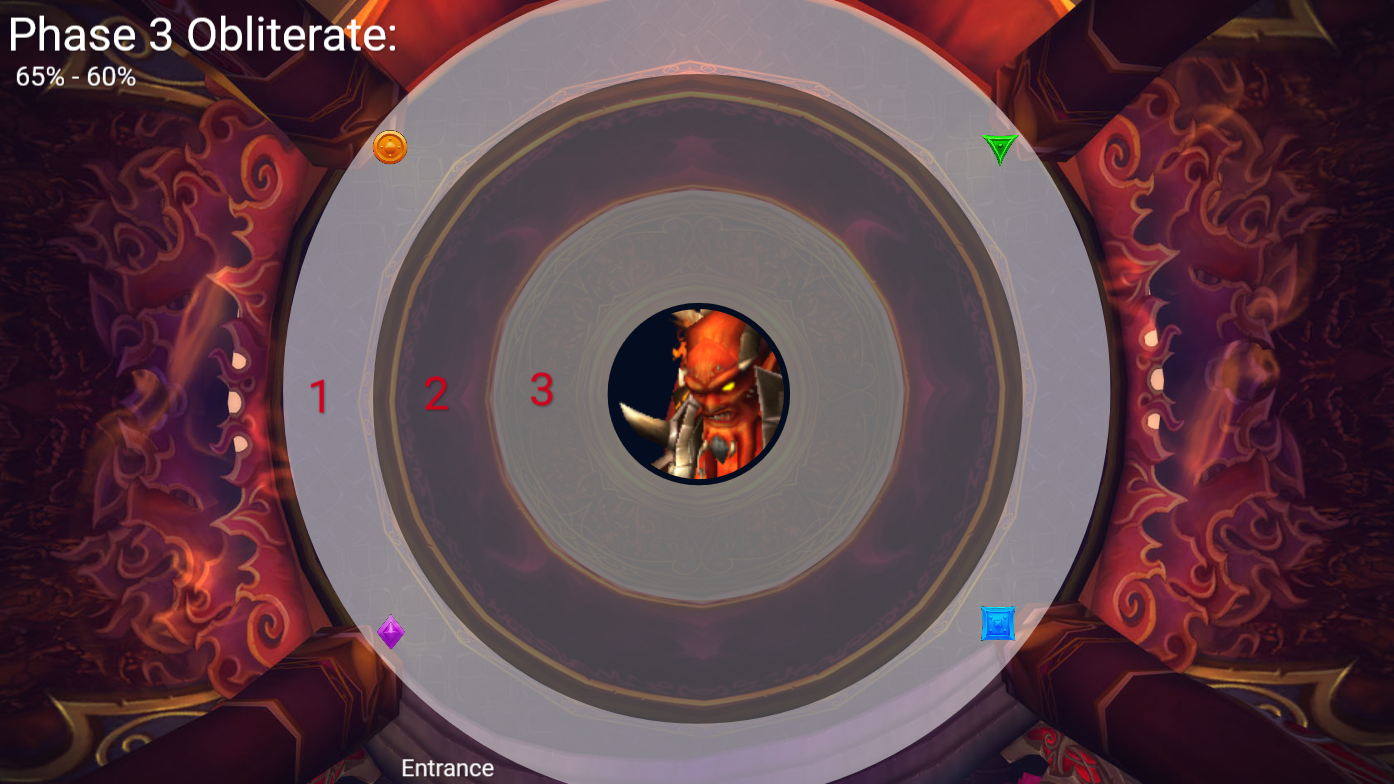
- Obliterate – Deals massive damage in an area. The arena is divided into 3 sections, 2 are covered in Obliterate circles and 1 is clear. Move into the clear area. This repeats 10 times for a major event and 3 times for a minor event.
Phase 3 strategy:
- From 80% to 65%, this phase is similar to Phase 2. The group stays stacked on the mark where the shield was & attacks the boss. The tanks move one mark left of the group and stay stacked. Move right for fire blooms and stay close enough to the group without hitting each other.
- If Annihilate mini event: The person who used the dragon first will need to clear shadow during/after the Annihilate mini event. You must use the 6 button & run through the shadow left behind the Annihilate beam (clear the inner rings, closer to the boss).
- If Sinister Reflection mini event: Use a raid wide defensive and kill reflections before phasing to 60%.
- Try to not overlap Obliterate when people still have Fire Blooms active on them, this can cause an incredibly fast and unexpected wipe.
- At 65%, boss will begin transition & cast Obliterate. HP cannot go below 60% until after Darkness of a Thousand Souls cast.
- Move to avoid Obliterate 12 times. After the 5th cast, 1 orb will be empowered. Begin to move toward it while dodging Obliterate. Drums of Speed and Aspect of the Pack (if no adds are alive) are highly recommended to do this phase.
- Watch where the last 3 obliterates are covering. If it covers the inner ring of the arena on the last cast, you will get a Legion Lightning and that person needs to run. Tanks need to rush in and taunt + defensive while he’s casting to prevent another Legion Lightning, potentially preventing a wipe.
- After Obliterate is done, 1 person clicks it and puts a shield on the group at the appropriate time to avoid Darkness of a Thousand Souls one shot. Scroll to the bottom for more assistance with this.
Phase 4: Armageddon
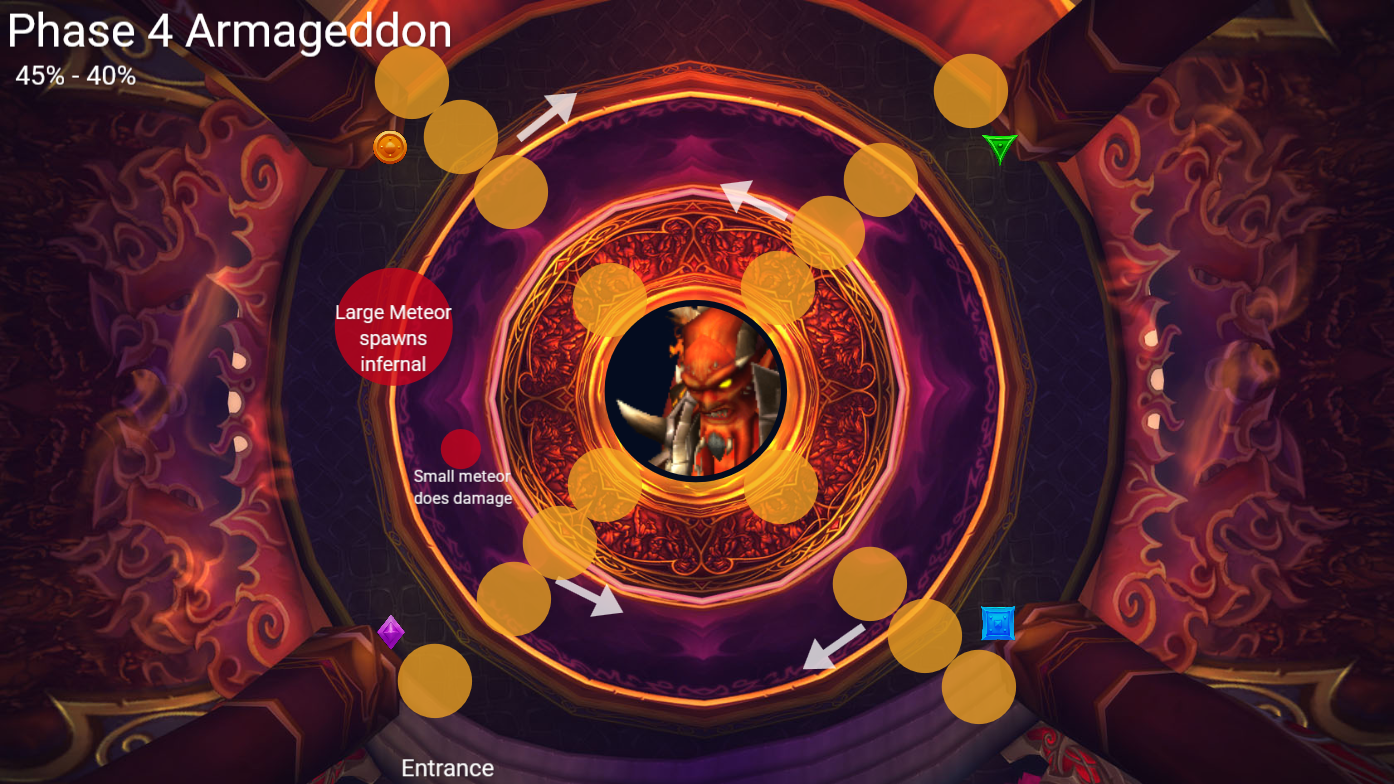
- Armageddon – Spawns 4 walls of tornadoes that counter rotate. Spawns small meteors that deal damage, and large meteors that spawn an infernal. Basically bullet hell + occasional adds.
- Infernal – Kickable. Casts, and then channels Blaze. Blaze deals damage, and increases your fire damage taken, stacking per tick.
Phase 4 strategy:
- From 60% to 45%, this phase is similar to Phase 2. Group stays stacked on the mark where the shield was & attacks the boss. Move right for fire bloom.
- At 45%, boss will begin transition & cast Obliterate. HP cannot go below 40% until after Darkness of a Thousand Souls cast.
- Dodge the tornado walls & meteor circles. Kill and interrupt the infernals as they spawn
- During the event, 1 orb will become empowered. Move towards it as a group
- After Armageddon finishes, 1 person clicks it and puts a shield on the group at the appropriate time to avoid Darkness of a Thousand Souls one shot. Scroll to the bottom for more assistance.
Phase 5 ASCENDED ONLY: Secret Phase
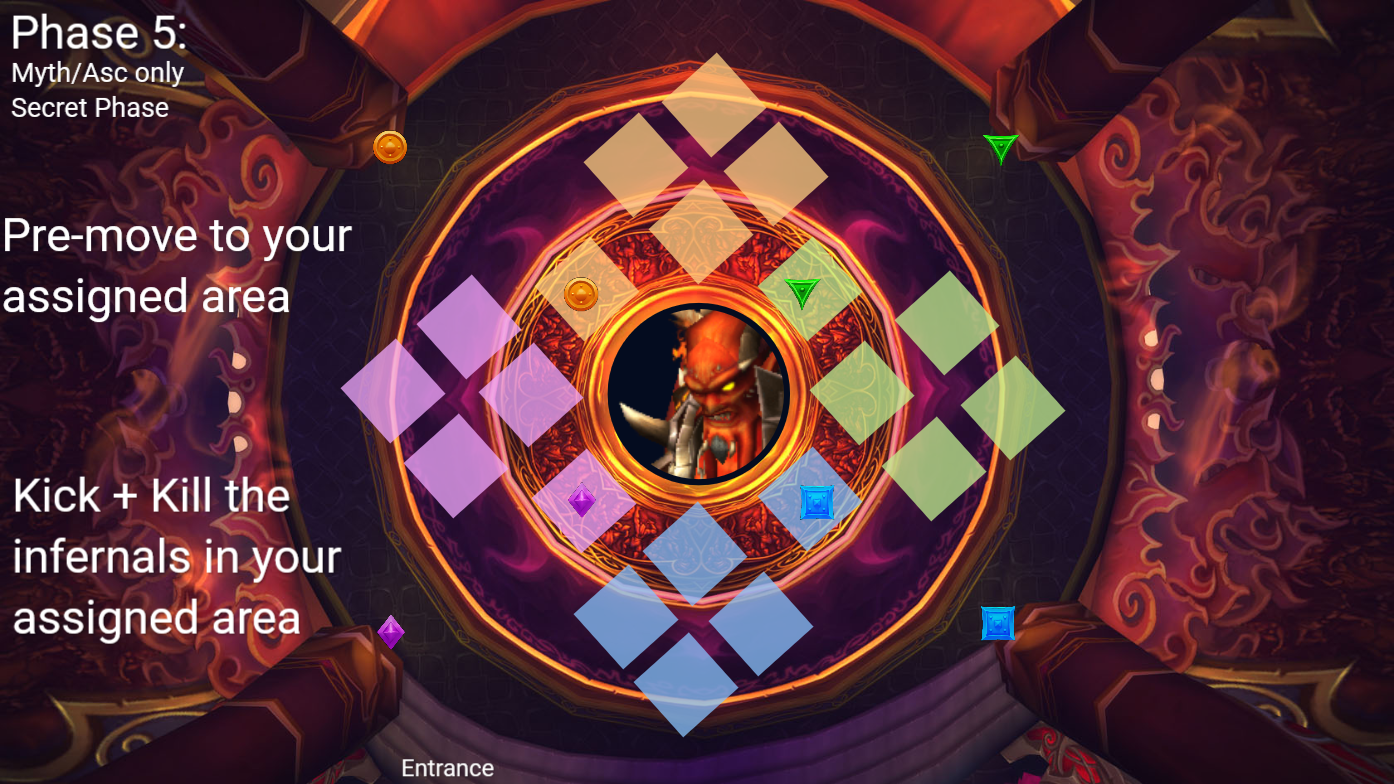
- Gravity Pull – Launches the raid in the air, then pulls you down. People are pulled to their nearest platform, preferring to put 1 person on each.
- Platforms – 20 platforms spawn floating in the air. Below the platforms, the arena is full of consuming darkness. If you fall off the platforms, you die.
- Annihilate – Casts the beam as normal, but no additional smoke is left behind.
- Obliterate – Instead of spawning in rings around the room, approx 40% of platforms are targeted instead.
- Armageddon – Spawns 3 small meteor indicators under every player, which land a few seconds later. Also spawns 4 large meteors which each spawn infernals. These are the same infernals which must be kicked and killed.
- Abilities which no longer exist: Legion Lightning, Fire Bloom, World Breaker, Sinister Reflections, Shield Orb, Dragon orbs
Phase 5 strategy:
- When the boss hits 0%, he will regen his HP to 50% and begin the secret phase.
- Pre-assign people to platforms. During this transition, people should pre-move to their approximate assigned location. Boss will launch the raid in the air, then snap you down to your nearest platform.
- Cast rotation: Armageddon > Obliterate > Annihilate
- Armageddon is cast as soon as you land. Dodge the 3 meteor spawns beneath your feet while you kick/kill the infernals
- Obliterate is next. Approx 40% of platforms are covered and explode. This happens 3 times.
- Annihilate is next. Frontal beam which is pretty easy to dodge.
- Mechanics repeat until the boss is dead.
- The main problem during progression is people jumping off their platforms. Focus on this.
- DPS can leave Aspect of the Cheetah on for this entire phase which helps a lot.
Recommended Abilities:
- Kick for Infernals & Archonisus
- Angelic Feather, Aspect of the Cheetah, Shimmer
- Leatherworkers for drums of speed. Very helpful during Obliterate transition & secret phase
Dragon Orb Tips:
The group should all move to the inner mark nearest the empowered orb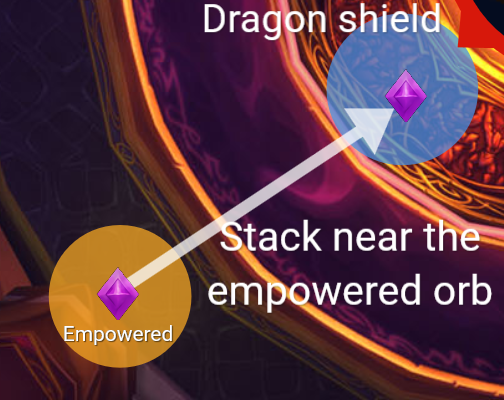
Use the weakaura pack found at the top of this document. This will tell you exactly when the dragon should activate their shield. When the weakaura turns from Green to Red, press your button. The shield button is 4 by default
The other buttons the dragon has are very helpful. Here’s what they do:
- Blink – Teleports the caster 20 yards forward
- Revitalizing Breath – Breathes in a cone, regenerating 5% heath and mana every second to all allies hit
- Accelerating Breath – Breathes in a cone, increasing attack, casting, and movement speeds of friendly targets by 50% for 10 seconds
- Shield of the Blue – Reduces magic damage taken by allies standing in the shield.
- Flicker – Teleports to a target ally in front of the caster
- Arcane Detention – Channels arcane energy to pushback against the All Consuming Darkness
Huge shout out to the TITO team for your efforts. Thanks to Sinstalis for putting the raid together and fixing it’s issues. Thanks to Caras for being the most responsive and helpful GM on the server.
This is an extremely difficult raid, good luck – Draz
Adapted from a guide by Doer published on db.ascension.gg.








0 Commentaires
Aucun commentaire pour le moment. Soyez le premier à commenter !