
Black Temple
Ascension raid guide
Written By Draz
Google doc version: https://docs.google.com/document/d/1ejcIywCtCaH1Vh2rj_oUbV_hp2a9nLxvWde06jSKJd4/edit?usp=sharing
Important information
Default raid comp
- 2 tanks
- 1 healer per 5 raiders approx
- 10 man raid group = 2 tanks, 2 healers, 6 dps
- 25 man raid group = 2 tanks, 5 healers, 18 dps
- Melee dps should be less than half of the total dps players
- Range/Caster dps should be at least half of total dps players
- Most of your dps should be range/casters. Most fights in Black Temple have large advantages to this. Melee can be acceptable, but be aware that they will have a disadvantage in many fights.
Pictures
I’ve included pictures with each boss explanation. Some require the group to split up. I’ve indicated this with Blue Square and Orange Circle icons to indicate Left and Right.
Kill Videos
- High Warlord Naj’entus – https://youtu.be/qsEqzMTrqoI
- Supremus – Imperium – https://youtu.be/JDlx_GBF67M
- Shade of Akama – https://youtu.be/blByRE1YM7s
- Teron Gorefiend – https://youtu.be/D095nyv77hY
- Gurtogg Bloodboil – https://youtu.be/XFjxduVASaA
- Reliquary of the Lost – https://youtu.be/creZ9D0yR90
- Mother Shahraz – https://youtu.be/CDF7qSmlG48
- Illidari Council – https://youtu.be/D_xXLIcwvoM
- Illidan Stormrage – HEROIC ONLY ATM https://youtu.be/iMdrHmyDNbE?si=BcRoy5dff1OsbPz8
Weakaura pack
Credit to Luciqq and We Go Again for making this weakaura pack
https://wago.io/lEhUupeoS
High Warlord Naj’entus
Kill Video – https://youtu.be/qsEqzMTrqoI
Default raid comp – Can be solo tanked if you properly handle oozes
Mechanics:
- Tidal Shield – Boss gains a shield that must be taken off with a spine
- Impaling Spine – Incapacitates a raider. Spine must be picked up by another player. Use the item in your inventory on the boss to remove Tidal shield
- Static Charge – Debuff that does damage to those near you when it expires
Strategy:
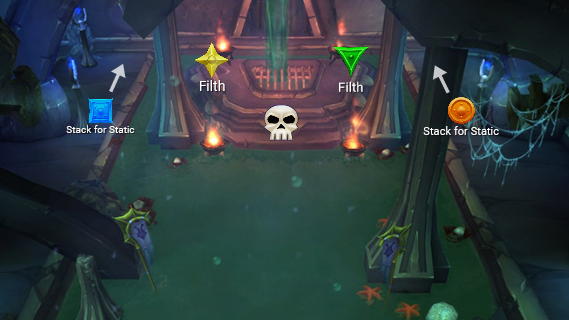
- Split healers and range dps into 2 groups. Move out when you get Static
- 1 tank will be on boss, 1 tank will focus on picking up adds (oozes named Filth) and picking up impaling spines.
Recommended Abilities:
- Movement (to move for static)
Supremus
Kill Video – https://youtu.be/JDlx_GBF67M
Default raid comp
Mechanics:
- Add Spawn – Spawns 1 large and a group of small adds
- Shadowmoon Outrider + Shadowmoon Direwolf – Hunter that runs from the group and shoots.
- Bonechewer Juggernaut – Enrages at low health
- Volcano – Spawns a green patch which later turns into a volcano. Explodes when Supremus comes into contact with it. Each volcano applies 100% damage taken increase to Supremus. Green patch turns into Volcano after 10 seconds. 1st volcano spawns 15 seconds after pull, then every 20 seconds
- Fixate – Supremus fixates the first person to attack him. This fixate changes to a different target every time he hits a volcano.
Ascended:
- Eye Beam – Fixate target is also chased by 2 fire trails
Strategy:
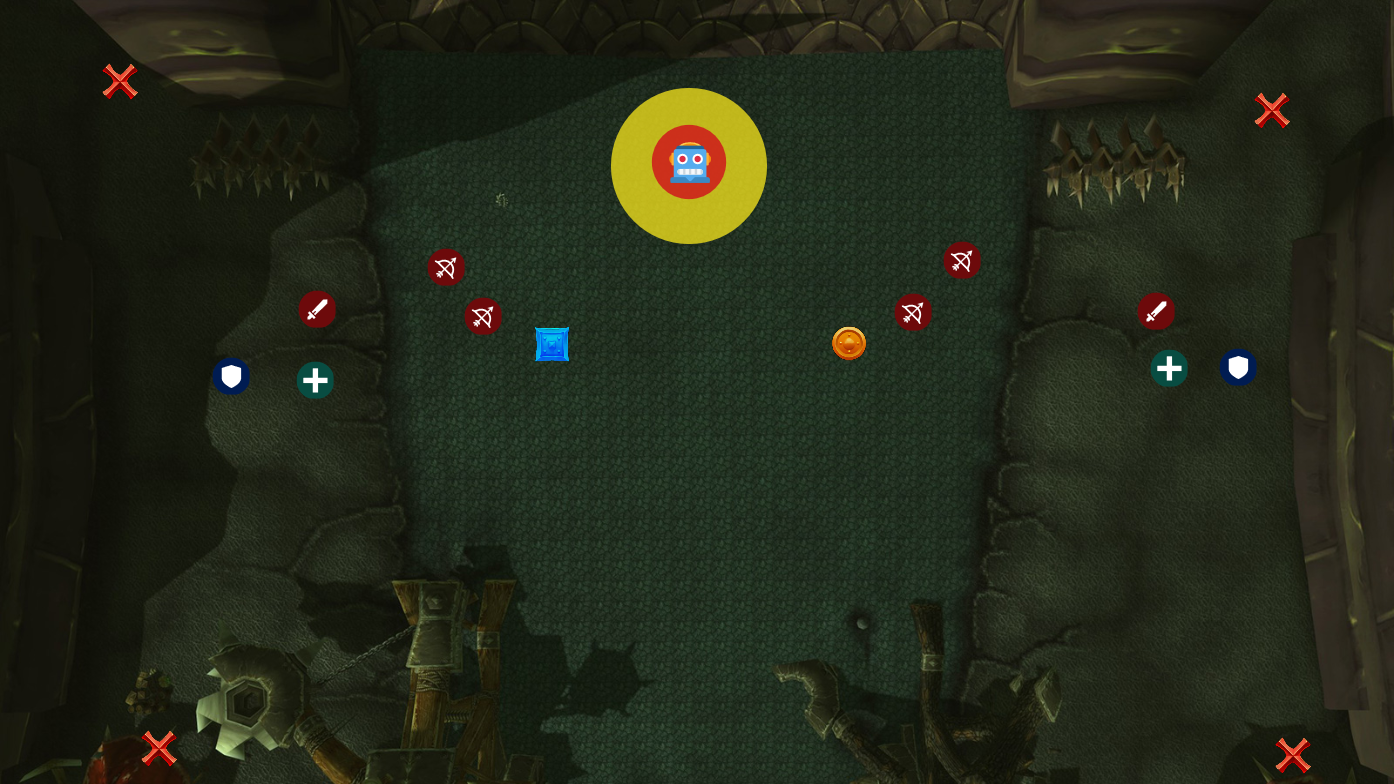
- Split group in 2 evenly. Half left, half right.
- Prioritize attacking adds unless you’re fixated
Recommended Abilities:
- Movement, Slows/Stun/Root for wolfs, DPS can taunt boss to move him slightly
Shade of Akama
Kill Video – https://youtu.be/blByRE1YM7s
Default raid comp
Adds:
- Channeler – Starts on stage channeling into boss
- Sorcerer – Spawns on the sides. Runs to boss and casts. Mobile version of Channeler
- Defender – Reduces the damage that nearby enemies take by 50%
- Spiritbinder – Healer
- Elementalist – Caster
- Rogue – Applies stacking 10% damage taken debuff to tanks
Ascended:
- Damage done to Shade of Akama is reflected to Akama. If Akama dies, you lose.
Strategy:
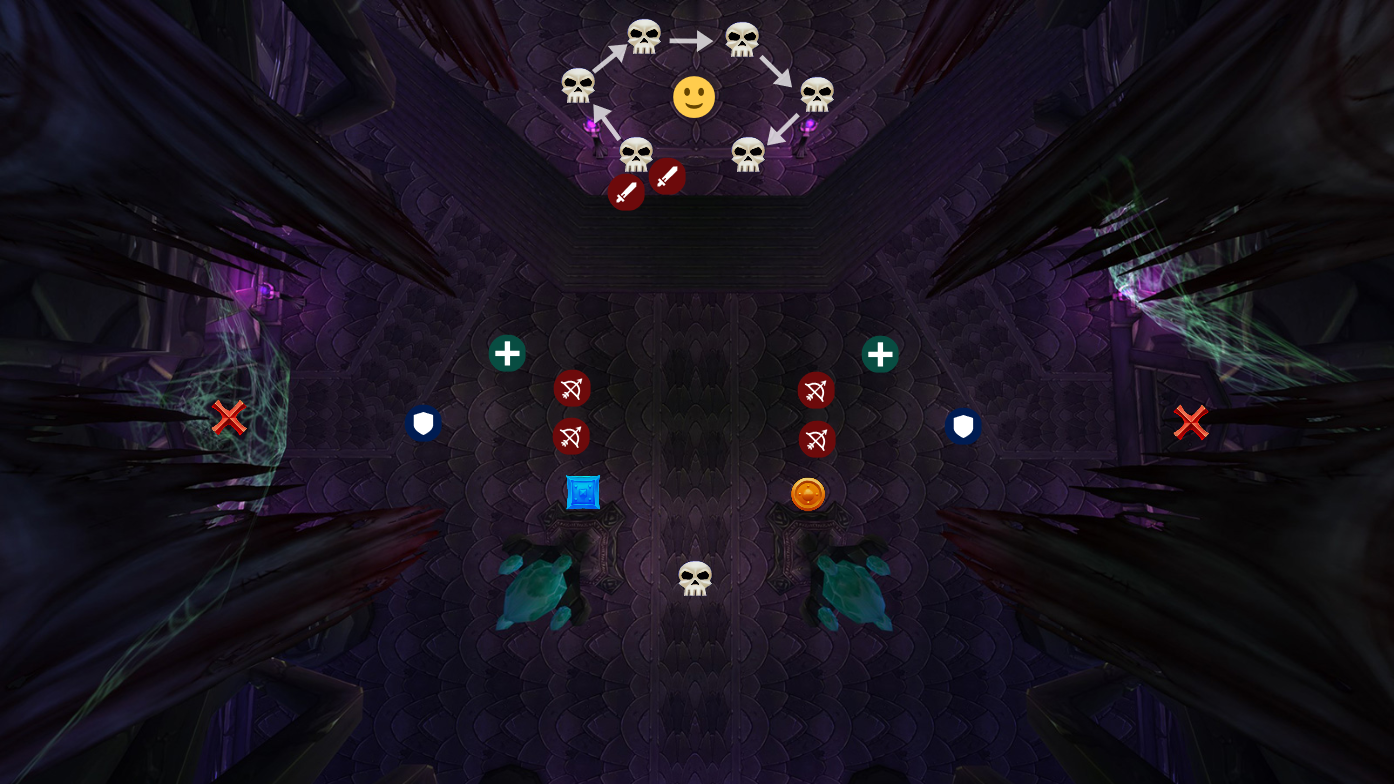
- Downstairs – Bring adds to the middle and CC/Interrupt them. Kill priority: Defender > Spiritbinder > Elementalist > Rogue
- Upstairs – Interrupt channelers as you kill them
Recommended Abilities:
- Solar Beam, Kicks, Flesh Hook, AOE Stuns, Steward of Eternity & Judgement of Light (to heal Akama), Mocking Blow & Challenging shout to taunt Shade
Teron Gorefiend
Kill Video – https://youtu.be/D095nyv77hY
Default raid comp
Mechanics:
- Soul Reaper – Deals damage and applies Impale Soul debuff. 10 seconds after pull, then every 20 seconds
- Wither and Rot – Death and decay like ability. 15 seconds after pull, then every 30 seconds
- Grasping Death – Incapacitates raiders. 30 seconds after pull, then every 30 seconds
- Shadow of Death – When debuff runs out, you die and become a ghost. Dying releases other ghosts that will attack the raid
Ascended:
- Soul Fragment – Boss cannot die unless 1 person with more soul fragments than him lands the killing blow
- Soul Shards – Boss consumes his stored soul shards at 25% hp to heal him for 1% max hp per soul shard.
Strategy:
- Move when debuff at 10 seconds. Play the minigame to practice. https://teron.faldorn.net/
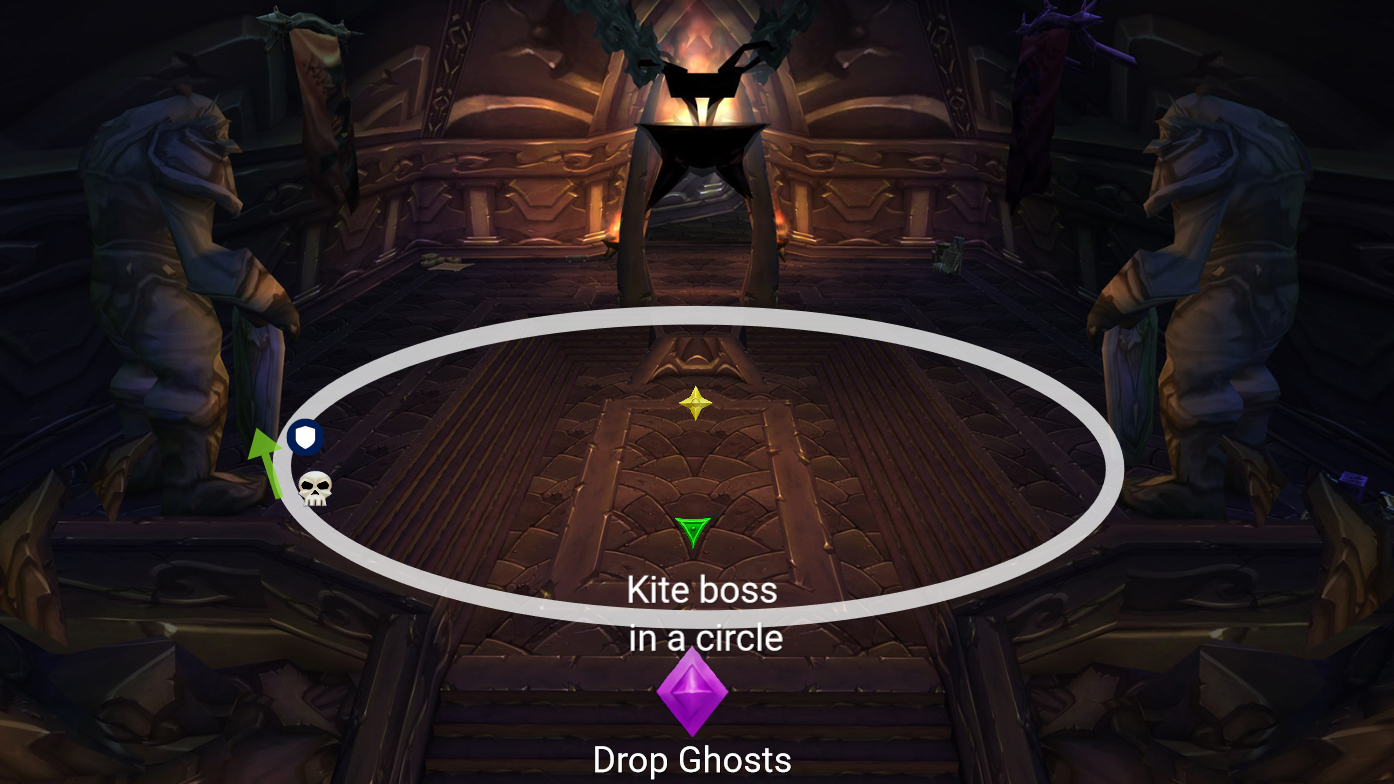
- Kite boss in a circle so he doesn’t re-absorb his Soul Fragments
- Range dps/healers stand on either Star or Triangle. Move to the other when standing on Wither and Rot
Shadow of Death:
- Debuffs correspond to the order you enter raid. Last to enter is first to become a ghost
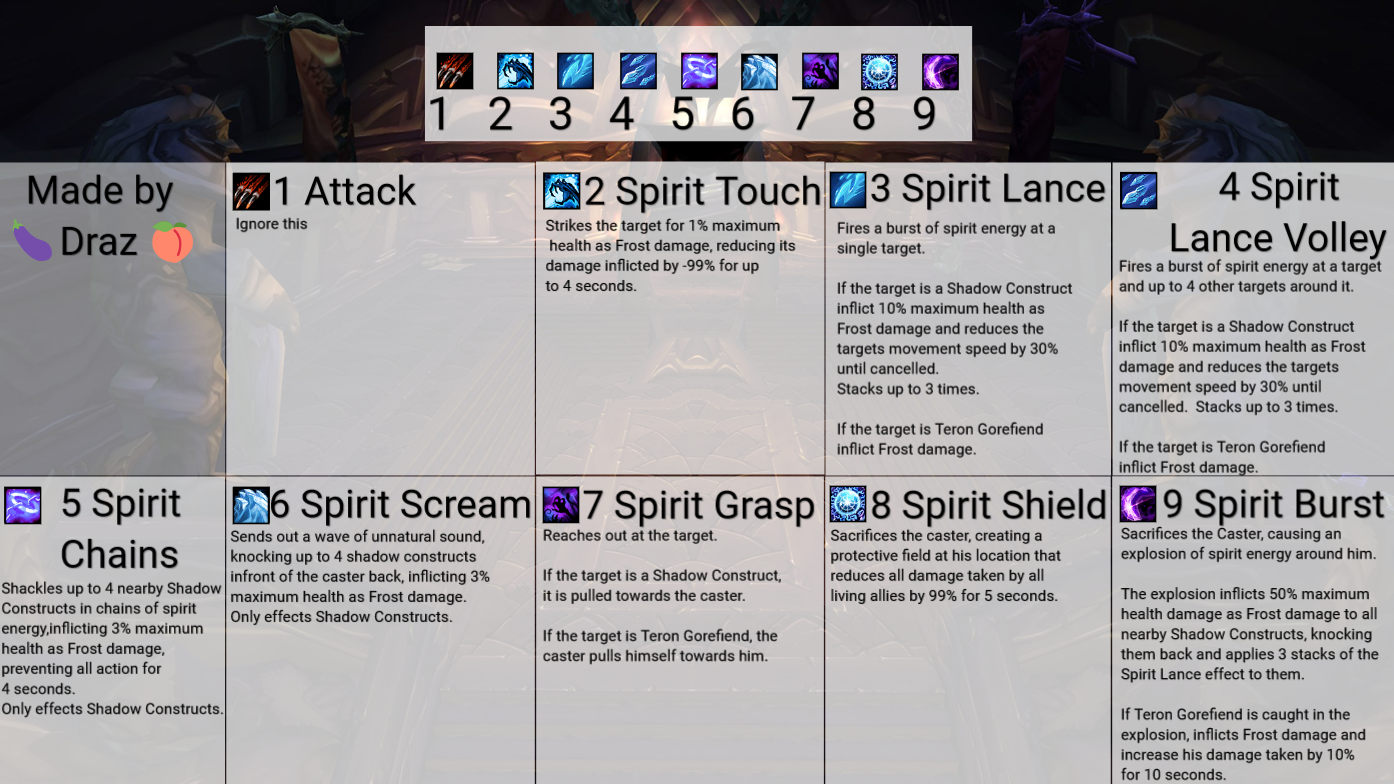
Teron Gorefiend – Vengeful Spirit tips
Example of perfect Spirit handling
Example of what it looks like to handle Vengeful Spirits perfectly. This is before the change that sends 1 person into the void early. The main difference is that you’ll click orbs for longer before needing to help the second person.
Vengeful Spirits ability guide:
- Use 4 Volley followed by 5 Chains. After 5 Chains, step back to the stairs to make pushback more consistent. While moving back, cast 3 Spirit Lance at each mob. Tab targeting makes this easier. Goal is to get 2 stacks on every mob.
- After root expires, the ghosts will move toward you. Use 6 Spirit Scream to push them back. Spirit Scream is weird and takes some getting used to. If used incorrectly, it can push mobs in a direction you don’t want. Always target the ghost nearest you.
- Continue applying 3 Spirit Lance to all ghosts until 4 Volley and 5 Chains are available.
- When no ghosts are alive, use 2 Spirit touch on the orbs that will be following the boss
- When your group doesn’t need anymore orbs, you can start spamming 2 Spirit Touch on Teron Gorefiend to apply a stacking damage taken debuff. This debuff is personal and does not affect other ghosts or players.
- Do not use 8 Spirit Shield or 9 Spirit Burst unless your raid leaders instruct you to. These kill your ghost but provide a buff to your raid for a short amount of time. If used improperly, these hurt overall dps and don’t provide their needed benefit.
- Never press 1. It’s a waste of a global
Gurtogg Bloodboil
Kill Video – https://youtu.be/XFjxduVASaA
2 tanks, 3 healers – DPS should either be self heal or have high armor
Mechanics:
- Boiling Blood – Stacking debuff that does fire damage. 10 seconds after pull, then every 20 seconds
- Seismic Smash – Frontal ability that knocks players in the air. 20 seconds after pull, then every 20 seconds
- Mak’gora – Targets 1 player and focuses them. Targeted player receives a huge buff. 1 minute 10 seconds after pull, then every 1 minute 10 seconds
- Blood Shield – 99% of healing received is converted to a shield on the player
Ascended:
- Living Blood – Blood puddles are animated into oozes.
Strategy:
- Spread around the room, staying in range of all healers
- Use a large healing cooldown on pull, ideally a nature healer using tranquility. Do this to ensure everyone has a Blood Shield
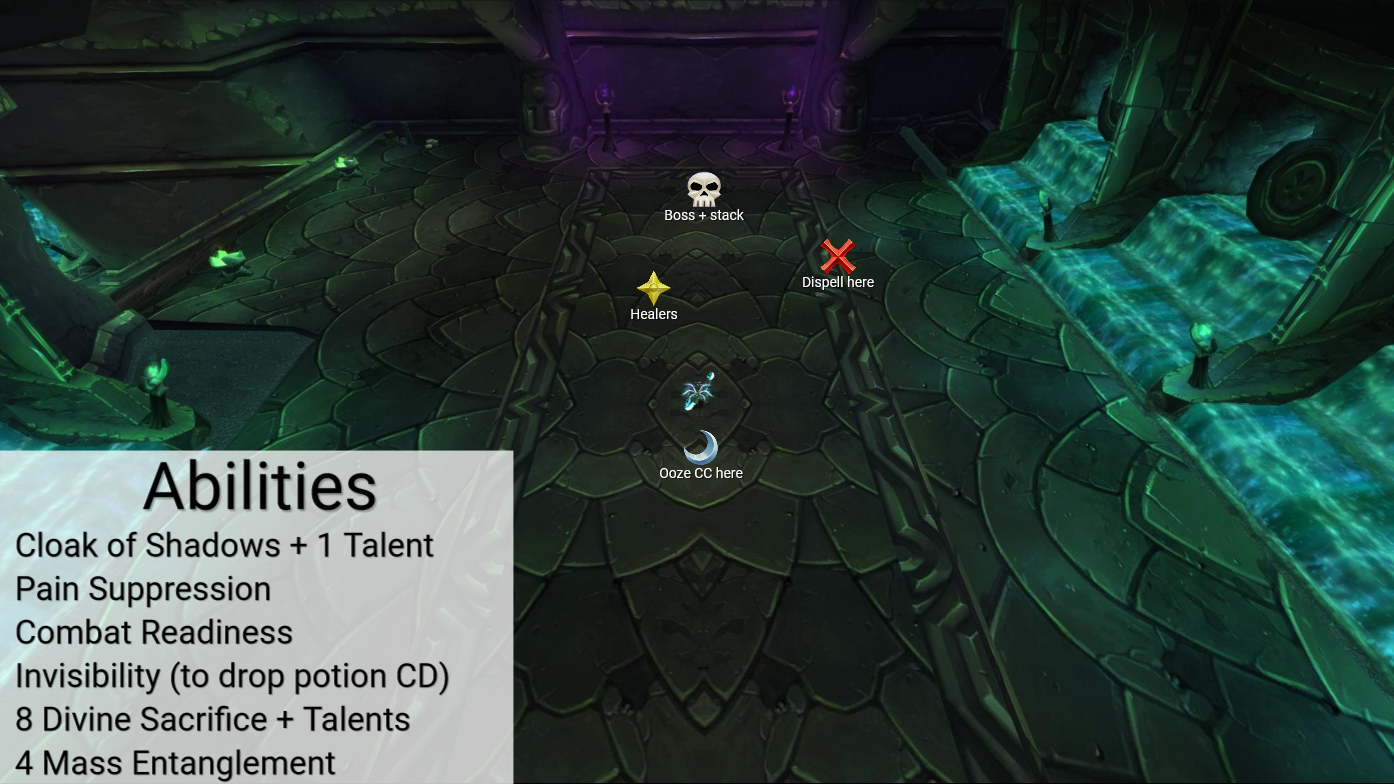
- At 3 stacks of Boiling Blood, move to X and cloak of shadows. Wait for Seismic smash, then move to skull
- Off tank must get aggro on the animated bloods and CC them on Moon.
- Healers don’t soak mak’gora. Healers are squishy and can die easily
- You need 5 Dsac s per Mak’gora, and 8 total
Recommended Abilities:
- Cloak + 1 point in Elusiveness, Combat Readiness, self heal or high armor specs
Reliquary of the Lost
Kill Video – https://youtu.be/creZ9D0yR90
Solo tank
Boss 1 – Essence of Suffering:
- Aura of Suffering – Reduces all healing recieved by 99% and reduces all defensive stats to 0
- Soul Drain – Magic debuff applied to raiders that deals shadow damage. Dispellable
Boss 2 – Essence of Desire:
- Aura of Desire – Reflects 10% of all damage done
- Desire – Stacking debuff. Reduces all stats by 10% per stack
- Spirit Shock – Kickable cast. Applies magic debuff that removes all threat
- Rune Shield – Boss gains a shield buff. Spellsteal
- Tease – Buff applied to raiders. Increases damage done by 100%, damage taken by 100%, and reduces resource costs by 100%
Boss 3 – Essence of Anger:
- Aura of Anger – Applies Anger debuff to players
- Anger – Take 1% of current health per second. Shadow damage
- Soul Scream – Frontal cone that converts your resources (mana, energy, rage) into damage taken. Happens every 12 seconds
Intermission phases:
- Adds spawn that must be killed or boss gains 1% damage per add
- Dodge purple circles that move from the outside to the center of the room
Ascended:
- Purple circles spawn at all times, rather than only during intermission phase. It’s also possible now to spawn a complete circle of swirls. This requires you jump over them.
Strategy:
- Lust all 3 phases
- You’re able to jump over the purple swirls. This is required at times
- P2 don’t kill yourself with reflect damage
Recommended Abilities:
- 3 Bloodlusts, Dsac for p2, Spellsteal, kick, Misdirect, Disengage, Aspect of the Cheetah
Mother Shahraz
Kill Video – https://youtu.be/CDF7qSmlG48
Default raid comp – Parry tanks recomended
Mechanics:
- Fatal Attraction – links 3 players together. Move apart to break chain. 35 seconds after pull, then every 30 seconds
- Thoughts – Receive 1 of 4 thoughts debuffs
- Beam – Deals damage to players until their beam and thoughts debuff match
- Gauntlet – Boss moves to the other side of the room at 20%. Moves again at 10%.
- Tank Debuffs – There are 4 separate tank debuffs (Mater, Filia, Avia, Virgo). Just taunt around 5 stacks and then swap taunt every time your debuffs fall off
Ascended:
- Private Session – Boss summons a copy of herself that the tank must kill. Nobody else can see this copy
Strategy:
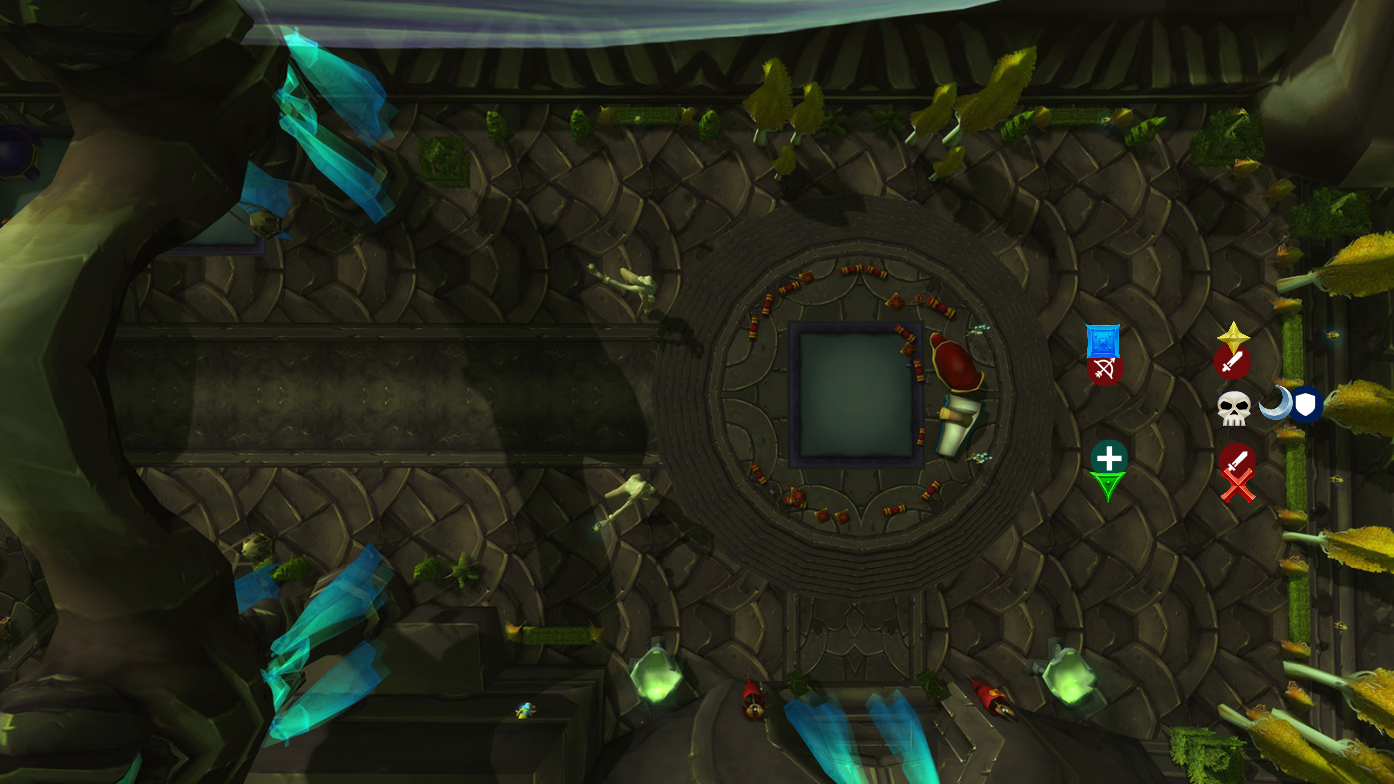
- Tank boss in the corner
- Split group evenly on each mark. Melee splitting between Yellow/Red, Casters and healers splitting between Blue/Green. Both tanks (if parry) stack on moon. If one tank is not parry, have one on Moon and one on the opposite side of the boss.
- For Gauntlet, large groups can leave a small group at the original platform to avoid gauntlet wipes. Best group to leave is 1 Steward healer and 2 or 3 Shadow Visions/Self heal players
- Players need high shadow resistance. Necklace and food recommended
Recommended Abilities:
- Dsac, 1 improved aspect of the pack, movement abilities
The Illidari Council
Kill Video – https://youtu.be/D_xXLIcwvoM
Raid comp:
2 tanks, 3 heals, 5 dps (10 man)
Bosses:Mage – High Nethermancer Zerevor
- Nether Protection – 75% magic damage taken reduction. Spellsteal. Cast on pull, reapplied 30 seconds after being spellstolen
- Empowered – Orbs follow players instead of moving in circles
Priest – Lady Malande
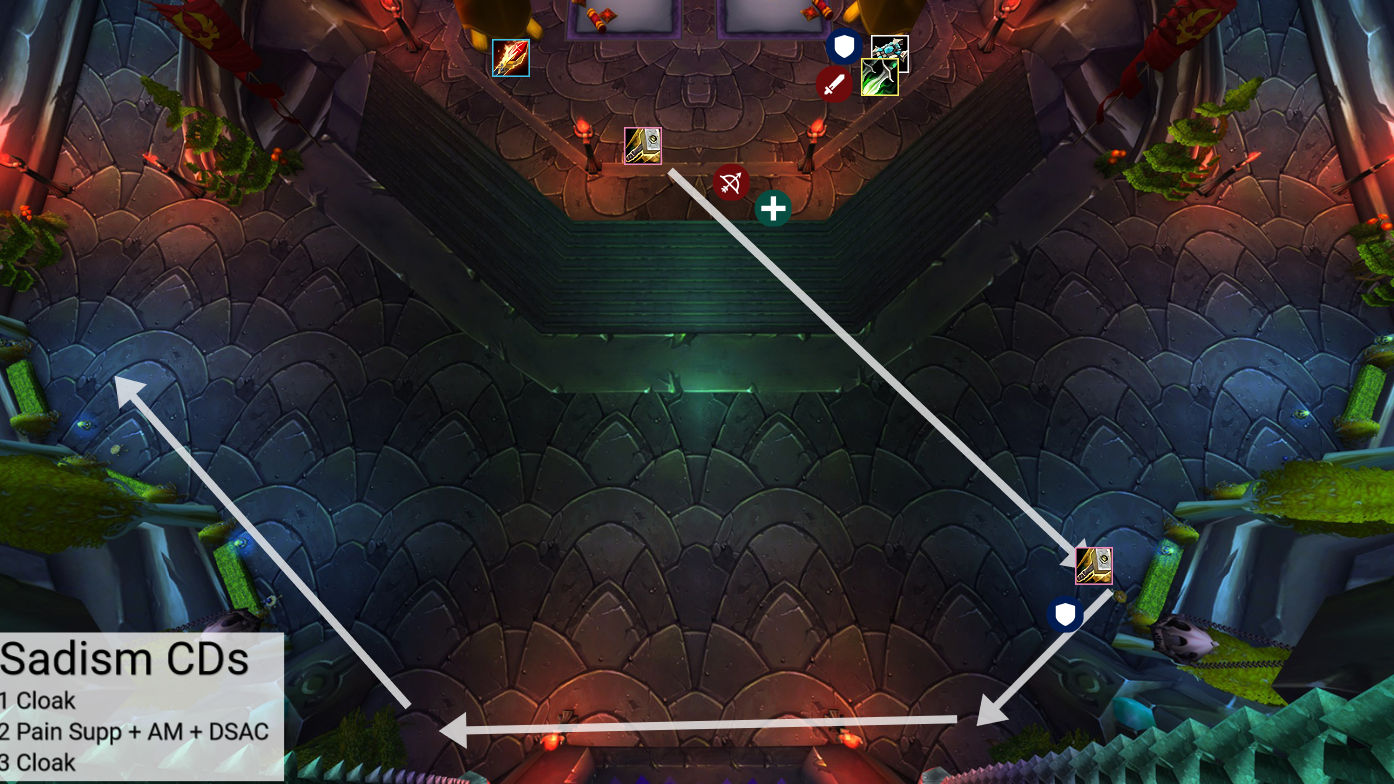
- Sadism – AOE shadow damage to group
- Empowered – Does more damage
- Pleasure to pain – Heals priest. Kick
- Empowered – Heals all bosses instead of just one
- MInd flay – Deals damage
- Empowered – Changes from mind flay to mind sear. AOE damage
Paladin – Gathios the Shatterer
- Aura of Command – 30 yard aura. Reduces other bosses damage taken by 25% and makes them immune to interrupt
- Empowered – Increase from 30 yard to 60 yard aura
- Consecration – damage & silence area
- Empowered – Consecration is permanent
- Execution Sentence – Deals damage to people near you
- Empowered – Last pulse must be stacked
Rogue – Veras Darkshadow
- Smoke Bomb – LOS damage and healers
- Empowered – Poison smoke bomb
- Fan of Knives
Ascended:
- Boss wearing the crown gets their abilities empowered. Empowered abilities don’t affect normal or heroic
Strategy:
- Kill order: Rogue > Priest > Mage & Paladin
- Have 2 range dps attack mage on pull until around 97% hp
- Bring Rogue to Priest and AOE them down. Rogue priority
- Paladin should have crown for >90% of the fight. Drop crown after priest is dead breifly, then get it back. This causes Consecrations to despawn
- Tanks should spellsteal mage
- Kick Mage & Priest. Don’t let Pleasure to Pain to cast. Don’t let mage get to 20 stacks
Recommended Abilities:
- Cloak of Shadows (tanks need hasty/Elusiveness), Aura Mastery + Shadow Aura, Kicks, Pain Suppression, Spellsteal, Dsac
HEROIC ONLY – Illidan Stormrage
Kill Video – https://youtu.be/iMdrHmyDNbE?si=BcRoy5dff1OsbPz8
Default raid comp – try not to bring too many melee
Phase 1 – Illidan:
- Flame Crash – Does high AOE damage and leaves fire patches. Fire patches drain your mana and do damage.
- Shear – High tank damage. Taunt swap
- Warglage – Throws a warglave at the player farthest from Illidan. Does large fire damage around the warglave
- Parasites – Similar to Lady Vashj. Debuff expires which spawns adds that target players to re-infect. Does not happen during the first Phase 1, but does in subsequent phase 1.
Phase 2 – Flames of Azzinoth:
- 2 Flames spawn in their circle. If they’re moved out of circle, they do huge damage. Flames do frontal cone and drop flame patches in front of them.
- Chaos Blast – Targeted at a player. Deals AOE damage and applies 100% fire damage taken debuff to all players near the target
Phase 3 – Betrayer’s Spire Guard:
- Bats fly in and land on both sides of the room. Need to be tanked
- Chaos Burst – All players must spread to avoid taking fire damage. This happens 1 time at the start of phase and again at the end of phase.
- Shadow Blast – 1 range dps must pickup the Skull of Guldan and taunt Illidan. Pickup the Skull AFTER Chaos Burst and drop before the second one. Taunt boss to keep the Shadow Blast on yourself
- Shadow Demon – Spawns on Illidan and stun 1 player per demon. All other dps must attack and CC them to stop them from reaching the player they’re channeling at
Adapted from a guide by Drazbeta published on db.ascension.gg.









0 Commentaires
Aucun commentaire pour le moment. Soyez le premier à commenter !