
📖 Source : Forum officiel Ascension
Dungeon Delver – Solo Dungeon Challenge Guide
Dungeon Delver is hands down the most difficult trial on Ascension – as of this writing, only 6 people have completed it on Elune. That said, it will definitely take more care and preparation than the other challenges.
‘Slow is fast’ when doing this trial, since mistakes will just send you back to Brill and you will loose hours invested. This guide is intended for Elune, although it maybe useful for Area 52 people as well. I’ll assume that you have a strong understanding of WoW and Ascension if your attempting this challenge. Feel free to DM me on discord if you have any questions #drifter9913
Build
The build I use combines tank and shadow sustain. Most of the successful builds I’ve seen either do this (either as block or Bear) or use Cryotherapist. I don’t use bear since it is generally weaker when it matters – at the late game vs casters.
Righteous Fury is for general tankiness and it will weight some defensive abilities/talents, as well as grant you some SP. Shield of Righteousness is general filler for its life gain (which is big later, in particular with Inner Light), it can trigger Shadow Strikes and weighs your block talents. Corruption, Shadow Arrow (and Jadefire if you rng it) is your passive dmg/healing. Shadow Bolt with Soul Leech is your active dmg/healing. Vampire Lord and Draining Strikes are raw passive healing. Stat allocation is Int.
I recommend Night Elf for race, since you it will allow you split pull some troublesome packs of mobs. Wait until one or two mobs melee you, then Shadow Meld and it will reset the others. Works on boss adds also, but not bosses or mobs that can see through stealth. Human and Gnome are decent alternate choices, so you can avoid using the Insigna of the Alliance in favor of a stat trinket.
Here is your start:
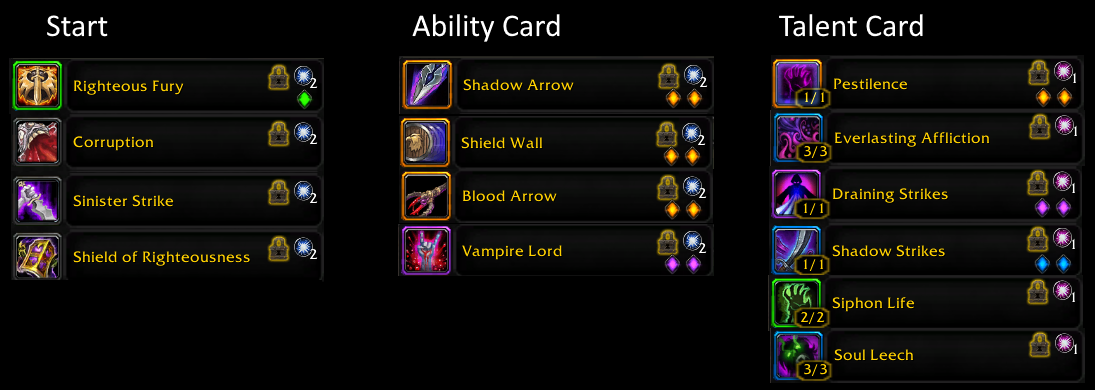
It’s mandatory to roll into Shadow Bolt or Shadow Waste Bolt before level 40. Luckily these are heavily weighted and its very likely you will roll into it. Shadow Waste is preferred since its higher dps.
Abilities and talents to keep a look out for:
S Tier: Jadefire Corruption, Dispel Curse*, Evasion, Divine Protection, Backlash, any 10% block talent or ability, Inner Light, Nightfall’s Promise
A Tier: Improved Soul Leech, Fire/Shadow Resist Aura, Critical Block, Demonic Leap, Shield Block, Frost/Demon Armor, Blessing of Sanctuary
B Tier: Block/Dodge/Parry talents, Mana tools, Corruption buffs, Shadow Bolt buffs, Player buffs, Mobility abilities, 5% crit talents
* Dispel Curse will drastically improve your odds in two important fights
The rotation will use a priority system to keep up your corruptions and use your shadow bolt procs. You rotation will change once you get Everlasting Affliction at 30 since Blood Arrow and Shadow Bolt can refresh your three corruptions (Shadow Arrow, Corruption, Jadefire Corruption).
Single Target: Shadow Arrow, Corruption(s) and maintain with Blood Arrow/Shadow Bolt. Use Shadow Bolt on Shadow Trance trigger. Shield of Righteousness and Sinister Strike as filler.
AOE: Same as above but prioritize refreshing corruptions on fresh targets so you maintain them until the end without recasting.
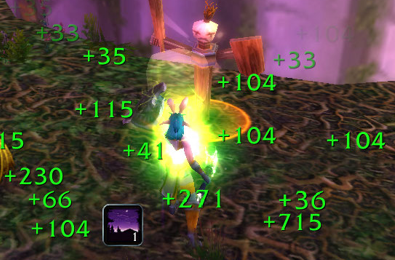
The end result is something like below, where each damage source provides two or three heals depending if Draining Strikes triggers. This will create a very high sustain and decent dps for the level/gear.
To improve your odds of getting those S and A Tier abilities, try to get as many scrolls of fortune as you can through questing for Adventurer Chests. You can farm these periodically to increase your odds of picking up the best abilities and talents. Depends on your patience, but get as many as you can at each point where you level caps before you kill a boss. At the very least I would recommend getting at least 30 scrolls at level 20 since it is generally the most impactful at this time due to the ability/talent pools being smaller. If your motivated you can get well over 100.
Roll away abilities and talents that can weigh the wrong things. For example, if you roll into a Pet, roll it off asap. Same thing with Totems and so forth. This will increase your odds in the long run of getting what you need.
Preparation
Preparation can go a long way, in particular the more difficult fights. If your doing the prestige version of the challenge, you can simply use the AH. If your doing the fresh character version, its probably worth it to level Alchemy and farm up the various mats. I would recommend the following:
Healing/Mana Potions of the appropriate level
Nature Protection Potion and Shadow Protection Potion
Greater Protection Potions for Fire, Frost, Nature and Arcane
Greater Stoneskin Potion
Stamina Scrolls of the appropriate level
Clamlette Surprise or High Risk food of the appropriate level
Elixir of Shadow power and/or High Risk flasks of the appropriate level
Brilliant Wizard Oil
Restorative Potion Uldaman Reagent Run
Luffa (trinket) Incendosaurs? Whateverosaur is More Like It
Insignia of the Horde/Alliance Gordok Ogre Suit
 Viewing Room Key
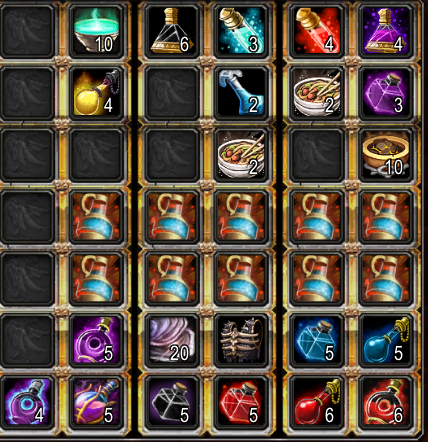
If you are doing the fresh character challenge instead of the prestige version, this will be the main hang-up. You can either forgo the preparation for a greater risk, or spend a few days doing professions/mats. Otherwise the differences between the two challenges are marginal.
Gearing and Enchants
Pick the gear from the Adventure’s Chests that has Spell Power, Stamina and Shield Block Value. The highest value pieces use all three stats. Use Heirloom Gear if available, but replace any pieces that are worse as you go. Generally speaking, you will use the Heirloom weapon, necklace and shield throughout the run, but the rest you will replace. Enchant gear if your are able. Buy honor gear if you are able. Rings, Cape and stamina Trinkets from WSG and Boots and Belt from AB vendors.
If your doing a fresh character run, you can use gold to do board quests for orbs/honor as needed. See below for REs. Wizard’s Corruption are used to assist with mana.
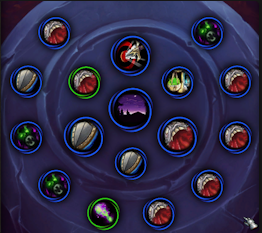
Accurate Shadowbolt
Accurate Corruption
Balance of Power
Precision
Darkness
3x Soul Leech
3x Shield Specialization
3x Improved Corruption
Adjust according your your hit.
Dungeon Strategies
I’ll assign a tier from S (very hard) to C (easy) so you are aware of what to watch out for. Dungeon Delver will load you up with overconfidence because most things won’t even move you health bar… until you come across something deadly and you will quickly drop if your not expecting it. Just be aware things can quickly change one you surpass the sustain threshold of the build.
Deadmines (Tier C) – Easy instance, just be weary of overpulling because your taking no damage and accidentally pulling Captain Greenskin from one of the below decks. Nothing notable here otherwise.
Wailing Caverns (Tier C) – Easy instance, start the Mutanus encounter from the outset and just blow through it with the npc. The hardest part is just getting to the instance because trash outside is harder than the instance is.
Shadow Fang Keep (Tier B) – Easy instance with the notable exception of Archmage Arugal. He is the first ‘check’ and will generally stomp under performing build here. But you don’t have an underperforming build do you? So just make sure your at full mana, stand on the wall near the door and keep up your Corruptions with Blood Arrow and Shadow bolt filler. No problem.
Black Fathom Deeps (Tier B) – The only reason this is B tier instead of C, is the trash outside can be lethal if you over-pull or try to run into the instance portal. There are a lot of corpses outside for a reason. Once you get inside it is quite easy.
Razorfen Kraul (Tier C) – Easy instance, probably the only things to watch for is over pulling too many champions or bats.
Gnomeregan (Tier B) – Another easy instance, the main things to watch out for it is the mines from the Dark Irons and the spell reflect from the Arcane Nullifier X-21. Give them respect and it will go fine.
Scarlet Monastery (Tier B) – The mobs outside the instance are harder than the actual instance, so pay attention and know when to dip back into the instance portal. Notable mobs are Scarlet Monks and Defenders who interrupt anything hard cast and Doan’s Detonation, which you need to run from. Otherwise its fairly easy as long as you not overpulling.
Razorfen Downs (Tier A) – The instance is generally quite easy until Amnennar, but he is a check. Under performing builds will tend to die here since his Frostbolts hit hard and they are relentless. If you have a Frost Protection potion, pre-pop one and stand with your back to the fire. Never stand next to the edge of a drop as he can knock you off. You can ignore adds as they will pick up the corruptions and heal you more. Don’t interrupt his casts as it will knock you back. Use another Frost Protection Potion if needed. This build is well suited for him, but other builds may lack the sustain.
Uldaman (Tier B) – Fairly easy instance until you get the last boss, Archaedas. You have plenty of sustain for him, the biggest issue is actually mana if you have zero mana tools and play too greedily with your spells. He has a large health pool for his level, so bring a mana pot and concentrate on playing it slow and steady and its no problem then.
Maraudon (Tier A) – Mara has a couple things to watch for which can potentially be lethal. The first is, enter through the purple side since Orange side is a deathtrap.
Vyletongue packs can hit pretty hard due to the combination of Corruption, poison and physical mobs. Target Corruptors first and split-pull as needed. Nature or Shadow protection potions can be useful
Noxious Slime can hit hard, use nature protection potion and kite back. Split pull as needed.
Lord Vyletongue spread corruptions and kill adds and your good.
Razorlash can kill you if you don’t have Luffa and can’t clear the Rend before it hits 15 stacks. Use Luffa when the stacks are high and you are fine. If you don’t have Luffa for some reason, go get it. Get the Luffa here:Incendosaurs? Whateverosaur is More Like It
Celebras the Cursed, get in close and spread your corruptions and you should be fine.
Princess Threradas, apply your corruptions and kite around the room. Melee is a very bad idea. A very easy fight if you kite, and you can do her anytime you do the other bosses, even if under leveled.
Zul Farrak (Tier B) – Two main things to watch out for here, the Sandfury Shadowcaster’s have a Shadow Word: Pain that hits waaay harder than it should so you need to burst these guys down asap and just avoid the ones you can. Use Shadow Protection potions liberally. The other thing to watch is Servant of Antu’sul (or other Basalisk mobs) which can stun you for a long time. Wear the Insignia of the Horde/Alliance to clear it if needed. Otherwise the place is not bad.
Sunken Temple (Tier B) – Fairly easy instance. Be sure you know the Hakkar event before attempting so you don’t flounder around too much. The trash before Jammal is annoying, just flee from the ghosts. After Jammal drops there are two pulls with double-drakes that can be high dps. Use a Potion of Nature Protection before hand and it should be fine however. The last boss is easier than the two double drake pulls.
Diremaul East (Tier A) – Fairly easy until the last boss. Watch for patrols on the way Alzzin the Wildshaper . Alzzin has two main things to watch for, the first is the mana drain on the initial phase. This can be spicy if you don’t have any mana tools, so bring mana potions and dark runes just in case. Secondly is that there is a large Treant patrol mob that pulls with him in the last phase (sometimes) that is hidden under the ramp somewhere. Fairly sure this is bugged and its not suppose to be there. If your a Night Elf, meld as soon as you see him or the imps and its fine. Otherwise just brute force your way through it.
Black Rock Depths (Tier B) – Again, very easy instance until Emperor Dagran Thaurissan. Wise to clear all trash before pulling. Use a Greater Fire Protection potion beforehand and pull up to his throne. When he enters in Avatar form, you can drop down to the lower level if you don’t feel safe. Usually you can face tank it however.
Black Rock Spire (Tier B) – Just a lot of trash to wade through unless you have Demonic Leap and can do some good skips. Nothing is overly difficult, mainly just watch for overpulling as that will be the main threat. Drop down to the lava area when you can to avoid the trolls who Hex. Bring a potion to cure poison for Mother’s Milk if you need it. The bosses are about as hard as the trash is.
Stratholme (Tier A) – You need to take your time here because of the sheer amount of trash to wade through. There are several notable things to watch for.
Eye of Naxxramas – a couple of these will pat and will be a bad time if they appear in poor locations, so always pull your pack back a good bit to mitigate it.
Crimson Battle Mage – High damage, use a Greater Fire Protection potion beforehand.
Crimson Sorcerer – High damage, use a Greater Arcane Protection potion beforehand.
Balnazzar – Not too much trouble but Insignia of the Horde/Alliance for the Fear and Greater Shadow Protection potion can help a lot. Don’t forget the zombies that come after he is down.
Baroness Anastari– If her debuff stacks to full it can be lethal so you need to either line of sight the bolts, decurse it, or use Restorative Potion.
Maleki the Pallid – Similar to Amnennar in that its relentless Frostbolts that do high damage. Greater Frost Resistance potions are good. I recommend keeping the adds alive for corruption leeching.
Baron Rivendare – Greater Shadow Protection potion beforehand, otherwise he is easy.
Diremaul North (Tier A) – Get a Gordok Ogre Suit before attempting and use it on Captain Kromcrush. Otherwise run it as a normal tribute run. The King can be a bit scary due to the high upfront damage. Use a Greater Nature Protection beforehand and kill Cho’Rush the Observer first. Use defensives early here since the fight is easier after Cho’Rush is dropped. You can reset the King if needed by running off his platform.
Scholomance (Tier S) – Scholo is difficult due to the strong mini-bosses and Gandling. Get your Viewing Room Key beforehand if possible and pull trash slowly. Here are the difficult parts:
Instructor Malicia – The combination of shadow bolt, corruption and death and decay can be a bit spicy. Use your normal rotation and swap to Shadow Bolt spam once you need to get out of Death of Decay.
Doctor Theolen Krastinov – The highest physical dps boss in the challenge, he can be rough. Luckily you can reset if you pull him close to the door, so stand by the stairs just in case. Use a Greater Stoneskin Potion and just race him. Save defensives when he is ~20% and he frenzies. Can you kite him with Demonic Leap, but this can be sketchy since you will be away from the door reset.
Lord Alexei Barov – Applies a 75% reduce heal curse so obviously having Dispel Curse helps tremendously. Otherwise your reliant on Restorative Potion and it will be a very sketchy fight. Kind of unfair that it can come down getting good rng on Dispel Curse or not. If you dont have it, pop
Restorative Potion about 20 seconds in and pull out all the stop to dps race him.
Darkmaster Gandling – High Damage fire caster that can give some builds a lot of trouble. Luckily we are not one of those builds. Pre-pot Greater Fire Protection and use your standard rotation. Once adds spawn, your golden because corruption will leech and adds and your fine at this point.
Diremail West (Tier S) – Difficult instance because of two things, the Arcane Aberrations and Immol’thar. The Arcane Aberrations guard the pylons and if you eat the attacks, it can be high damage. Always line of sight when you see them casting and keep corruptions up and spreading. You can use Greater Arcane Protection potion to mitigate some of the damage.
Immol’thar can be downright unfair. He spawns eyes every 20 seconds which deal shadow damage every 0.5 seconds that slow you (77 per tick base). The unfair part is that they can spawn out of range (sometimes) and he can spawn more than one (1-3 at random). So, the RNG of the fight can either make not bad at all, or be very difficult if you just happen to have bad luck. You can reset him if your near the edge of his arena, but strange things can happen like eye spawning in the walls which can’t attack you, eyes spawning in the walls which can attack you and you can’t attack them. Your best bet is pre-pot Shadow Protection potions, use some shadow resistance gear with SP, and just ignore eyes and blast him in an all out race. Target only Immolthar, but drag him slowly to the eyes so the corruption can spread. If you get three eyes on the first eye summon, try to reset. Otherwise you should be okay as long as your dps in the 1.5k+ range.
Fun to get all this way and then RNG can can just blast you – that’s Immol’thar..

A few last notes where I see people dying to the most:
Deadmines Trash: People just flat-out underestimating the challenge and treating it like the other (joke) challenges. Welcome to reality.
Sneed (Deadmines): People over pulling the boss with the trash. The trash can stun and the boss can disarm so it be deadly for greedy pulls or bad builds.
Captain Greenskin (Deadmines): High dps for his level and so he is a build check for sustain. Also he can knock you off the boat if your positioning is poor.
Arugal (SFK): He is the first real ‘check’ if your DPS/Sustain is up to snuff. People generally die here if they have a build that is lacking either. Melee builds will suffer even more so.
Amnennar (RFD): The second big ‘check’ for his high DPS. People will tend to panic here because the DPS taken will be higher than anything they have encountered previously. Frost Protection Potions are your friend, and don’t panic or stray from your game plan.
Darkmaster Gandling (Scholo): Highest DPS in the challenge and he will crush those who don’t have the sustain against a single caster mob. Greater Fire Protection ease the pain.
Immol’thar (DMW): The last and greatest ‘check’ mostly because of the rng and people tend to approach it wrong and over complicate it by killing eyes. If you focus eyes and your rng is bad, your just dead. So just race the boss.
Good Luck fellow Delvers
Shoutout to the Changelogged guild in general for insights and assistance. Big gratz to those who actually complete this on Elune!
Adapted from a guide by Drifter published on db.ascension.gg.







0 Commentaires
Aucun commentaire pour le moment. Soyez le premier à commenter !