
📖 Source : Forum officiel Ascension
Author Preface
While I have personally completed most of the trials on this list, some I have not yet completed or have attempted before and failed. Trials and / or information that I have have not completed, am speculating about, or have not personally verified, I will mark with the following:
- {?}
When it comes to sections marked, I will still strive to give the most accurate information and best advice that I am able to.
Table of Contents
Prestige VS Non-Prestige
A Trial’s Beginnings
The Price of Failure
Helpful Vanity Items
Reused Trial Modifiers
Trial Specific Modifiers
- Adventure Mode
- Item Restriction
- Overwhelming Odds
- Spellbind Roulette
- Crafter’s Guild
- DEHTA
- Inn-Sane
- Feeling Fishy / Deep Sea Nightmare
- Narcolepsy
[anchor=prestigevsnonprestige]
Prestige VS Non-Prestige
While all trials may be started as a fresh / non-prestige character, not all can be started if you have prestiged on a character.
Note: There are 3 prestige dailies that are currently available and get cycled through daily Prestige: Battlegrounds, Prestige: Dungeons, and Prestige: Open World. The experience increases from these do stack with other sources.
Prestige versions of trials are often easier due to the following:
- You get to keep your bags, gold, and any other items in your inventory+bank
- For non-Resolute trials, you gain the Prestige Challenge bonus experience
- All Mystic Enchanting Altar currency is retained (
 Mark of Ascension and
  Mystic Draught)
 - {?} All previously unlocked flight paths are still unlocked
- You can relearn mount speed / skills and can learn them significantly earlier for free! (This includes 100% ground mount speed at level 1 and all 3 flying mount speeds at level 58)
- You keep all professions, their skill levels, and all special / drop recipes
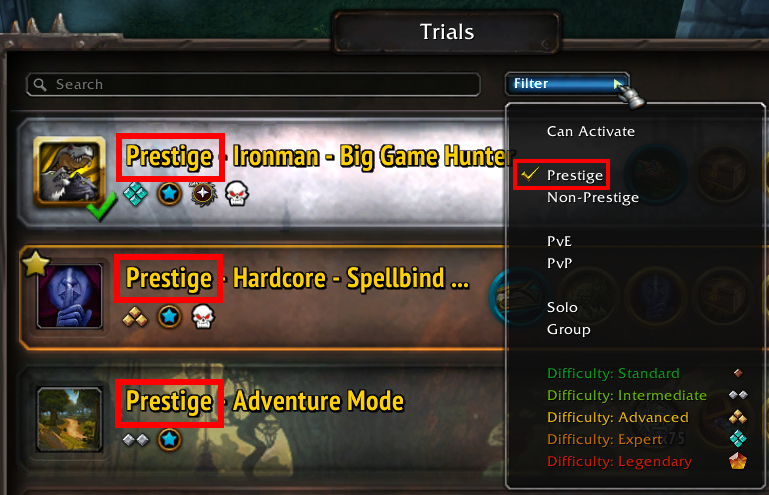
With all prestige-accessible trials, the above will provide a much easier time for them, especially with intentional preparations. A trial will always have the « Prestige » keyword in its name if it is the prestige-accessible version. You can also check if a trial is prestige-accessible by filtering in the Trials menu!
[anchor=atrialsbeginnings]
A Trial’s Beginnings
To begin a trial you must first open up the Trials menu and then select one to activate.
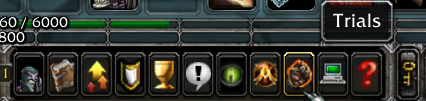
Opening the Trials menu will present you with a list of trials you can select. An example of a selected trial is below:
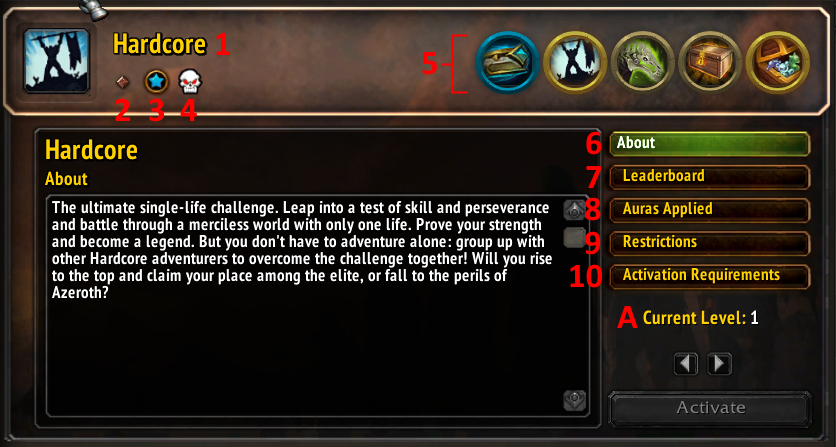
1: The Trial’s name. Can also contain keywords such as « Ironman », « Prestige », and « Nightmare » that give cursory glance information on the trial.
2: The relative difficulty of the trial ranging from 1 to 5 with 5 being the hardest. Higher difficulty trials yield more rewards.
3: Risk-Type Restrictions. This will tell you if a trial has restrictions on PVP, PVE, High Risk, etc.
4: Death Restrictions are listed here. This will tell you if a trial allows for multiple lives during a single run.
5: The rewards are listed here! Note that repeating trials will yield less rewards than first time completions.
6: The About tab will give general information on the trial.
7: Global leaderboards for completion time of a given trial.
8: The Auras Applied tab will show you what buffs / debuffs will be applied to your character upon activation. (Example: Hardcore)
9: The Restrictions tab will give you an in-depth overview of what is allowed and what is not allowed once the trial has been activated. This will list out things such as « No Auction House » and « Challenge Exclusive Trading ».
10: The Activation Requirements tab will let you know what state you need to be in to activate a given trial. This will list things such as « No EXP gained » and « No loot interaction ».
A: This is currently used for scaling Adventure Mode difficulty. Most trials will not use this.
[anchor=thepriceoffailure]
The Price of Failure
Should you die during your trial, you will get to keep your character, your items, and everything else you’ve earned during your attempt. Listed below are what happens next:
- Your character loses the trial debuff and you become ineligible for the rewards
- You get to keep all earned gold, reputation, materials, etc on your character
- Partying and interaction restrictions are completely lifted and you may transfer all earned goods to other players/characters
- You may reach level cap then prestige in order to participate in the prestige version of trials once again
- You will need to create a new character to participate in non-prestige-only trials
[anchor=helpfulvanityitems]
Helpful Vanity Items
There are many different vanity items that can make overcoming trials significantly easier. Listed below are highly recommended vanity items:
- Fel-Enchanted Warchest – Gives a Hearthstone equivalent item with separate cooldown and gives infinite 22-slot bags!
- Stones of Retreat – Infinitely reusable teleportation on a 15 minute cooldown. (Example: Stone of Retreat: Goldshire)
- Lootbot-3000 / Loot-Transfigurator 5000 – Provides automated looting at range!
- Book of Ascension – Level up your skills without having to return to a city. Summoning / using this pet levels up skills automatically
- Book of Artisans – Learn and level up professions without having to return to a city. Learning recipes is not automatic
- Ethereal Tool Dispenser – Save on bag space and always have the tool you need!
- Profession Hats – Provide a significant bonus for crafting / gathering speeds while worn and for 30 minutes after removing it. (Example:
Miner's Hat)
- Thermal Anvil – Provides a reusable combined Anvil+Forge station for anywhere
- Travel Permit – Allows you to instantly teleport to a different starting zone if you are less than level 9. Useful for selecting favorable starting zones before beginning trials
- Heirlooms – Bonus exp, level-scaling, and usable on all characters (prestige and non-prestige). Can be purchased from
Guardian of Time or from the WebStore
- Feather of Ancients Azeroth and TBC – Instantly unlocks all flight paths without the need for visiting that location beforehand and automatically provides all flight paths for new characters
- Flight Master’s Whistle – Instantly teleport to one of the 3 closest flight masters to you
- Mystic Enchanting Altar – Reusable Mystic Enchanting Altar that’s usable anywhere in the world
- Vanity Collection Sync – Instantly syncs your Area-52 transmogs and vanity items to the seasonal server! (Only useful on Seasonal Realms)
[anchor=reusedtrialmodifiers]
Reused Trial Modifiers
[anchor=ironman]
Ironman
Ironman is a modifier that prevents you from interacting with other players. This includes the following:
- You cannot party up, trade, or use spells / items to interact with other players
- Under most circumstances, you cannot attack mobs tagged by other players, nor can they attack mobs you have tagged
- You cannot receive mail during the trial* (See tips section below for additional information)
- You cannot use the Auction House
Tips for Ironman Trials:
- You may reobtain any owned vanity item. This can allow you to obtain trial-specific vanity items to make things easier. (Example: Book of Artisans for the Ironman – Lonely Artisan trial)
- {?} After creating a character but before starting the trial, any purchased items from the WebStore will appear in your mailbox and can be collected after starting the trial. (Author’s Note: This mailbox workaround was taken from the Lonely Artisan Guide)
.
[anchor=nightmare]
Nightmare
The Nightmare Challenge modifier will significantly increase the damage you and your pet take. It increases physical damage taken by 300% and non-physical damage by 500%.
For Nightmare trials, there are 2 common approaches: Using Mana-forged Barrier or high-burst damage spells / abilities (labeled « Overwhelming Force » below). I would personally recommend using MFB for Nightmare trials as it provides a much more forgiving experience and will give you the best chances of completing the trial.
Tips for Nightmare Trials:
- Ranged builds will have a significantly easier time compared to melee builds
- Interrupts and silences are highly recommended for dealing with casters. Counterspell is recommended for a ranged interrupt
- Dispels are extremely helpful due to DoTs also receiving the 500% increased damage. Cleanse Spirit and / or Cleanse recommended!
- Crowd control can help when dealing with multiple mobs. Frost Nova, Polymorph, and Hypnosis are all great CC candidates
- Feign Death and Vanish are useful emergency abilities for escaping death. (Make sure you reactivate MFB after using Vanish when you are safe)
- Use and abuse line of sight when dealing with casters!
- The addon called « Mob Spells » can help give information on what abilities the targeted mob has (Not 100% accurate. User discretion is advised!)
- Avoid fighting elites and doing group quests. It’s not worth the risk, even with MFB (Overconfidence is a slow and insidious killer)
- Having a heal spell on reserve can save a run during dire moments. Greater Heal and Holy Light are recommended
- Healing potions can be used as extra emergency healing
- If you are out of combat and taking damage from a DoT, use the Rest ability and / or eat some food to combat the incoming damage
- Outland mobs are significantly more dangerous than Azeroth mobs!
- Never multi-pull mobs when casters are involved. It invites trouble
- Escort quest NPCs do not take the increased damage
- Mobs with the Lightning Shield ability should either be avoided or approached very carefully, preferably with Purge! You can near-one-shot yourself when fighting these mobs!
- Instant cast magic damage abilities can end runs quickly! Be careful with mobs that have them. (Example:
Un'Goro Thunderer)
[anchor=assassination-targets]
Assassination Targets
Assassination targets are mobs which you must slay before you can progress past the level restriction provided. You will not be able to level up to the restricted level and will instead stop at 1 exp short of leveling up. (Example: You must slay Banglash before you may continue leveling during his assassination trial).
Tips for Assassination Targets:
- Having Feign Death and / or Vanish as emergency escapes can reset an unfavorable fight with the target and save your run
- Having CC can prove useful for if additional mobs show up. Frost Nova, Polymorph, and Hypnosis are recommended
- Burst damage builds and abilities can make these kinds of modifiers easier (Examples: Pyroblast and Beam of Hatred)
- Eliminating targets at earlier levels does not provide any inherent benefits outside of allowing uninterrupted leveling (until the next restriction)
- Eliminating them at the highest level allowed will provide the greatest advantage
- Mobs and quests will not give exp when at the current restriction cap, but will provide loot and quest rewards
[anchor=resolute]
Resolute
Resolute sets your exp modifier to 1x rate, down from Ascensions standard rate (>3x). The following are affected:
- Rested exp will still grant its bonus for the amount gained
- Mobs and quests will give « vanilla » exp rates, with level scaling taken into consideration
-
Potion of Experience and
Aura of Experience (and similar items) do not confer their exp bonuses
- Exp hot-zones no longer give doubled mob kill exp
- {?} Recruit a Friend no longer gives exp bonus to resolute challengers
- {?} Crafting and gathering exp may be reduced
Tips for Resolute:
- Resolute is a marathon-style trial. When you sign up for this trial, going for the fastest clear time will only burn you out before you finish!
- Standard healthcare tips, « take breaks », « drink water », « straighten your back », etc apply here. You will be here a while…
- Running resolute trials on a separate character can help make it more tolerable with being able to « stop » whenever you’d like
- Pick an enjoyable build to play, you do not want to be stuck playing something you don’t like during this trial
- If you feel yourself zoning out or drifting to sleep, come back another time. It’s better to be alert than to doze off and lose all your progress to a mishap
- Make sure you are at a rested zone whenever you log out. The rested exp will help make leveling faster, especially at higher levels
[anchor=survival]
Survival
The Survival modifier adds the Thirst and Hunger debuffs to your character. This will gradually increase over time (~5s for 1 stack of thirst and ~10s for 1 stack of hunger). Should either of these reach 100 stacks, your character will instantly die!
Note: You can no longer buy food or drink from vendors! This can affect some quests such as the Clamlette Surprise quest in Gadgetzan.
Tips for Survival Mode:
- No, you cannot drink ocean water… and the game will tell you as such
- Use the provided water cup liberally whenever you’re near a non-ocean source of water
- Higher level food/drink will remove more stacks and faster
- [skill=185] and [skill=356] can provide good sources of food
- Azeroth quests that provide an
Adventurer's Cache will also provide one food and one drink item depending on player level (at levels 5, 15, 25, 35, and 45)
- All non-ocean water counts as drinkable water, even the corrupted water in Felwood and Helfire Peninsula!
- Humanoid mobs can still drop food and drink items
- Open world chests can contain food and drinks items
- Trading in 5x
 Wastewander Water Pouch to
 Spigot Operator Luglunket will give you a
 Gadgetzan Water Co. Care Package that contains
  Moon Harvest Pumpkin and
  Moonberry Juice within it
 - Always be sure to have your water cup filled before leaving a water source
- Having Stone of Retreat: Goldshire or Stone of Retreat: Brill can make for convenient teleports to towns with immediate sources of water
- Teleport spells can also make for easy-to-obtain water sources from cities
- DO NOT USE THE FLIGHT MASTER, ESPECIALLY FOR LONG FLIGHTS! Stacks will accumulate during your flight!
- Potions do not provide any stacks of thirst despite being drinkable liquids
- If you level cooking, then the food you eat can also provide various Well-Fed buffs to make the trial easier
- It may take a little bit of spamming and wiggling but even shin-high sources of water can fill the empty water cup
Note: Hellfire Peninsula is labeled as « Unfavorable Zone » instead of « Zone to Avoid » because of how easy and lucrative the quests there can be. Be sure to stock up on extra food and water before journeying to outland! Hellfire Peninsula’s water source are the [zone=3553].
Note: The Barrens is listed as « Unfavorable Zone » instead of « Zone to Avoid » only if you are using a prestige character and have access to 100% Mount speed, as this then makes going between the Oasis tolerable.
Note: Tanaris is listed as « Unfavorable Zone » instead of « Zone to Avoid » due to Wastewander Water Pouches being able to sustain you for a few quests.
Note: Moonglade is not generally considered a leveling zone, however, it does have a large source of drinkable water.
[anchor=trialspecificmodifiers]
Trial Specific Modifiers
[anchor=adventure-mode]
Adventure Mode
Adventure Mode! is the quintessential trial for people wanting a more challenging open world experience. Adventure Mode is a scalable trial that increases in difficulty and rewards up until Adventure Mode 100!. You may spend the Adventurer's Coin you receive from Adventure Mode at
Harrison Jones.
The following is affected by level of Adventure Mode:
- Experience earned from quests is increased [100%-150%]
- Experience earned by killing mobs is reduced by 50%
- Physical damage taken increased by [125%-2600%]
- Non-physical damage taken increased by [50%-842%]
- Reduces damage done by [50%-80%]
- Reduces healing done by [15%-25%]
- UNLISTED: Enemy aggro range, social aggro range, and aggro retention distance are increased
Tips for Adventure Mode:
- Adventure Mode has no death limit, so you can die unlimited amount of times and even body-crawl to victory if needed
- CC is strongly recommended due to the increase in mob aggro range and social aggro range! Frost Nova, Polymorph, and Hypnosis are recommended
- Quests that do not require killing mobs, such as
Gordo's Task, still give experience and receive the increased experience bonus
- {?}
Potion of Experience and
Aura of Experience (and similar items) should give you their respective bonuses
- {?} Recruit a Friend should also give the increased experience bonus
- {?} Exp hot zones should still function properly
- During the trial, all mobs are considered elites!
[anchor=item-restriction]
Item Restriction
The 2 trials that restrict item usage, Ironman – White Knight and Ironman – Nudist are fairly straightforward in that they only affect items that the player can equip while everything else is standard Ascension fare.
Tips for Item Restriction Trials:
- Vanity items / Heirlooms are not « Common » and cannot be equipped for the White Knight trial
- {?} You should be able to still use weapons during the Nudist trial
- Armor and Weapon vendors throughout the world can help keep your white-rarity gear up to date
- Play a spellcaster build for the White Knight trial for an easy run
- If you have ranged weapon heirlooms, ranged attack builds may be done for an easy time for Nudist, otherwise, play a spellcaster
- Tips from other trials apply here as well (Use CC, exp items and zones work, etc)
[anchor=overwhelming-odds]
Overwhelming Odds
Overwhelming Odds’ gimmick is that you are supposed to always be punching up. As such the trial will add the following changes to your leveling journey:
- Mob level scaling is disabled
- Mobs do not give exp when slain at your level or below
- Mobs do not give kill credit towards quests when slain at your level or below
Tips for Overwhelming Odds:
- You should immediately abandon all slaying quests as most will not be completable with how fast you level in Ascension
- Monsters still drop items even if they are at your level or below, thus, « Gather
» quests can still be completed for full experience - Because of disabled mob scaling, it is now possible to bully lower level zones and complete all non-slaying quests for easy experience
- {?} Crafting and gathering should still give exp
[anchor=spellbind-roulette]
Spellbind Roulette
Spellbind Roulette trials will roll a random ability you have learned and make it instantly kill you if you use it for the duration of the current roll. Use one of the following WeakAuras for significant help during the trial: Spellbind Roulette Warning or Spell Roulette WA.
Tips for Spellbind Roulette:
- Custom crafted spells such as Mechanical Arm, Savage Blade, and Bone Spear cannot be selected for the death spell! (Author’s Note: This has been confirmed on Elune with Shattered RE’s. This has been tested on Area-52 with mixed results)
- Buff spells, permanent buff spells, auras, and stances can be selected for the death spell but are highly recommended due to not needing to be recast often
- Pet revive spells can be selected for the death spell
- Triggered ability casts count when it comes to death spells and will instantly kill you! (Example: If Bloodrage is selected as the death spell and you trigger it using Whirl of Rage, you will instantly die)
- {?} Auto Shot shouldn’t be eligible for the death spell
- Use explosives from [skill=202] for free damage without having to worry about death spells
- Having a buff before it becomes selected for the death spell does not kill you. (Example: Having Slice and Dice active and then have it be selected will not kill you unless you recast it)
- Auto-attack builds are encouraged due to then not having to rely on skills as your primary source of damage
- {?} Totems cast with the « Call of… » skills will kill you if a totem is selected for the death spell
[anchor=crafters-guild]
{?} Crafter’s Guild
Section TBD pending completion of trial.
Crafter’s Guild Speculation Tips:
- [Azeroth] [skill=202] and [skill=186] should be fairly fast if only leveling to 60
- [TBC] [skill=197] and [skill=393] when combined with survival modifier or leveling to 70
- The 4 secondary professions, [skill=185], [skill=129], [skill=356], and [skill=732] are all useful
[anchor=dehta]
DEHTA
In this trial, your main concern is to avoid accidentally killing beasts and critters. To help with that, use the D.E.H.T.A Weakaura. 1 of your assassination targets is in [zone=215], 3 of your assassination targets are located in [zone=17] and the final 1 is in [zone=406].
- While it is possible to undertake this trial as an alliance Alliance character, it is significantly easier to reach the assassination targets when you are a Horde character
-
Grand Foreman Puzik Gallywix is an elite! Do not take the fight lightly and come prepared!
- Gallywix’s tower bodyguards will outlevel you during your level restriction. It is advised to have at least 1 CC spell so you can fight the 2 guards one-by-one
- Farming the Venture Co mobs after assassinating
Tinkerer Sniggles can help you get to the maximum allowed level before fighting
Boss Copperplug nearby to save on backtracking
- Do not use any AoE or cleaving spells / abilities as this can accidentally slay nearby critters and instantly end your run. Stick to single-target!
- While you yourself cannot slay beasts, you are allowed to purchase their body parts on the Auction House for quests! (Example: Buying
 Chunk of Boar Meat for
 Pie for Billy)
-
Gerenzo Wrenchwhistle is located up on his platform near the waterwheel. Do not try to jump the gap or you can fall to your death! (See Hardcore classic compilations)
- [skill=393] is strongly discouraged due to not being able to slay beasts to level the skill up. (See exception below)
- Despite their looks,
Starving Helboar,
Hulking Helboar, and
Deranged Helboar in Hellfire Peninsula are classified as Demons!
[anchor=inn-sane]
Inn-Sane
The Inn-sane trial adds the caveat that your health and mana cannot regenerate / increase while not in a rested zone. Energy and Rage behave as normal, however.
Author Recommended Build for Inn-Sane Trial
Tips for Inn-Sane using above build:
- Use Concussive Shot before you get Waylay to stop melee mobs from reaching you. Afterwards, use it for any additional kiting that is needed
- It is better to use Frost Nova than to take damage from a mob. You may use lower ranks of the spell if you are confident it will not get resisted
- Syndicate Sniper Shot will be your main damaging ability and 2 casts (with Fleeting Shadow) should kill any non-elite mob
- If you pull one mob at a time, you should never take damage from melee mobs
- Use Backstab as your backup melee attack if using daggers or Sinister Strike if using any other weapon
- Using Syndicate Sniper Shot can sometimes cause your character to auto-shoot during the « cast » time. Using a « stopattack » macro can help prevent this
- Use line of sight abuse to prevent casters from casting spells at you with Counterspell as a backup interrupt
- Ranged physical attack mobs will deal some damage to you. This is unavoidable and the reason for having Devotion Aura and Frost Armor (same with Demon Skin)
- Use the [pet=1] type pet as the Furious Howl ability will give you ranged attack power
- Apply
 Instant Poison to your ranged weapon. Syndicate Sniper Shot can deal extra damage with it
 - Slice and Dice affects ranged attack speed when using Compound Power. Remorseless Attacks and Cut to the Chase + Compound Shot can keep it active near-permanently
- Evasion should be used if a melee mob reaches you to prevent damage taken
- Vanish is your emergency escape cooldown
Other Tips for Inn-Sane:
- Healing spells, bandages, and potions do not work while outside of a rested zone! Don’t even get them
- Starting areas are considered rested zones!
- Mobs and quests do not scale during the trial. It is better to go to a level-appropriate area than attempt to do quests in lower level zones
- It is better to spend some mana to kill mobs faster than it is to take damage from them
- Pets are subject to the disabled health regeneration / increases
- Buffs are exceptionally useful for this trial, as they give more time spent out in the open world before having to return to a rested zone
- Prioritizing Rage and Energy skills can help you stay out in the open world for longer
- I recommend retreating back to a rested zone at around 50% hp to be safe, as you may encounter trouble on the way back
[anchor=feeling-fishy]
Feeling Fishy / Deep Sea Nightmare
The Feeling Fishy / Deep Sea Nightmare trials now causes you to drown while on land and at the water’s surface. In order to regain « oxygen », you need to now be inside of pools of water. The following Feeling Fishy Breath Bar Weakaura will help with keeping track of your breath meter.
Tips for Feeling Fishy:
- Any large enough body of water will suffice, even the ocean
- After leaving the water you are given 3 minutes before you must return
- Race does not matter for your breath bar duration. Forsaken do not get an easier time
- Underwater breathing effects do not affect your breath bar duration
- You cannot just jump into any body of water, you must also submerge yourself completely. This may require you to hold right click and aim your character downwards to properly regain « oxygen »
- Speed is the key. Kill mobs fast and do not idle outside of water
- Log out inside of water whenever possible. (Server crashes will hearth you but also refill your breath meter)
- Lure mobs into the water whenever possible to keep your breath meter filled while fighting
- Remember the 50% rule (if it took you 50% of your time to get there, it will take 50% of your time to get back)
- Stones of Retreat and Teleport spells can help with emergency « oxygen » resupply moments
- Troublesome quests or quests far away from water should be avoided. Focus on easier and « safer » quests
- Over half of outland is unsuitable for this trial! Stick to favorable zones in outland to prevent « drowning »
- {?} No, you cannot use lava as a substitute for resupplying « oxygen »
Note: The Barrens is listed as « Unfavorable Zone » instead of « Zone to Avoid » only if you are using a prestige character and have access to 100% Mount speed, as this then makes going between the Oasis tolerable.
Note: Tanaris is listed as « Unfavorable Zone » instead of « Zone to Avoid » only if you stick to the Northeastern and Eastern parts of Tanaris and focus on the Wastewander and Bloodsail quests.
Note: Moonglade is not generally considered a leveling zone, however, it has a lake with which to resupply « oxygen » at.
Note: Swamp of Sorrows and Dustwallow Marsh have lots of water but I am unsure about the amount of water you can fully submerge in.
Note: Alterac Mountains is listed as « Unfavorable Zone » instead of « Zone to Avoid » only if you stick to the lower level near Lake Lordamere.
Fun Fact: In Hellfire Peninsula’s there are exactly 2 spots in the [zone=3553] that you can resupply « oxygen » at!
[anchor=narcolepsy]
Narcolepsy
Narcolepsy causes your character to gain Fatigue while outside of a rested zone. This fatigue bar is like that of swimming out of the world’s bounds. Make sure you return to a rested zone before you collapse from exhaustion!
Tips for Narcolepsy:
- Behaves like normal fatigue where upon running out, you begin rapidly taking damage (rather than instantly dying)
- Full duration of fatigue upon leaving a rested zone is 7.5 minutes
- Your character has ~6 seconds to live upon taking the first tick of fatigue damage
- Going into fatigue-inducing areas does not cause your fatigue bar to deplete faster
- Teleport spells and Stones of Retreat directly into cities can save your character. (Make sure you move after teleporting to ensure the server updates your location!)
- Remember the 50% rule (if it took you 50% of your time to get there, it will take 50% of your time to get back)
- The fatigue bar will near-instantly fill backup once you’re within a rested zone
End Credits Cutscene
Thank you if you made it this far. Hopefully you found the guide enjoyable and helpful.
Until next time!
Adapted from a guide by Dimmondback published on db.ascension.gg.









0 Commentaires
Aucun commentaire pour le moment. Soyez le premier à commenter !