
Mount Hyjal
Ascension raid guide
Written By Draz
Google doc version: https://docs.google.com/document/d/1WSPKQWM_S7qv8pRnePcdpt7DhuSARloeMvlTc3Zel2w/edit?usp=sharing
Important information
Default raid comp
- 2 tanks
- 1 healer per 5 raiders approx
- 10 man raid group = 2 tanks, 2 healers, 6 dps
- 25 man raid group = 2 tanks, 5 healers, 18 dps
- Try to bring an even split between melee and range
Pictures
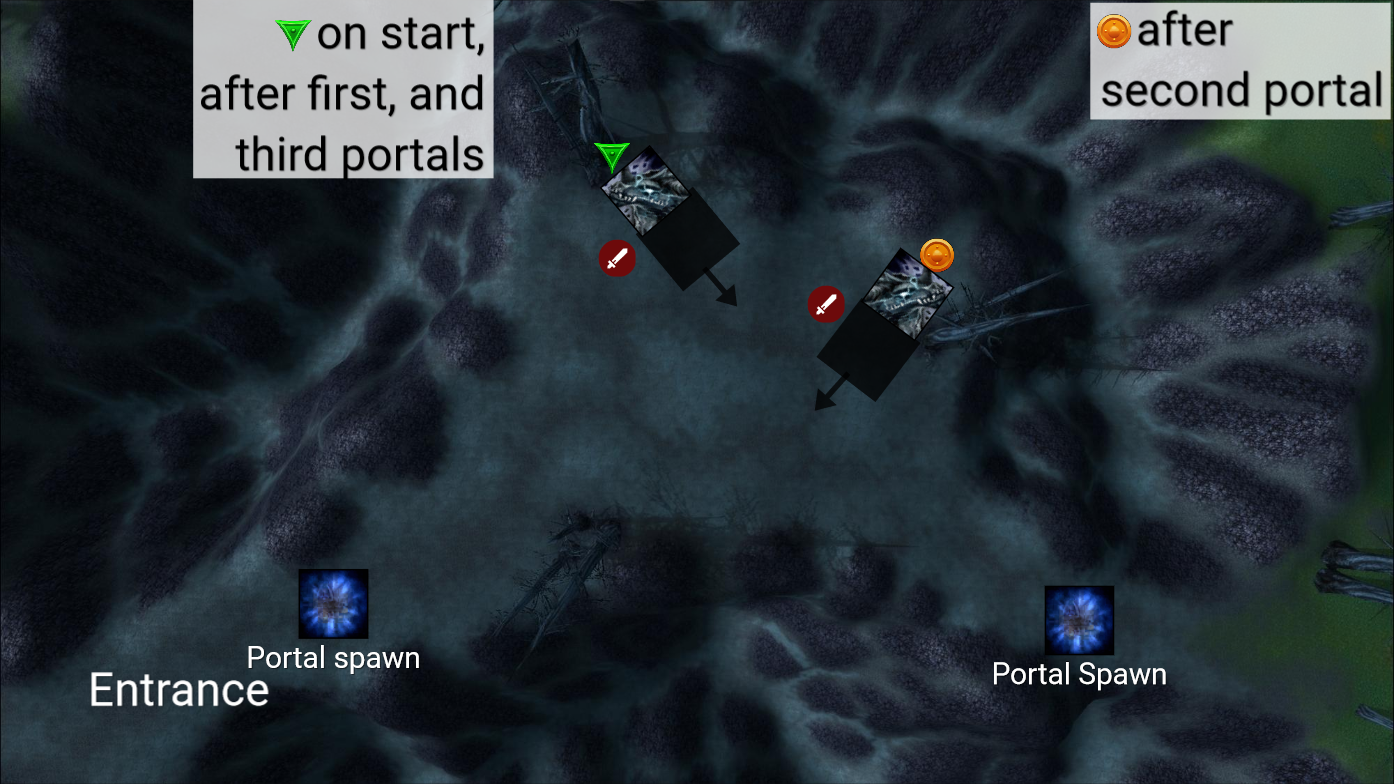
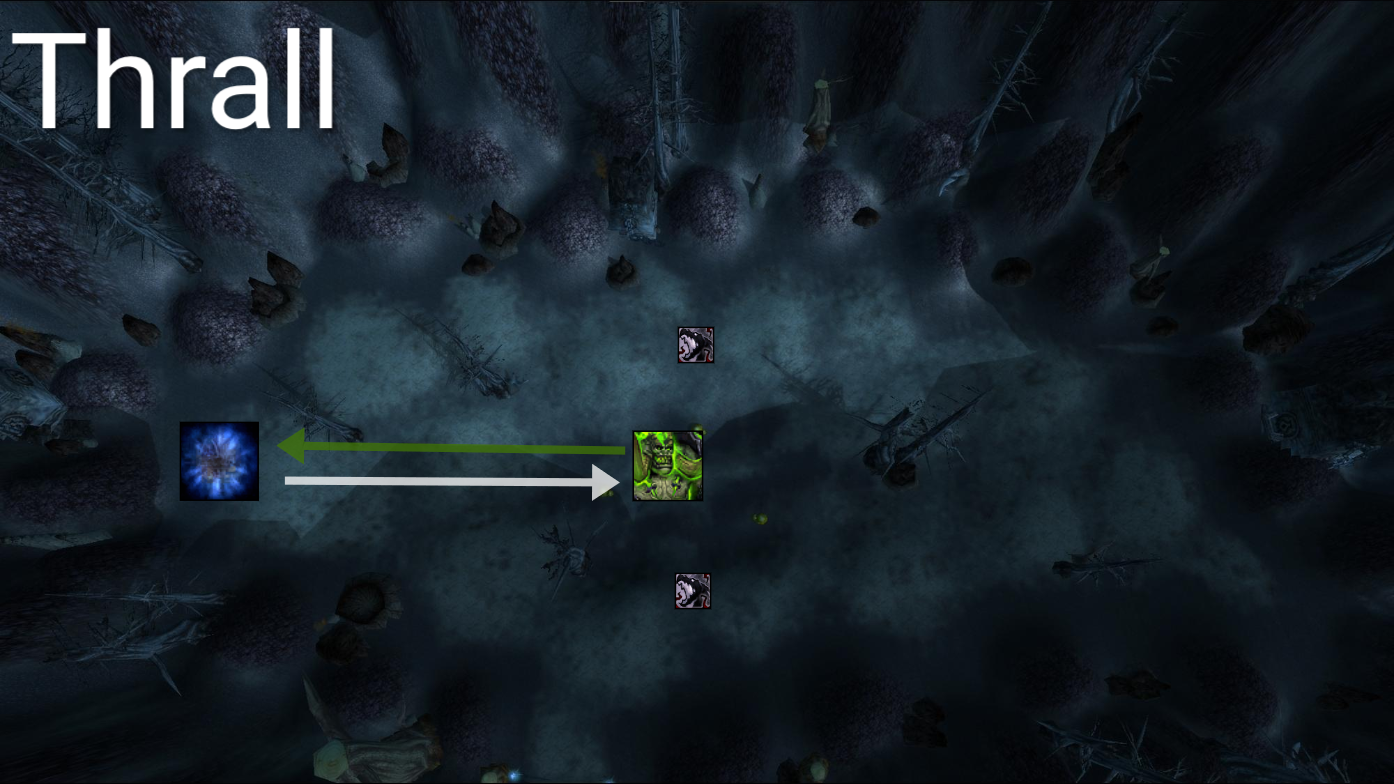
I’ve included pictures with each boss explanation. Some require the group to split up. I’ve indicated this with Blue Square and Orange Circle icons to indicate Left and Right.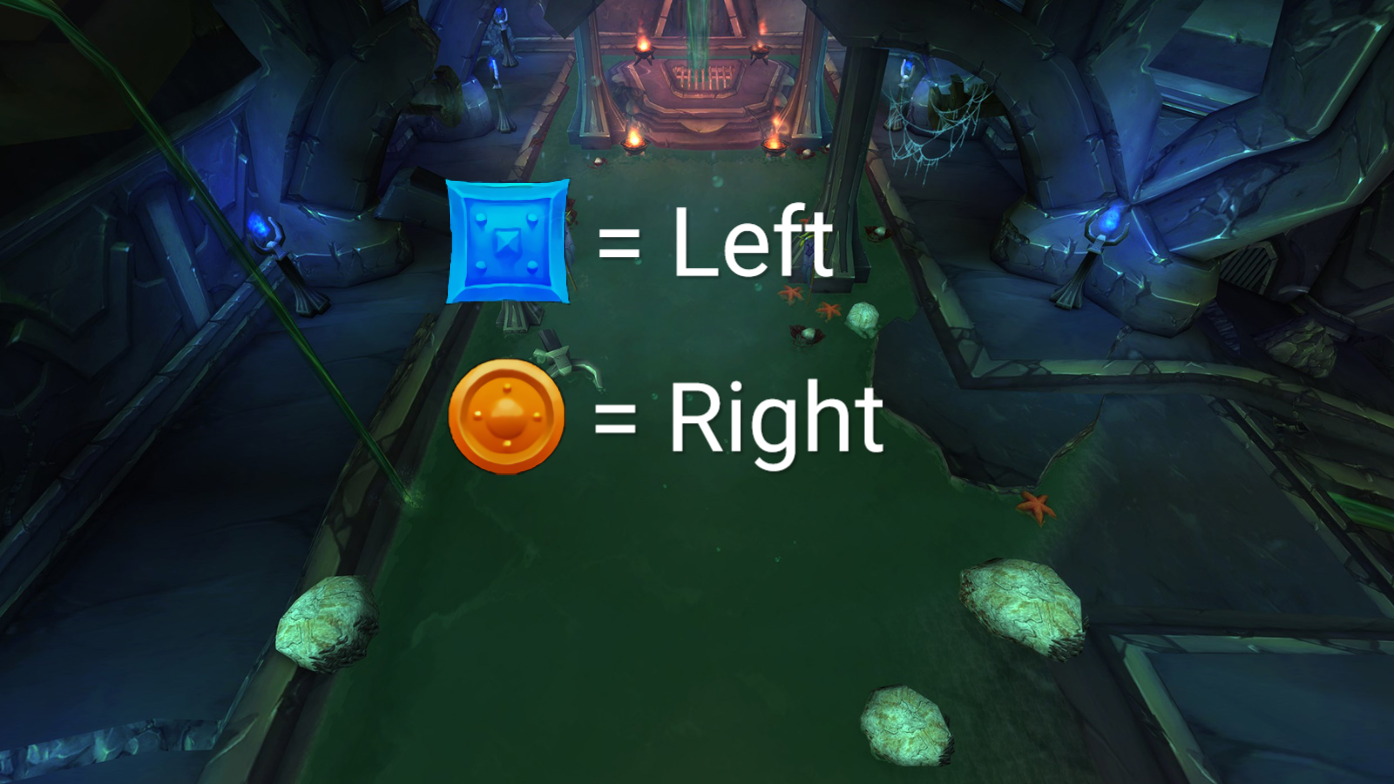
Kill Videos
- Rage Winterchill – https://youtu.be/XWA9oInbOWA
- Anetheron – https://youtu.be/tNqB7epT9ag
- Kaz’rogal – https://youtu.be/M_rKoCHvxBI
- Azgalor – https://youtu.be/6JpRe7GL8Fk
- Chromius – https://youtu.be/XEMBsVO392s
- Archimonde – https://youtu.be/rpIhXr3sUQM
Weakaura pack
Credit to Luciqq and We Go Again for making this weakaura pack
https://wago.io/IWjMRSA0B
Hyjal Mob info
Spreadsheet showing all mechanics for every mob, and itemizing what mobs are in each wave.
https://docs.google.com/spreadsheets/d/1A2KONZWry1mG6b3GpUqi7JeqpbeMcP4VanQwSGT-yt4/edit?usp=sharing
Rage Winterchill
Kill Video – https://youtu.be/XWA9oInbOWA
Default raid comp – Can be solo tanked if you can manage the Lich Slap properly
Mechanics:
- Chilled to the Bone – Stacking debuff that stuns you at 20 stacks. Each stack gives 5% movement speed reduction. Move or or huddle to remove.
- Death and Decay – Deals shadow damage and reduces healing taken by 75%.
- Winter’s Touch – Small damage and small knockback. Creates an Ice Block that can be used for line of sight.
- Ice Barrage – Deals damage to every player within line of sight of the boss.
- Lich Slap – Slaps the tank and knocks them away. Drops all threat
Intermission Phases:
- At 66% and 33% boss will become immune and 6 spawn adds. Each add runs to a set position and begins to heal the Rage Winterchill. Killing the Phylactery and then the Acolyte stops the healing. Kill all 6 sets to engage Winterchill again.
Ascended:
- Chains of Winterchill – Players are chained in groups of 2. The players share magic damage taken and healing received. If you move farther than 15 yards from each other you are pulled back together.
- Soul Fragment – After killing a Phylactery a Soul Fragment will spawn. These adds are not able to be killed, but can be damaged. The lower their HP, the slower they are, but the faster their attack speed is. Up to 100% movement speed and 300% attack speed.
Recommended Abilities:
- Cloak of Shadows – Use when boss is about to hit 66% or 33%
- Divine Sacrifice – Use for Death and Decay or as needed
- Movement abilities – Use to get out of Death and Decay
- Mass Entanglement – Use to CC Soul Fragment adds away from the group
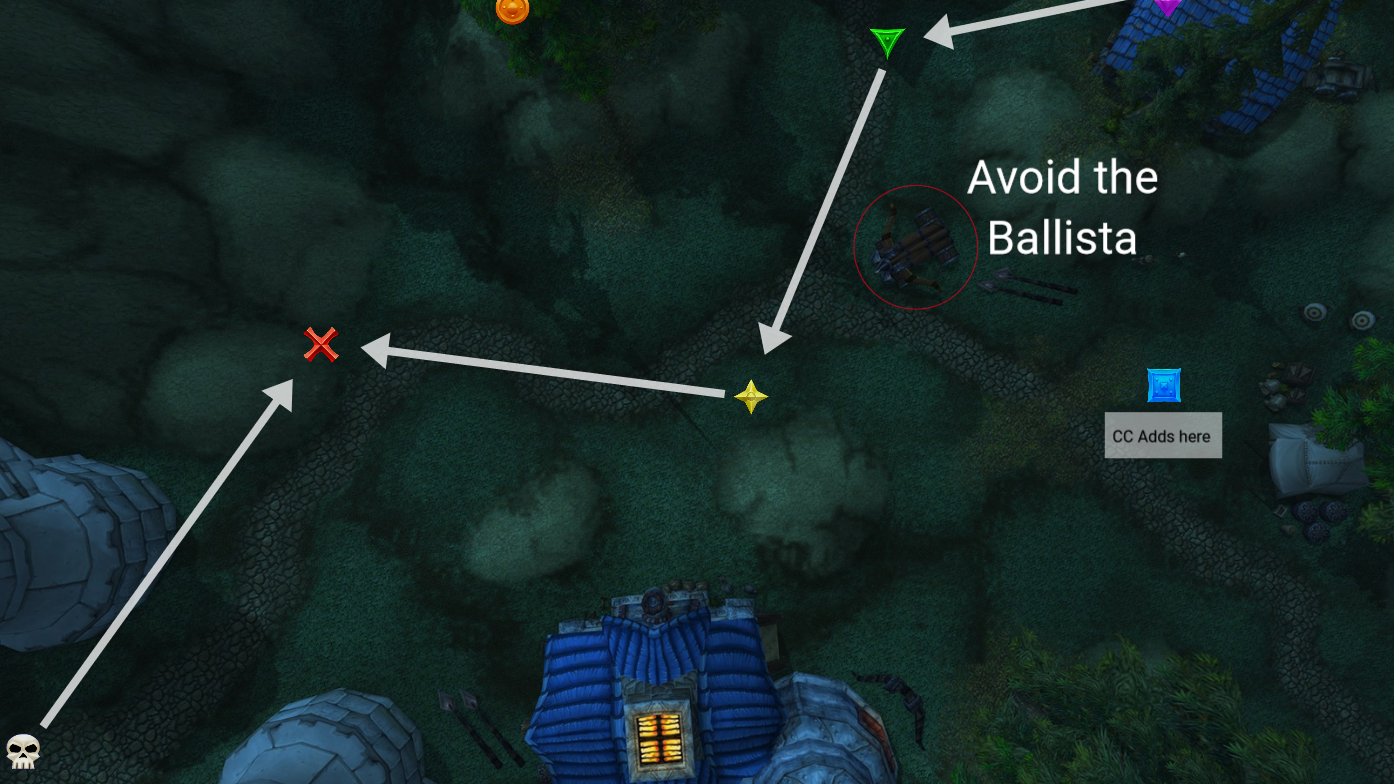
Strategy – see picture below for marker positions:
- Begin the fight at Skull. Move to X for D&D, and if you get a second move to Star. Phase the boss to 66%.
- When adds spawn, clear them in this order: 2 Circle, Star, 2 Blue. Before you kill purple, make sure the 5 adds spawned are CCed with Mass Entangle. Set pets to follow.
- When boss comes back, move to the marks and drop D&D on the following marks in this order: Diamond, Triangle, Star, X. Get the boss to 33% on either Star or X.
- When adds spawn, clear them in the same order as before. Before you kill purple, CC all 11 adds at blue. This is very important since 11 adds do a lot of damage.
- Repeat what you did last boss phase. Diamond, Triangle, Star, X. When you get to Triangle use lust.
Anetheron
Kill Video – https://youtu.be/tNqB7epT9ag
Solo tank – New groups could consider bringing an extra healer for the nightmare bodies
Mechanics:
- Vampiric Aura – Anetheron restores health equal to 100% of all damage he inflicts
- Carrion Swarm – Frontal cone which applies a DOT which reduces your healing received by 75%.
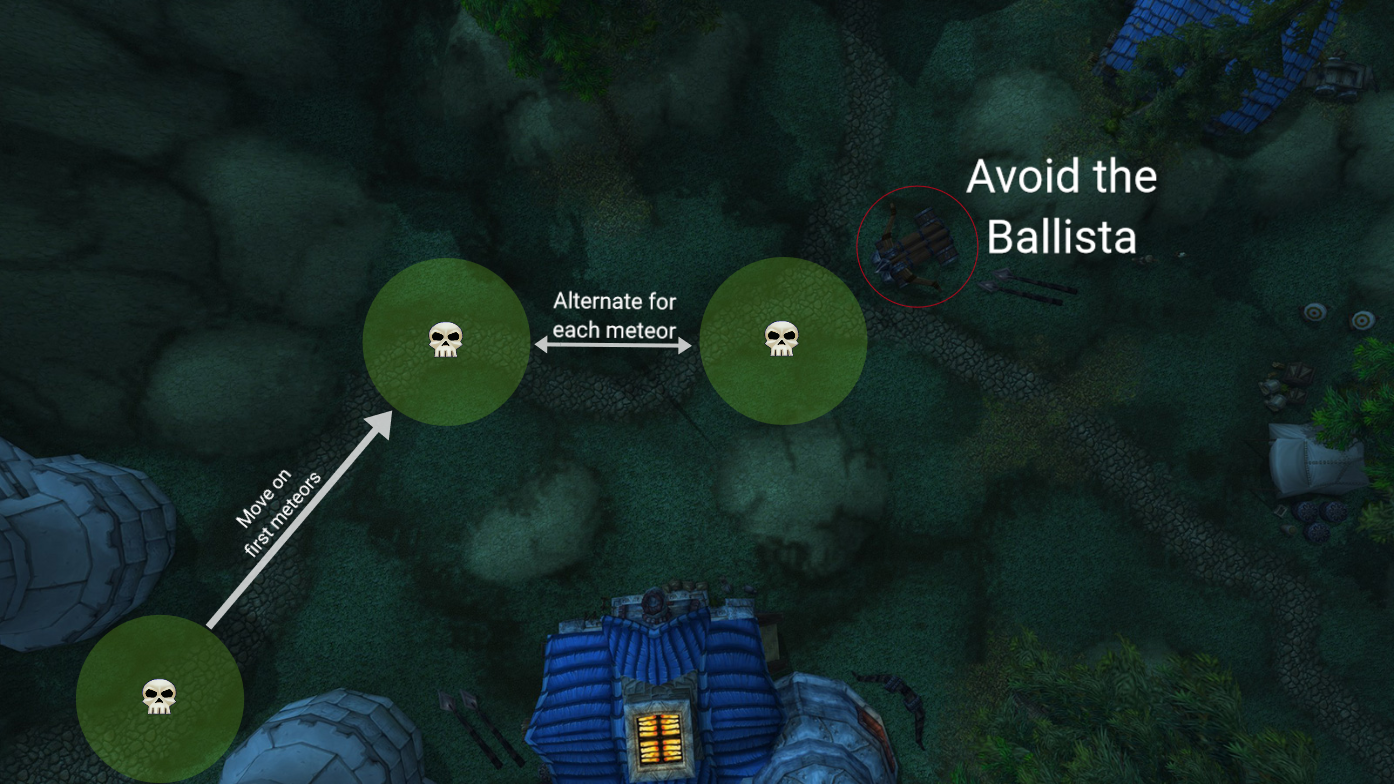
- Infernal Rain – Boss selects areas which meteors will fall on. The first area selected will be much larger and spawn an infernal from it which must be tanked.
- Nightmare – Puts the target to sleep, sending the player into a different phase. The player’s body is left behind which must be healed by the group.
- Circle of Frost – Jaina places a circle that will freeze all enemies (besides Anetheron) that enter it. This increases their damage taken and stops them from doing damage.
Ascended:
- The Infernals have a buff that stacks over time. Upon reaching 30 stacks the infernal begins to do heavy AOE damage to the raid.
- Vampiric Aura’s healing also deals damage to the tank.
Strategy:
- Players sent into the nightmare should search for the Unknown Entity and kill it. Then exit through the green portals to rejoin the group.
Sidestep all Carrion Swarm casts. You can use Shadowstep as a gap closer, but don’t rely on it putting you behind the boss.
Recommended Abilities:
- Movement, Cloak of Shadows
- If solo tanking, tank will need a reliable way to get aggro on the Infernal
Kaz’rogal
Kill Video – https://youtu.be/M_rKoCHvxBI
Solo tank – Also need 1 dedicated tank healer. Growing Light recommended for this
Mechanics:
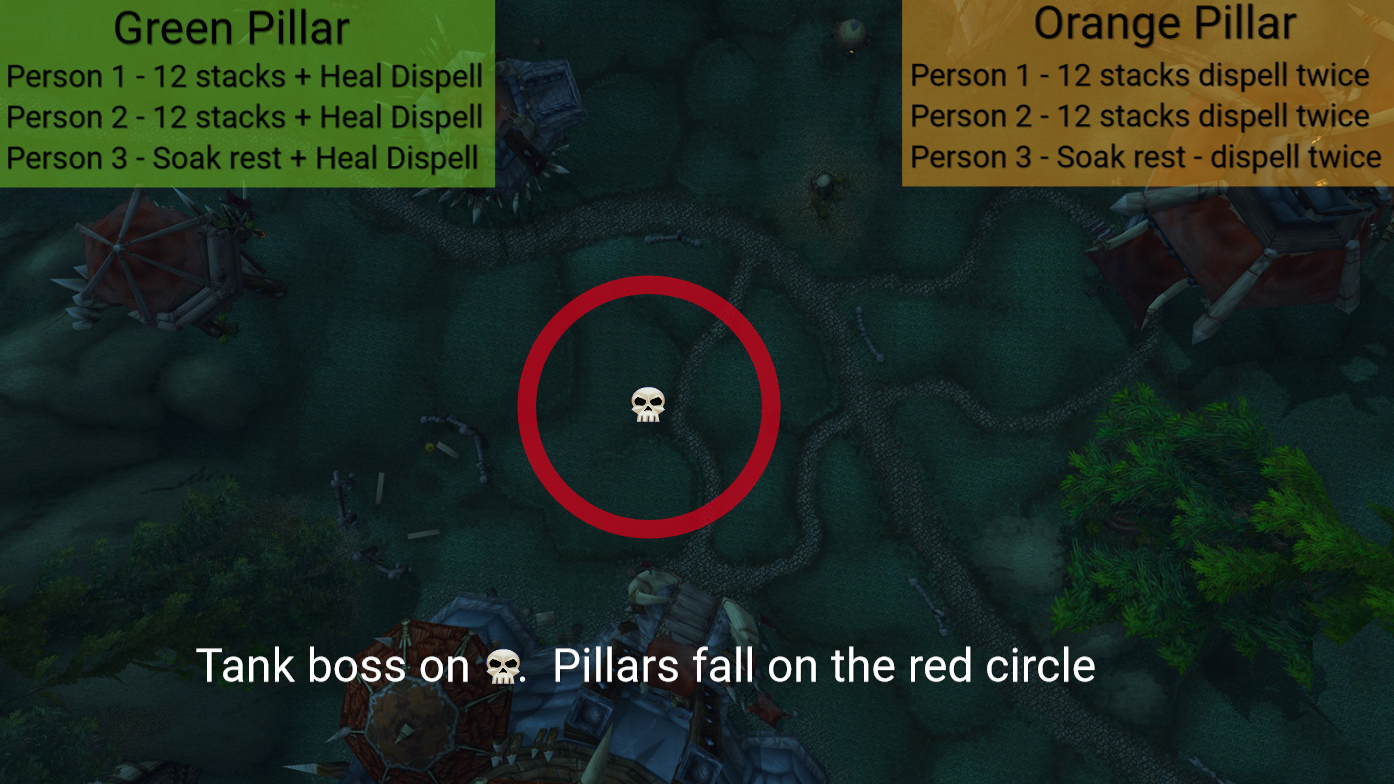
- Pillar of Cataclysm – Must be soaked by standing near it.
- Pillar of Suffering – Must be soaked by standing near it.
- Cataclysmic Strike – Deals fire damage and applies a fire DOT to the target.
- Tormenting Strike – Deals additional shadow damage with melee attacks.
- War Stomp – Knocks players in the air and also lifts the grounded pillar back into the air. The other pillar will land soon after.
- Mark of Kaz’rogal – Drains 1% of players mana per second. If any player’s mana falls below 10% they will start pulsing damage around them.
- Thrall – Drops a mana totem that players may interact with to restore their mana.
Ascended:
- Pillar debuffs – Each pillar applies a debuff to the player soaking. Orange pillar gives a HP buff, green pillar gives a healing power buff.
Strategy:
- Assign 3 players to soak each pillar. Each player needs Barkskin, Cloak of Shadows, and Elusiveness. Orange pillar needs dispel curse twice. Green pillar needs to cleanse themselves once, then have the tank healer dispel them a second time.
- When the boss War Stomps, everyone besides tank should Shadow step.
Recommended Abilities:
- Barkskin, Cloak of Shadows, Shadowstep, Pain Suppression (for tank)
Azgalor
Kill Video – https://youtu.be/6JpRe7GL8Fk
Default raid comp – Can be solo tanked if you move to portals
Mechanics:
- Rain of Fire – Fire patch that applies a stacking DOT
- Howl of Azgalor – Casted fear, still cast while feared.
- Glaive Cleave – Frontal cone that applies healing received and armor reduction debuff
- Mark of Azgalor – Drains 1% of current hp per second. Going below 5% damage kills you
- Legion Portal – Spawns a portal, which spawns adds from it. Portals can spawn in many locations. There are ground and air portals.
Ascended:
- There are no ascended mechanics
Strategy:
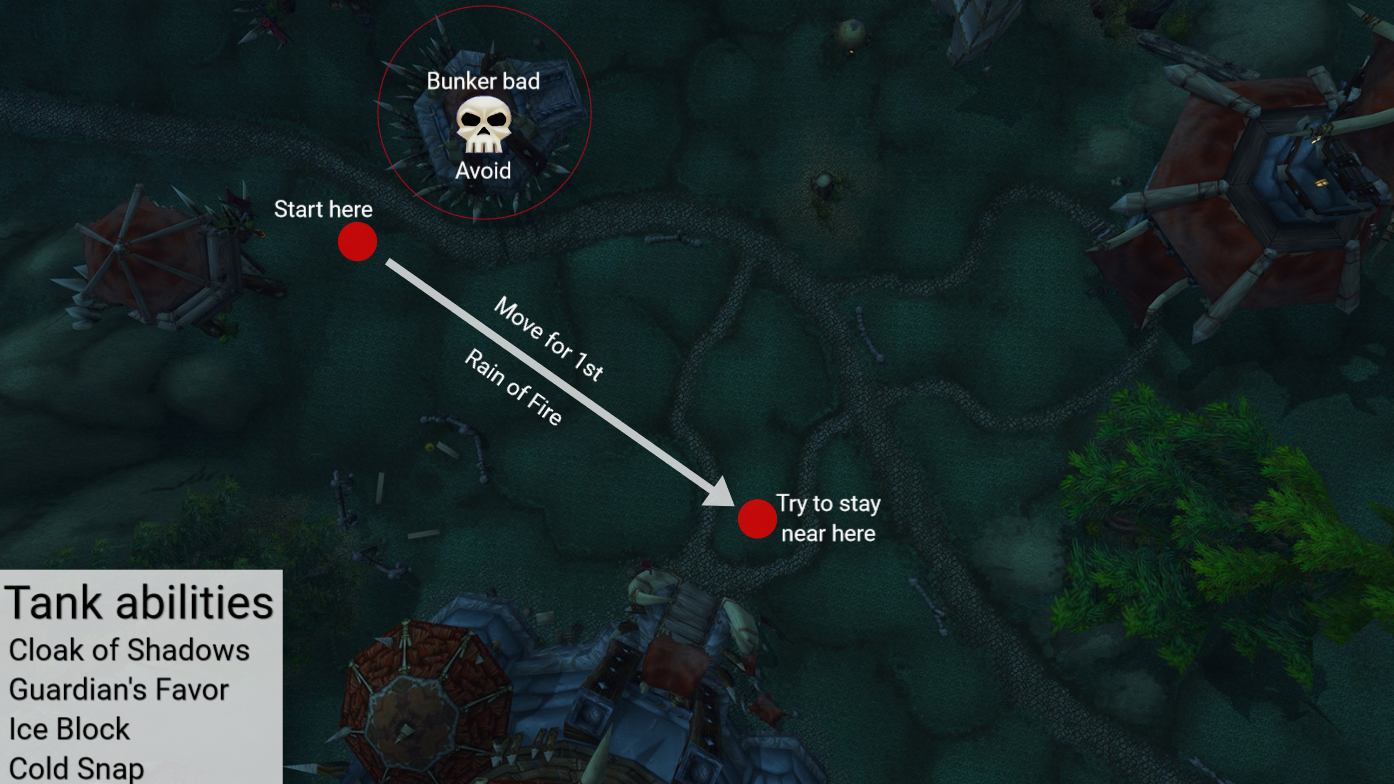
- Keep boss near the large building. Portals spawn in a radius from the boss, keeping boss here hedges against bad RNG.
- Leave 1 tank, 1 healer, and 2-3 dps on boss at all times. Send everyone else to every portal. Kill the portal, then bring the adds back to boss and cleave them down.
Recommended Abilities:
- Movement, Flesh hook, Purge (for anti magic shell), Tremor Totem
- Boss tank needs Blessing of Protection, Guardian’s Favor, Ice Block, Cold Snap
Chromius
Kill Video – https://youtu.be/XEMBsVO392s
Bring 1 additional healer – Can also be solo tanked if you properly handle the Arcane Explosion
Chromius Mechanics:
- Arcane Breath – Frontal cone that does heavy arcane damage and applies a temporary debuff that increases arcane damage taken. Ticks multiple times during breath channel.
- Infinite Hourglass – Clock arms that sweep the boss arena. Standing in the arms deals damage and silences the player. Use a movement ability to get through these arms.
- Final Countdown – The hourglass will pulse once for every minute that has passed. Ex. at 3 minutes the clock will pulse 3 times. Deals heavy arcane damage to the raid.
- Infinite Time Warder – Spawns after a portal scenario. Casts Arcane Explosion that deals heavy damage and knocks players away.
Portal Scenarios:
- Portal Scenarios happen at 50% on Normal and Heroic, and at 75%, 50%, 25% on Mythic and Ascended.
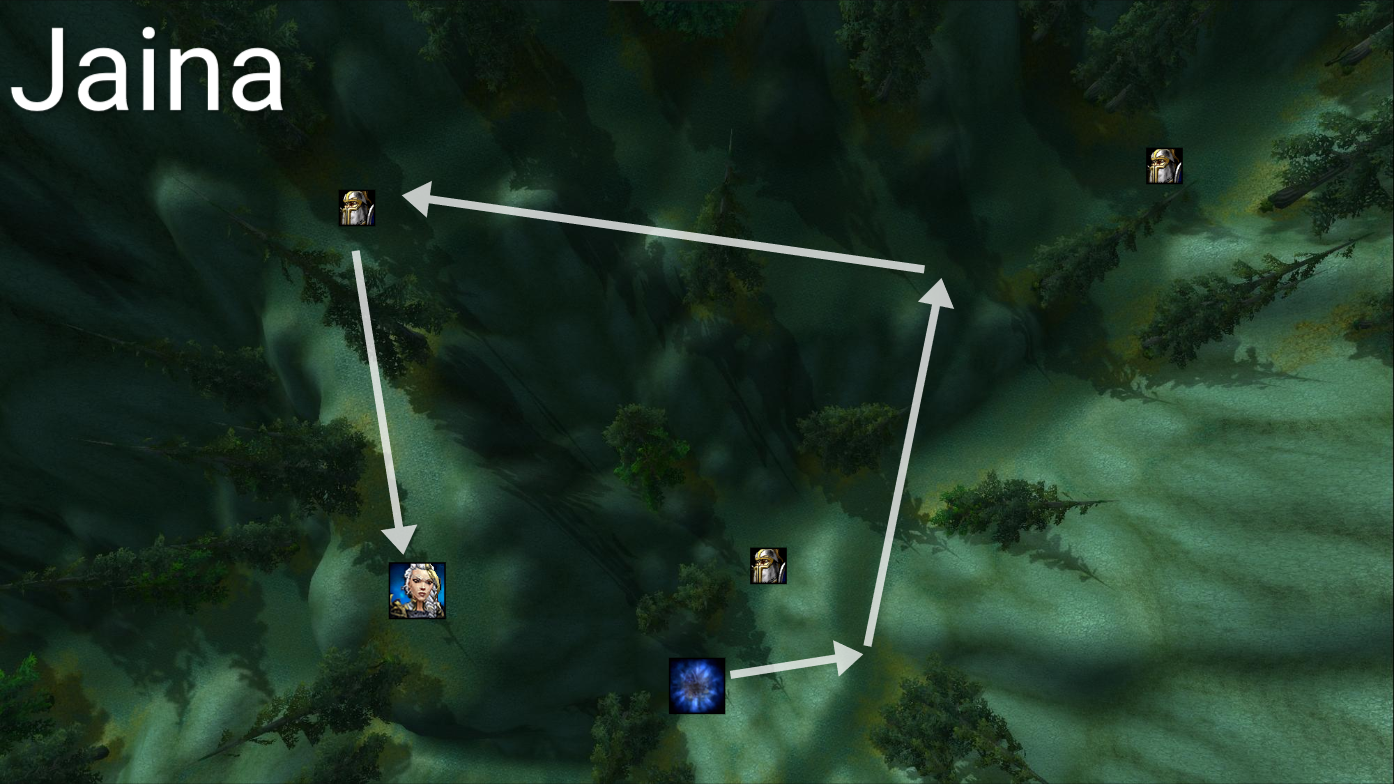
- Jaina
- Holy Light – Uther & Arthas heal a target for 40% hp. Kickable
- Consecration – Uther & Arthas silence and deal damage to players who stand on consecration
- Adds – The scariest add is the Priest, who heals a target for 25% hp
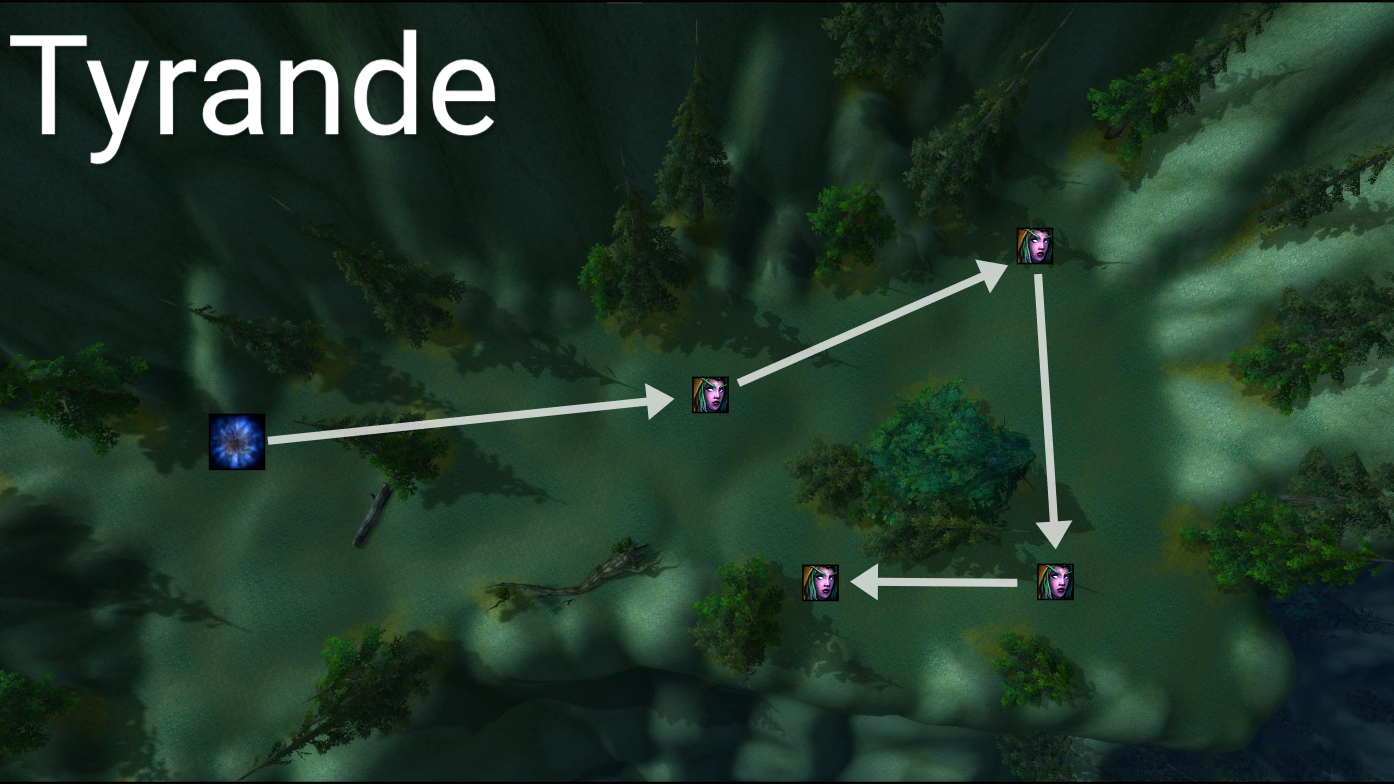
- Tyrande
- Black Arrow – Damage debuff that can be decursed
- Daggers in the Dark – Sylvanas will do a fan of knives ability repeatedly
- Thrall
- Chaos Blast – Deals heavy damage targeted at a player. Projectile has travel time and lands where the player was when the cast is finished. Travel time allows player to move away from the location.
- Mannoroth’s Fury – Deals heavy damage to players near Mannoroth. Falls off with distance
Ascended:
- In ascended you do all 3 portal scenarios rather than only 1.
- Tail Swipe – Knocks players away who stand behind Chromius.
Recommended Abilities:
- 8 Divine Sacrifices, Barkskin, Cloak of Shadows, Kick, Guardian Spirit, Aspect of the Pack, Aura Mastery + Fire resistance aura (for Mannoroth), DPS get lesser healing wave
Strategy:
- Place 2 markers (see picture). This may change depending on your group’s dps. Plan to bring the boss to the GREEN mark always. The only time you bring boss to ORANGE is after you exit the second portal scenario.
- Keep group stacked on the boss’ side. Use movement to pass the arms that get near.
- The group needs to always stay close together, especially when Final Countdown is close. Grouping helps healers. DPS should heal themselves when there’s no enemies.
- Jaina portal – Skip the small packs of adds and go straight to Jaina. Tanks bring adds away, kicking Holy Light.
- Tyrande portal – Move as a group and heal NPCs as you go. Guardian spirit them
- Thrall portal – Pull Mannoroth to the entrance and group moves into the center of the room. Chaos Blast moves away from boss. If Mannoroth’s Fury and Final Countdown ever overlap, everyone needs to use Cloak of Shadows.
Archimonde
Kill Video – https://youtu.be/rpIhXr3sUQM
Bring 1 additional healer – Can be solo tanked if you’re a chad
Add Phase Mechanics:
- Threat – All adds share a threat table. This defaults to whoever is closest on pull. Make sure the tank is the closest when they are engaged.
- Harroon – Charges and casts Shockwave. Shockwave will stun
- Narmak – Charges and casts Fel Bombs. Bombs will tick and then explode
Archimonde general mechanics:
- Grasp of the Defiler – Curse applied to players. Able to be decursed.
- Force of Will – Boss turns and casts a frontal cone. This knocks players in the air
Phase 1 Mechanics:
- Doomfire Meteor – Meteor lands on a targeted area. Fire spreads from this towards the players
- Draw Flames – Removes all fire on the ground (except meteors) and places it in a different location. Begins to spread again.
Phase 2 Mechanics:
- Lightning Strike – Deals damage and stuns players in the selected area. These can spawn stacked and are the thing that will wipe you most of the time.
- Living Lightning – Boss throws lightning orbs that follow players. Can be absorbed by Thrall’s Lightning Capture Totem. Orbs spawn from a ground visual which can be soaked by players.
Phase 3 Mechanics:
- Light of Elune – Item given by Tyrande. Grants a buff and stuns/damages adds in front of the player. Able to be thrown to new players.
- Glimpse of Tomorrow – Boss fears players and spawns tentacles at their location. Also spawns a Voidherold in the distance that must be tanked.
- Lightning strike will also happen in this phase.
Ascended:
- Grasp of the defiler turns into multiple different curses that have different affects when dispelled. Instead of dispelling at any time, you must dispel when it’s green and titled “Loosening grasp”
- Eye of the Storm – The tornado will now follow the boss, dealing damage to players inside
Recommended Abilities:
- Shadow step, Divine Sacrifice, Movement, Fade, Safefall Scrolls from auction house
- Tank also needs cloak of shadows, elusiveness, hasty cloak
Macro to help with Light of Elune:
This macro will help you throw the light to players more quickly. There are 2 versions, one that you manually click, one that you attach to an ability that you spam. The perk of manually clicking the macro is that you’re able to hold onto the light and handle adds more easily. The majority of the raid should use the version of the macro which includes your ability.
#showtooltip <ability>
/use [@<person1>, nodead] light of elune
/use [@<person2>, nodead] light of elune
/use [@<person3>, nodead] light of elune
/use [@<person4>, nodead] light of elune
/cast <ability>
#showtooltip Light of Elune
/use [@<person1>, nodead] light of elune
/use [@<person2>, nodead] light of elune
/use [@<person3>, nodead] light of elune
/use [@<person4>, nodead] light of eluneExamples of Lightning Strike – DO NOT STAND IN THESE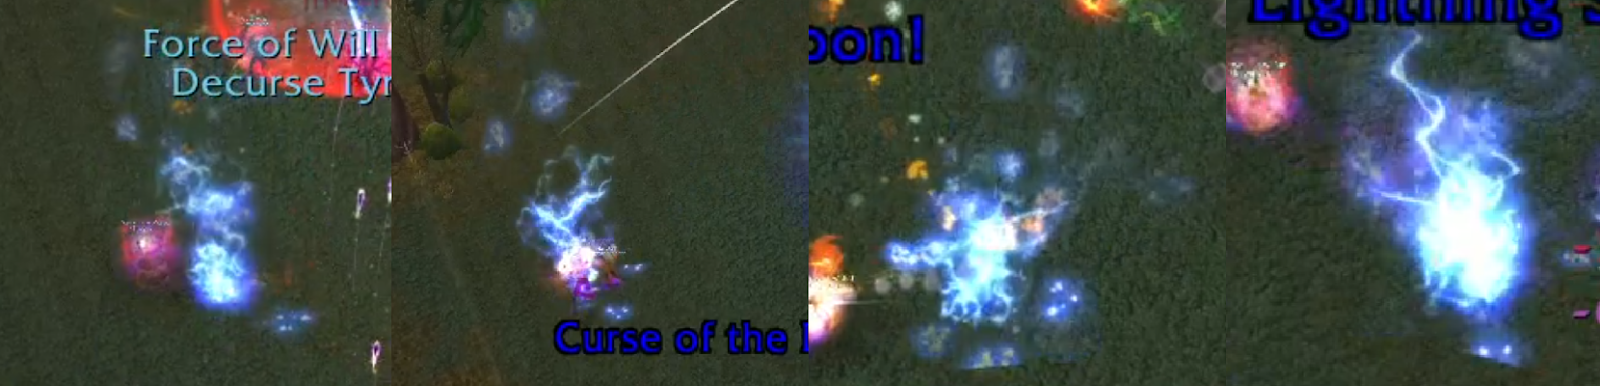
Examples of Living Lightning – STAND IN THESE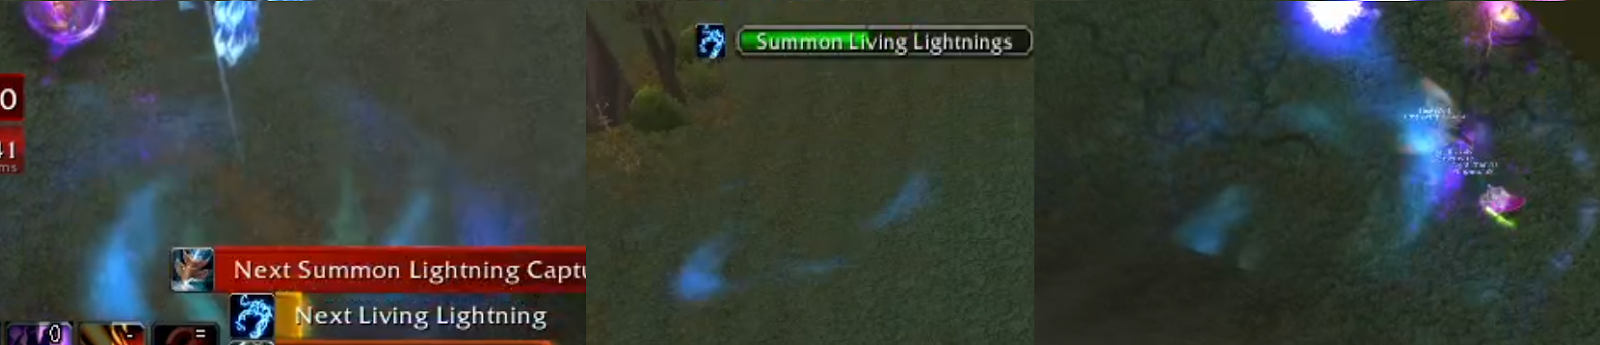
Strategy:
- Add Phase – Group the adds and kill the 2 large ones. Have 1 dps who doesn’t do much aoe damage in the demolisher. Have 1 healer in the glaive thrower, who will grip Harroon to them while he’s charging and before he uses shockwave.
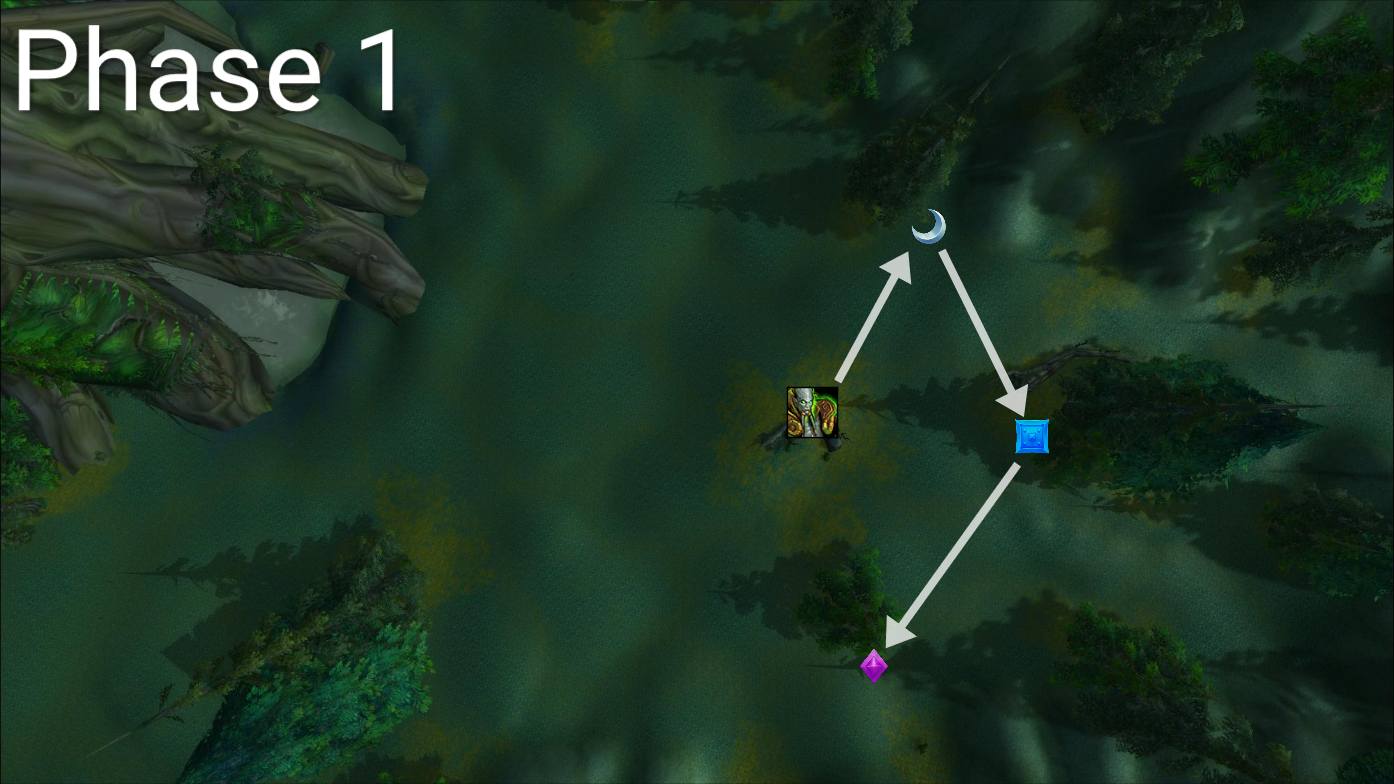
- Phase 1 – Place the Doomfire Meteors in the indicated positions to keep them out of the way for future phases. Shadowstep and sidestep the Force of Will casts.
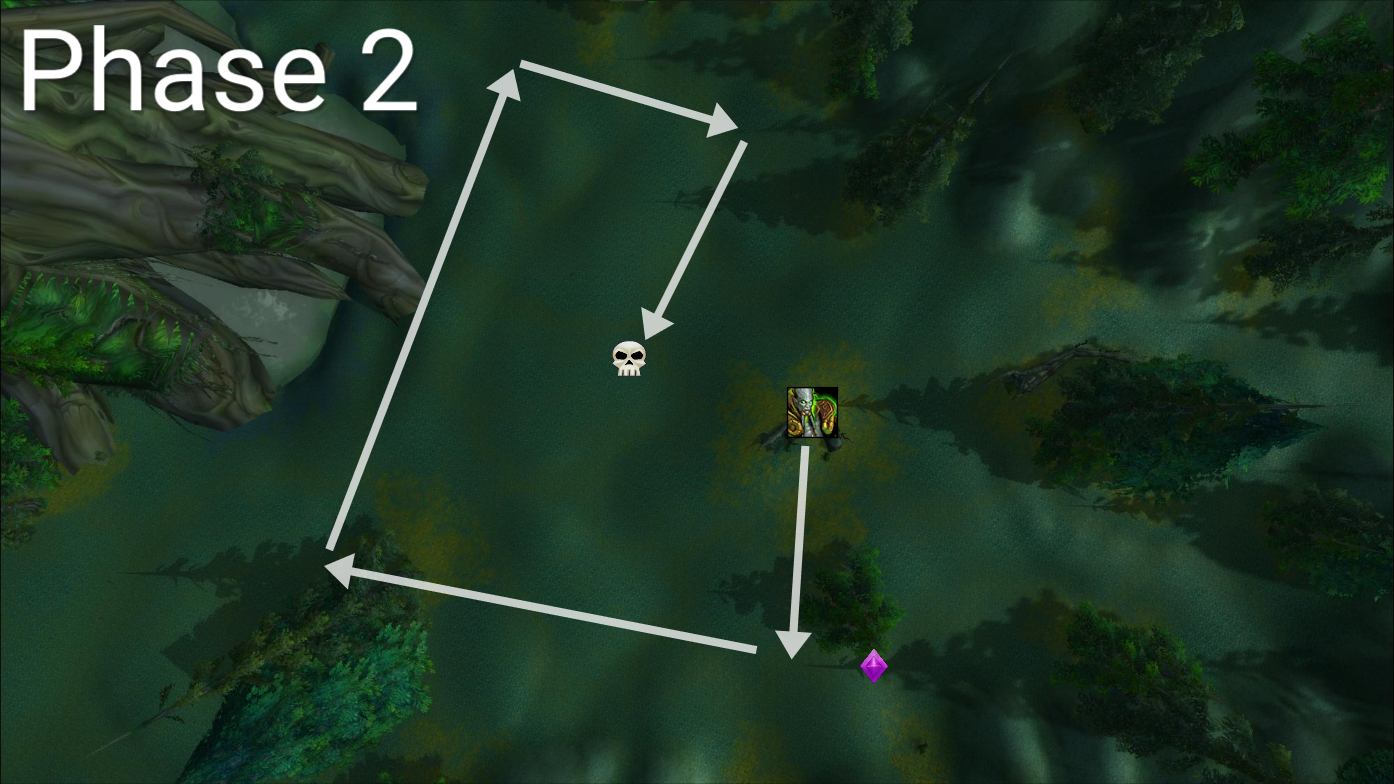
- Phase 2 – Move the boss clockwise around the outside of the room. Gauge your dps and attempt to get the boss to 40% in the center of the room. Focus on soaking the Living Lightning, and avoiding the lightning strikes. Examples of these visuals below.
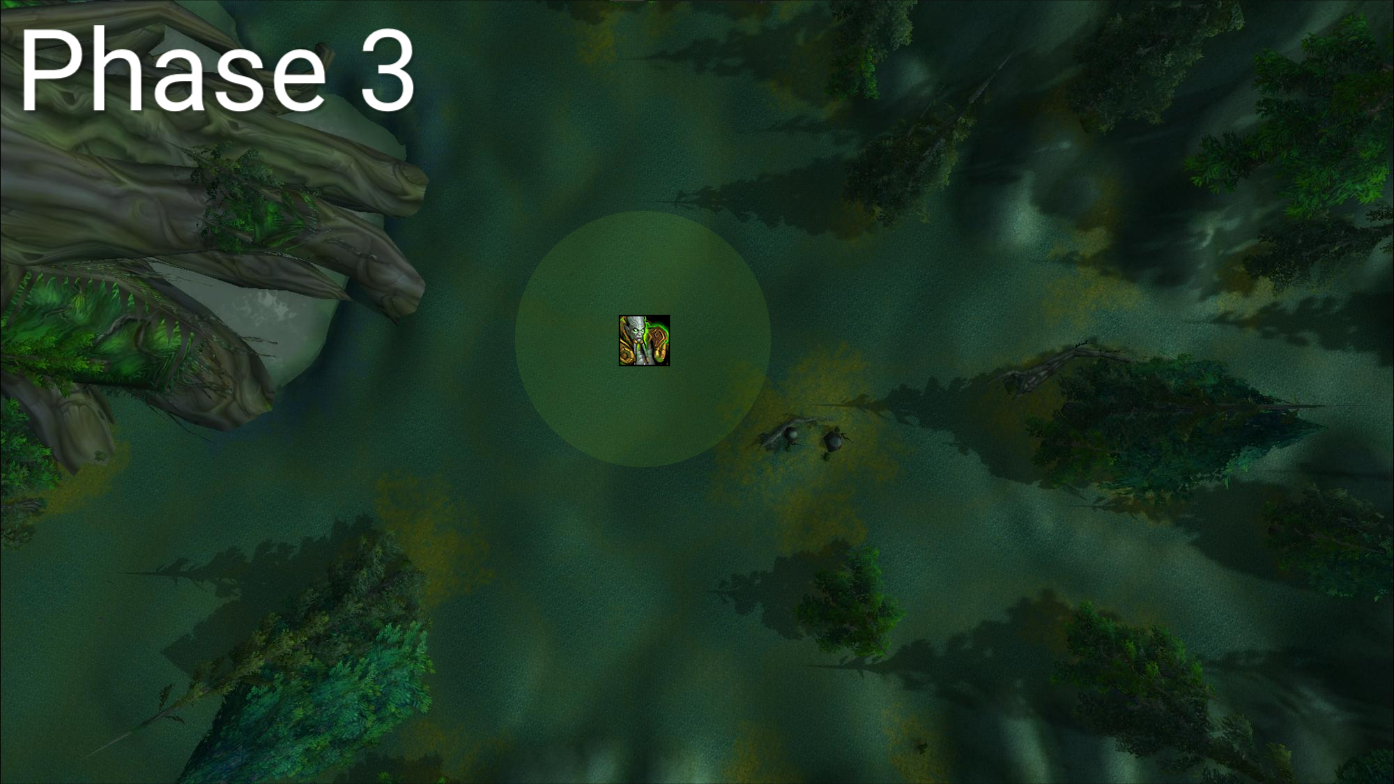
- Phase 3 – Keep boss in the center. Everyone besides the tank needs to stack up, place a mark beforehand. After Archimonde casts Glimpse of Tomorrow, cloak and spread. Kill the tentacles, and then boss. You’ll want a macro to assist in throwing the Light of Elune. Continue to be aware of Lightning Strikes which will cause wipes.
Adapted from a guide by Drazbeta published on db.ascension.gg.









0 Commentaires
Aucun commentaire pour le moment. Soyez le premier à commenter !